Magic [Draft 02/03/2010]

[Reflecting back on this post is a little bittersweet.  2010 was an incredible time to be someone with a 3D printer at home.  I remember Forrest Higgs’ detailed website about how he built his mostly wooden 3D printer.  By my recollection, it was slow but accurate enough to make useable parts.  Back then it was possible to read literally every single word published on the topic of 3D printers in about 30 minutes once a week – and I did.  I read, and re-read, so many of Forrest’s posts leading up to and well after the purchase of my Cupcake.  While Forrest’s site is no more, it lives on at Archive.org.]

Since I know basically nothing about how the actual electrical components of my MakerBot work, the entire thing is essentially magic to me.  (OOooooh!  Shiny lights!)

One of the things that kept me from buying a MakerBot in the beginning was the thought of trying to solder surface mount components.  Admittedly, I wasn’t exactly a pro at soldering through hole components either, but the idea of soldering super tiny parts using a hot plate was certainly off-putting.  I know the MakerBot guys said it is pretty easy, but I certainly had my doubts.

One of my favorite projects to monitor is Forrest Higgs progress on his Tommelise.  His goal, as I understand from his blog, is to design/build a machine that could be built cheaply by a reasonably clever and motivated 12 year old.  While the suggested cost of building a RepRap Darwin/Mendel is somewhere in the $500-$750 range, Forrest suggests a Tommelise could be built for as little as $150.

The trade off is that the Tommelise uses a lot of wood in its construction (cheap, but not RepRappable “vitamin” part), uses linear stepper motors, uses through-hole components so it doesn’t benefit from the nifty wizbang bits you can get in surface mount components,  and prints slower than a RepRap.  But, I keep thinking back to the breadboard prototypes Forrest puts up on site.

Drafts Zero - The Lost Blog Posts
  1. The Lost Blog Posts
  2. Plastruder! [Draft 12/25/2009]
  3. UNTITLED [Draft 12/25/2009]
  4. Preparing to print [Draft 12/27/2009]
  5. More prints [Draft 01/04/2010]
  6. Prototype Pricing [Draft 01/19/2010]
  7. MakerBot tuning [Draft 01/20/2010]
  8. Plastic Screw Anchor [Draft 02/02/2010]
  9. Magic [Draft 02/03/2010]
  10. How are you printing with PLA? [Draft 02/16/2010]
  11. Rebuilding my extruder [Draft 02/16/2010]
  12. MY robot [Draft 02/18/2010]
  13. more things i learned [Draft 02/20/2010]
  14. First commissioned piece! [Draft 02/22/2010]
  15. MakerBot: Toy or Tool? [02/25/2010]
  16. Idea for Skeinforge settings… [Draft 03/27/2010]
  17. RepRap and MakerBot alternatives [Draft 04/05/2010]
  18. RepRap Parts for Sale [Draft 04/07/2010]

Noise reduction via rubber bands

A common question from some of my friends is “How noisy is the robot?”  Since getting the belts tensioned pretty well and getting the stepper motors tuned up, it’s a little noisier.  But, it is quieter than our dishwasher or central heating unit.

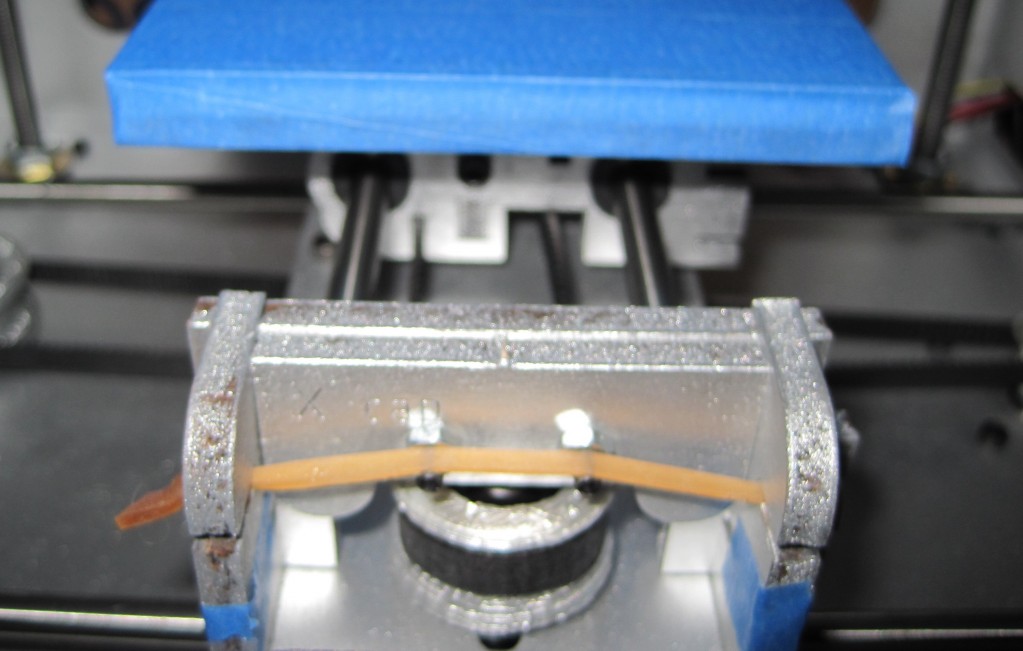
Rubber band for MakerBot noise reduction

Rubber band for MakerBot noise reduction

Besides making sure the rods are oiled and bolts tightened (they get loose with all the shaking) I noticed that compressing the two sides of the Y stage helped with noise reduction.  By taking a thick rubber band, stretching it, and tying a big knot in either end I can put it in the slots for the opto-endstop triggers.  This has helped a little.  You’ll notice I stretched them over the two bolts.  This seems to also have helped just a little bit.

Things I learned while assembling my MakerBot

I’ve assembled quite a lot of my MakerBot today.  This entailed assembling and putting together the X axis stage, Y axis stage, pulleys, putting gears on stepper motors, mounting gears, putting in the slider rods, Z axis threaded rods, bolting on the motors, and assembling the two “dinos.”

  • If you’ve got a Batch 9 MakerBot, definitely install the Z-axis after assembling the body of the MakerBot.
  • Put off adding the Z-stage/extruder-stage for as long as you can.  It will just be in the way.
  • Keep that sandpaper handy – you may need to sand down some tabs or widen slots or holes to make things fit, especially if you painted your MakerBot.
  • If the smooth slider rods are just a smidge too short, they will slide back and forth causing a little extra noise as your MakerBot operates.  I haven’t gotten mine running yet, but I have read this is the case.  I noticed that one of the slider rods for the X axis on my Batch 9 MakerBot was about 1mm too short.  When I put the caps on, I noticed that it still had some wiggle room.  I took a scrap of paper towel, folded it up so that it would push up against the end of the rod, and clamped it down.  There’s no wiggle room now, so hopefully that’s it.
  • Make sure the top bearing is just under the top edge of the top panel.  This is in the directions, but it’s really important to make sure everything spins freely.
  • Putting gears on the stepper motors is tough!  Even when you back the tightening screws on the gears out as much as you can, the fit is incredibly snug.  I eventually sanded the inside of the gear slightly, put the motor on cardboard, and then pushing downwards slowly and forcefully.
  • When you’re installing the geared belts, get them as level as you can manage.
    • For the top stage this will involve adding/subtracting washers/nuts from the printed pulleys as well as adjusting the gear’s placement on the stepper motor.
    • For the X and Y stages, the height would essentially be dictated by the height of the belt on the clamps.  The height of the belt on the clamp is essentially set, so the pulleys and gear on the stepper need to be matched to that.
  • When assembling the carriages with the plastic sliders, the instructions suggest you may need to sand the circular hole they fit into.  Just make a point of sanding them, if they’re tight they could affect the looseness of the stage on the rods.
  • Inspect your Y-stage pulley (this is the smallest printed pulley) to make sure the top is level and there are no protuberances.  Even a little bit of a nub will prevent it from rotating properly.
  • The easiest way to remove the itty-bitty sticky-paper protective acrylic cover is to use a razor blade or exacto-knife to pop them off.  You probably don’t need to, but it’s an aesthetic thing.