If I’m printing an object with a 0.5mm thickness, chances are the very first time there’s a slight overhang it will go pear shaped. When the walls are that thin, there’s almost nothing underneath even a very slight 20-30 degree overhang.
Duh.
If I’m printing an object with a 0.5mm thickness, chances are the very first time there’s a slight overhang it will go pear shaped. When the walls are that thin, there’s almost nothing underneath even a very slight 20-30 degree overhang.
Duh.
Oh, my prior submission wasn’t good enough? COME ON! My lesson plan included a mineshaft AND a tiger shark! Here’s MakerBot’s description of a minimally detailed lesson plan:
Pssh. No problem. I can bang out a lesson plan that covers those points. How’s this:
If you use any of these lesson plans in your own classroom, please link to this blog post.
I’m going to warn you right now, this post has nothing to do with RepRap or MakerBot.
Three years ago I was unemployed with a big fat mortgage payment. The year that followed my newfound unemployment was a roller coaster. I took contract work for others, I had a few small clients of my own, taught myself how to program in PHP/MySQL, built my first website, tried to turn that website into a business, did some freelance programming, and generally did whatever I could do in order to make ends meet. It was an exciting and scary time. About a year after becoming unemployed I accepted an unsolicited job offer and have been there ever since.
I wish that I had read Tim Ferriss’ Four Hour Work Week and Guy Kawasaki’s Art of the Start back then.1 I just finished reading the FHWW for the first time and I’m glad I bought it. Like Reality Check and The Art of the Start before it, these are books I’m positive I will be using as reference manuals. It would have been sooo helpful to have Guy’s book around when I started my first website business. I needn’t have learn so many lessons the hard way.
The same goes for the FHWW. Tim’s book includes a lot of advice that would have been invaluable to me as an unemployed entrepreneur-by-circumstance2 . Basically, when I had a surplus of time and deficit of money. With a steady job I no longer have a deficit of money3 , but I do have a deficit of time. Some days I will daydream about what I could accomplish if only I had a little more time in the day. I won’t know until I try, but the Four Hour Work Week may just be my chance to find out.
Suffice it to say, I’ve read both books and will probably re-read both again soon. If you’re unemployed or want to start a business4 , you should definitely pick up both of these books.
Okay, back to your regularly scheduled nonsense. :)


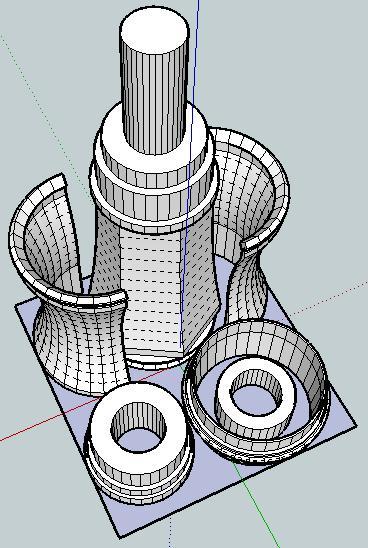
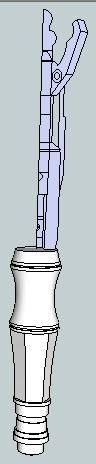
Off to the left is a picture of what the finished sonic screwdriver should look like. Here’s a picture of the parts I’ve designed so far. Assembled properly, these parts should be able to be assembled into the lower half of the sonic screwdriver.
I’ve arranged the parts so that they have a less than 60mm x 60mm footprint on the build platform. I would really like it if the final product could be printed all on one build plate and assembled without tools or additional non-printed pieces.
After my recent design-print fail, I’m going back to the drawing board (slightly)1 wiser. If nothing else, I like to think what I have so far is pretty neat. 2
After my design-print failure I thought it was about time I recalibrated my ‘bot:
I’ve been slowly working on the design of a printable (and fully MakerBottable) sonic screwdriver. This model of the sonic screwdriver is built up of a number of concentric cylinders, has several significant overhangs well in excess of 45 degrees, and is larger than the MakerBot’s built capacity. In order to deal with these design problems, I modeled it in sections.
In order to make the overall result something I could just pop/snap/slide together I designed it making some sections which were split vertically and other sections which slide around those sections to keep them together. In order to make the parts quickly printable I designed all the parts at around 0.5mm thickness.
About 40% of the way through the print one of the vertical sections wasn’t coming out properly – probably because it was too thin. The parts were too thin and flexible and ended up tearing between layers and just being too flimsy.
I also noticed something odd – the extrusion was too thin on that side of the model. I can’t be sure why this is happening – but I suspect it’s due to the extruder not getting a good enough grip. Perhaps I need to floss the extruder pulley or install a new extruder idler wheel. However, it doesn’t explain why the extrusion was too thin on just that one side and no other spots.
Suggestions?
I have the power to make other people blog.
Don’t mess with me or I’ll make YOU blog about the time your… extruder failed.
Oh, I think you KNOW what I’m talking about.
I tend to see the world through WordPress eyes.1 When I find (or write) a clever bit of script that would be useful to a WordPress website, I tend to convert it into a WordPress plugin. I did this with my PieChart Plugin and a few other knick-knacky plugins.
I just noticed Cryozap Cyrozap‘s Amazon affiliate link converter PHP script.
It occurs to me that it would be relatively easy to build a WordPress plugin that searches through a post/page, finds Amazon links, and then turns them into affiliate links… I think this could be useful in several of my sites, actually.
Update: Cyrozap – sory fore mispellnig yoru mane.

Update 3/28/2011: The Ultimaker is available for pre-order!
Erik de Bruijn along with a newly formed Dutch RepRap group have put together this new design for a low cost RepRap alternative. The stated goal of their blog is “designing/developing an easy to build low cost 3D printer with a small form factor but large build envelope.” Erik has invited everyone to comment on this beta design. It’s interesting to see their progression of prototypes in their second blog post.
The interesting thing about this model is that it combines some of the best parts of Darwin and MakerBot and what appears to be a Bowden extruder.
The very nature of FDM1 means that the robot will only move the Z axis a little bit every once in a while. One of the design drawbacks to the Darwin was that the heavy extruder head (motors, gears, heating elements) were so heavy that the entire robot would rock or vibrate with the lateral XY movements. MakerBot got around the heavy extruder head problem by moving the platform in the XY and moving the extruder head only up and down. This design decision isn’t without it’s tradeoffs, however. One downside is that their build area is much smaller than a Darwin. Another downside of the MakeBot design is that once the object being built reaches a sufficiently large volume or height, moving the object around quickly on the XY platform causes it to vibrate, shake, and become somewhat unstable.
One of the main improvements inherent in the Bowden extruder is that it allows you to take the heaviest parts of the extruder head, separate them from the rest of the extruder head, and move those heavy pieces to a different location. Using a Bowden extruder makes a Darwin style robot much more feasible – the small moveable print head won’t have the mass to cause the robot to become unstable.
It seems that combining either of the X or Y movements with the Z probably won’t matter all that much, since the Z axis will only move about 0.33mm or so per layer and the Z axis typically doesn’t operate at the same time as either the X or Y axis. Combining the as the new RepRap version II, Mendel, design shows us that combining the Z axis along with either the X or Y axis, but not both, can lead to a very stable configuration.
What I like about the Ultimaker design is that it would appear to incorporate some of the best parts of the MakerBot and Darwin designs. It appears to have a bolt/nut/T-slot MakerBot style assembly structure using thin lasercut wood pieces for the body. I found these parts to bolt together very quickly. Contrast this to the Darwin/Mendel structure using lots of nuts and threaded rod and printed plastic parts to hold it together. At the same time, by making use of a Bowden extruder and the Darwin body shape, it appears to be able to use most of the interior volume for printing.
I suspect it probably uses fewer parts than a typical Darwin, but I can’t be sure. I also have to wonder about the cost of lasercut wood versus the cost of nuts and threaded rod.
Nice find RepRap Log Phase!
I placed my order for a MakerGear Enhanced Operator’s Pack on 8/11/2010, it shipped the same day, and arrived today 8/13/2010. My extruder has been working really well and without problems with ABS since my last rebuild. I’m really hoping I won’t need these bits any time soon…
Thanks Rick and Karen!!!