Ah, just what I need! A new project!

A rough sketch
A rough sketch

If you’re anything like me, you’re familiar with the idea of Too-Many-Tabs™️.  I see a cool thing, I open it in a tab, I might organize tabs, I might bookmark them, and see them now and then.  The worst part about this for me is that as long as they’re not yet bookmarked and organized, I don’t want to close the tabs – so that I don’t “forget” about them.  But, as long as I’ve not bookmarked/organized/blogged about something, it will feel like it is still using some level of brain bandwidth, running as a “background process” using a small, but non-zero, amount of brain attention.  The only good ways I’ve found to excise these ideas/tabs/processes is for me to act on them (get started building and/or blog about them) or kill them (bookmark/organize).

I’ve seen several projects recently which are swirling around several similar concepts for me:

All of these projects do interestingly adjacent tasks – displaying relevant information, in an attractive way, serving as a reminder, good either on a desktop or perhaps a wearable.  I could see making a version of Tymer as a wearable watch.  The build seems fairly straightforward – buttons to input times, deep sleep functions which wake once a minute to determine if it needs to set off the vibration motor.  I would love a small simple e-display such as the ESticky – to sit on my desktop, perhaps on/near/in front of my monitor.  What’d I’d really like, of course, is something that’s kinda does some of each.

I ordered the parts for the ESticky, since the Tymer appears to basically require just a battery charging board (already integrated into the ESticky’s Seeed Studio XIAO ESP32C3) and a vibration motor (which I have a stack of already).  I’ve not used a Seeed Studio product before, but it appears to be similar in formfactor and function to the Adafruit QtPy’s I’ve been using in various recent projects.  Because I know I’m going to want to use one XIAO board as my dev board with headers and breadboard, one in the project itself, and one because…  they’re cheap ($5) and there’s even odds I’ll blow one up.

My plan is to build a direct copy of the ESticky on a breadboard, add the vibration timer and buttons to manipulate it, see if I can do it in a more permanent format by soldering it together, then design / print a case.

I’ve never worked with a Seeed Studio product and not played with eink displays yet.  Hopefully this will be fun!

Bonus:  Now that I’ve purchased some of the parts, I can close dozens of tabs!

Sticky Note Timer
  1. Ah, just what I need! A new project!
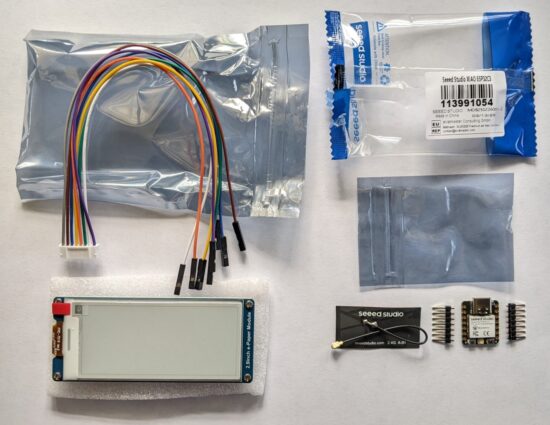
  2. Sticky Note Timer, parts arrived!
  3. Seeed Studio XIAO ESP32C3 and a small sticky note display
  4. Brainstorming More E-Ink Stuff
  5. Smol Fonts for E-Ink Displays
  6. Tap Light Focus Timer System

Off the rack options for EDC bags

This slideshow requires JavaScript.

I’m not too proud to admit that I thought Ryan Reynold’s thief character running around in Red Notice with a sling bag under his jacket packed with stolen goods was super cool.  I genuinely want a sling bag to carry a small amount of things comfortably, possibly while looking cool, and absolutely not while committing crimes.  I’d included these pictures above with a prior post and absolutely zero context.  I meant to come back to that post and I guess I am… about two years later.

I guess this post is about what kinds of bags I might choose if I was going to pick something off the shelf.  Or maybe just bags I saw.  Really, though, it’s about getting rid of browser tabs.1

  • Red Notice, Ryan Reynolds’ character Nolan booth using a North Face Electra Sling
    • The online reviews were kinda mixed for this bag – which is irrelevant since they’re not for sale anywhere and hard to locate used.
  • Deadpool 2, Josh Brolin’s Cable carrying an unknown tactical utility bag
    • Likely a prop department modification of an existing bag.  While I’ve seen references to a Porter Yoshida Heat Waist Bag2 or a Hazard4 brand bag in the years since the movie, I haven’t seen any definitive post identifying the specific manufacturer.  Kind of a missed marketing opportunity to capitalize on people’s willingness to get something similar to what someone in a movie wore.
    • I’d be interested to know what bag this really was and how it was put together, but all the unnecessarily militaristic MOLLE stuff and buckles would make it entirely too bulky for my purposes.
  • Patagonia Atom 8L
    • If I absolutely had to buy a side sling bag today, it would probably be either this Atom 8L or the Patagonia Black Hole Sling 8L, which appears to be semi-discontinued. 3  Not too small, not too big, strap looks wide and comfortable with a way to store a phone on it.

I do have some new designs for a bag, but they’re not super different from designs I posted last time.  And, really, I should either shelve the idea of making a new bag entirely or just going and make something.  I’d say my limiting factor of late has been time, rather than motivation.

I do genuinely want to get going on a few different sewing projects, though.  Some small zipper bags, some cosplay elements to go with our Maker Faire (and OpenSauce!) applications, and of course a new bag to carry around.

It’s late and I’m babbling.  More nonsense soon.

Custom Every Day Carry Bag
  1. My Ultimate Bag
  2. Custom Every Day Carry (EDC) Bag
  3. Sewing Practice
  4. EDC Bag Materials, Designs, Etc
  5. Off the rack options for EDC bags
  1. Sometimes I’ll blog as a way to jot down notes connected to links when a bookmark by itself won’t really do []
  2. Don’t go down the rabbit hole of looking for this bag.  It’s 7+ years old and the links mostly now point to sketchy new sites []
  3. You can still find used options around []

Designing Custom TCG Cards and Proxies

This post is basically a bookmark dump so I can locate this information later on.  Maybe it will be helpful to you too!

  • Card Design Websites
    • CardConjurer.App.  Easily the most comprehensive and feature rich card design option.  Lots of formats, borders, etc, for Magic the Gathering related cards.  You can download and save your cards in JSON formats.
    • MtG.Design.  Kinda difficult to navigate, reasonably easy to use, slightly strange saving system.  Limited frames.  Download cards as images.
    • MtGCardSmith.com.  Somewhat confusing interface, lots of options, confusing saving features.  You have to have artwork before rendering a design.
  • AI Art Generators
    • OpenAI’s ChatGPT.  I paid for ChatGPT for a few months, then stopped when I started using some local LLM’s and other free resources for code related projects.  You can still generated a limited number of images per day.  The paid version which gave a lot of image generations per day was probably the best I’ve used.
    • Google’s Gemini.  This works pretty well and while I haven’t really I haven’t bumped into the daily limits yet, I haven’t needed to.  Decent.
    • Playground.com.  I used to use this site a lot – until they made a hard pivot to what appears to be a way to integrate their generated images into products that you’d expect to see on Etsy/Amazon.  You have to really dig around to get it to give you something useable these days – but it’s free.

I have a semi-regular D&D game with friends.  In order to help track initiative / attack order, I had the idea of creating cards for every player.  The idea being that we all roll for initiative then hand the DM our stack of cards in the order we’re going – with the DM having a stack of opponent cards he can put in there too.  If the cards I create just happen to be TCG / MtG sized and he can find placeholder cards for goblins, trolls, etc, so much the better.

Print On Demand Custom Cards
  1. Custom Cards with DriveThruCards.com
  2. Review of DriveThruCards.com
  3. Designing Custom TCG Cards and Proxies

Inkscape Protractor and Rulers

Over the last week I’d tried making a set of small rulers and straight edges I could keep in notebooks of various sizes.  I’ve got a big heavy sketchbook, a thin college rule composition notebook with several DIY augments, and a very small sketchbook about 4″ square.

Just four notebooks
Just four notebooks

My idea was to make small credit card / ID card sized rulers, print them on paper, and then laminate them to keep in one or more notebooks.  My first attempt a few days ago was serviceable1 – but lacking in aesthetics and functionality. (I’ll show some pictures below…)

This morning I saw a Mastodon post by @concretedog234 demonstrating his use of a homebrew lasercut protractor.

@concretedog's lasercut protractor
@concretedog’s lasercut protractor

Inspired by @concretedog’s work, I embarked upon building my own in Inkscape, using some printable ruler I found online.  A few design progress pics:

This slideshow requires JavaScript.

The basic process I used was:

  • A few concentric circles for the overall protractor outline and semi-circle cutouts
  • A longer 10 degree increment rotated 18 times (since it was a line at the top and bottom), a medium 5 degree increment rotated 36 times, and a short 1 degree increment rotated 180 times
    • Edit -> Clone -> Create Tiled Clones
      • Symmetry:  P1: simple translation
      • Shift:  make sure the exponent is “0”
      • Rotation:
        • Angle row/column:  0, 5 degrees
        • Rows/columns:  1 x 18
  • Then added the rulers minus the numbers (just looked cleaner)
  • Three clones of the result, printed on paper, cut one out, cut out the semi-circle windows and center, laminated, then cut out the semi-circle windows and center again, ran it through the laminator for good luck

This slideshow requires JavaScript.

In an ideal world, I would also have created the ruler marks using @concretedog’s guide … I just hadn’t seen it until I got around to finishing this project. :)

Small Rulers and Protractors
  1. Inkscape Protractor and Rulers
  2. Prelude to Protractors
  1. built from PrintableRulers.net []
  2. Someone I’ve been following for years and have come to think of as a parasocial friend []
  3. Is following a fellow maker a parasocial relationship if you interact with them? []
  4. Parasocial could be pre-friendship? []

One Simple Trick Can Save You 30 Minutes…

After mentioning long render times on my machine, @raster suggested switching to the manifold 3D rendering backend.  Depending on your OpenSCAD version, you might need to poke around to find how to enable this option.  It’s absolutely worth your time and should really be enabled by default.

If you dig into this option a little, and you’re a 3D printing old timer, you might recognize the creator of this library as none other than Emmett Lalish!!!  Emmett was an early 3D printing adopter, from back in the MakerBot Thing-O-Matic days, creator of the original heart gears, and just all around incredible engineer. 1 2

Emmett’s manifold library dropped the render time for one of my designs from 300 seconds to… under 8 seconds.  I literally used to avoid hitting F5 on more complex designs or avoid cranking up the facets so I didn’t have to wait for long renders.  A single comment from a friend, telling me about an option written by another friend, has completely and permanently changed how quickly I’m able to iterate and design objects forever.

Here’s how you can instantly save tons of time with your OpenSCAD designs:

"Manifold (new/fast)"
“Manifold (new/fast)”
#OpenSCADClub
  1. OpenSCAD 3D Printed Spring
  2. OpenSCADClub Week 2: Directional Pad
  3. OpenSCAD Render Times
  4. One Simple Trick Can Save You 30 Minutes…
  5. OpenSCAD Club Cookies
  1. Emmett even wrote a guest post on this very blog about… 14 years ago?!?!  Time flies, I guess? []
  2. Special thanks to my honorary editor Andrew for catching a typo… []

OpenSCAD Render Times

Thanks to @raster, I’m going to do a side-by-side taste test of several different flavors of OpenSCAD.1 To give each one a similar test, I’m trying out my D-Pad design from … uh, earlier this morning.2

Version Release F5 Preview F6 Render Notes
2021.01 Stable 09:50.220 2.302 Best place to start
2024.01.13 Current 04:37.763 0.948 I’ve been running this one for a while
2025.04.04 Latest 04:36.593 0.483 Latest snapshot

Obviously, the good folks working on OpenSCAD have dramatically improved preview/render times over the last four years.  The speed boost in using a later snapshot is pretty significant if you’re doing any kind of complex designs.  They must be using some kind of cache system to make the render times so fast.

The speed differential between 2024.01.13 and the latest snapshot is so slight, I’m not going to switch things up unless I bump into a design that struggles with rendering some complex feature.

#OpenSCADClub
  1. OpenSCAD 3D Printed Spring
  2. OpenSCADClub Week 2: Directional Pad
  3. OpenSCAD Render Times
  4. One Simple Trick Can Save You 30 Minutes…
  5. OpenSCAD Club Cookies


  1. *I’m not avoiding work!* YOU’RE avoiding work! []
  2. Like, way earlier…  midnight or so… []

OpenSCADClub Week 2: Directional Pad

This week’s topic related to @deshipu’s directional keypad designs.  The directional pad is clearly the most complicated part of the design.  The four buttons are basically just cylinders that can be created in several different ways.

@deshipu's D Pad Design
@deshipu’s D Pad Design

Brian published his designs to Github.

@beerriot's designs
@beerriot’s designs

After staring at the design a little longer, I changed from my original design idea to creating a 2D cross, extruding that, subtracting out the curved area described by a sphere (a homebrew hack I’ll describe below), using the minkowski function to surround the entire surface with a small sphere to give it a rounded look, then cutting the bottom off to ensure it is flat.  I didn’t include a flat cylinder as in the original design above, but that’s a trivial addition.  The downside?  This is a 5 minute render on my machine, largely due to the minkowski function.

//  Settings
    fn = pow(2,5);
//  Measurements
    pad = [10,30,1,3];
    corner = 1;

dpad();

module dpad()
    {
    difference()
        {
        minkowski()
            {
            difference()
                {
                linear_extrude(height=pad[3], center=false)
                    offset(r=-corner/2, $fn=fn)
                    for (i=[0:1])
                        rotate([0,0,90*i])
                        square([pad[0],pad[1]], center=true);
                translate([0,0,pad[3]])
                    scale([pad[1]*1.03,pad[1]*1.03,pad[3]-pad[2]])
                        sphere(r=0.5, $fn=fn);
                }
            sphere(r=corner/2, $fn=pow(2,4));
            }
        mirror([0,0,1])
            cylinder(r=pad[1], h=pad[1], center=false);
        }
    }

Renders to:

MakerBlock's design
MakerBlock’s design

Hacks:

  1. You’ll notice I use “offset” to reduce the size of the directional pad, because I knew I was going to round it all with the minkowski function in a few lines.
  2. The directional pad is actually just a rectangle, run through a for loop once to rotated it by 90 degrees, before being extruded to the specified height.
  3. The last two lines of code are used to create a large cylinder, larger than what I knew the pad would be, then mirrored in the Z axis to cut everything below the XY plane.
  4. As in prior designs, I pre-define “fn” to be a “pow(2,5)” so that I can use a low exponent to iterate designs quickly, then crank it up for a detailed design.
  5. The hack I use the most often here, and the one I’m the most proud of, is where I make a sphere like “sphere(r=0.5)” and then scale it by whatever I need.  Since the sphere has a diameter of “0.5” mm, the actual sphere is 1mm in diameter – so when I scale it in the XY by 30 and in the Z by 2 (since the edges of the keypad are 3mm tall and the center is 1mm tall), the diameter is now 30mm and the height is 2mm.  This little trick, of being able to scale a sphere to the exact size I need has come in handy countless times.

I’m not the best programmer, not the best at OpenSCAD, but I’m kinda happy that I was able to build this in about 31 lines of code.  :)

#OpenSCADClub
  1. OpenSCAD 3D Printed Spring
  2. OpenSCADClub Week 2: Directional Pad
  3. OpenSCAD Render Times
  4. One Simple Trick Can Save You 30 Minutes…
  5. OpenSCAD Club Cookies

OpenSCAD 3D Printed Spring

OpenSCAD spring design by @rasterweb
“I’m trying to come up with a good way of creating this in OpenSCAD… I have something using a bunch of hull’d cylinders but I’m wondering if there is a better/easier way to do it.” @rasterweb

A friend posted a design pondering whether there was a better way to design an object in OpenSCAD.  As so often happens when I approach a 3D design, one solution pops up in my head… and is immediately discarded as garbage.  That first thought was to create a negative of the interior of the spring, then iterate along the length of a stretched cube.

In the end, I opted for1 creating a flat version of a single “loop”, made from differenced hulled circles, repeated over the number of desired loops, then trimming alternating ends (so it wouldn’t look like a chain).

OpenSCAD spring by MakerBlock

Here’s the OpenSCAD code to produce this spring:2

//  Settings
    $fn = pow(2,6);
//  Spring Dimensions
    springH     = 5;
    springOD    = 10;
    springW     = springOD*2;
    springOR    = springOD/2;
    springTh    = 2;
    springIR    = springOR-springTh;
    loops       = 8;

    spring();

module spring()
    {
    linear_extrude(height=springH, center=false)
    for (i=[0:loops])
        {
        translate([0,(springOD-springTh)*i,0])
            difference()
                {
                spring_loop();
                translate([-springOR+(springW+springOD)*(i%2),0,0]) 
                    square(springOD, center=true);
                }
        }
    }
    
module spring_loop()
    {
    difference()
        {
        hull()
            {
            circle(r=springOR);
            translate([springW,0,0])
                circle(r=springOR);
            }
        hull()
            {
            circle(r=springIR);
            translate([springW,0,0])
                circle(r=springIR);
            }
        }
    }

Some notes about my OpenSCAD style:

  • I like to use OD/ID/OR/IR to mean outer diameter, inner diameter, outer radius, inner radius.
  • I think the “spring_loop” module could be simplified slightly by calling another module which creates each hulled circle, but weighing the additional module code against just retyping a little code I opted for what got it done faster.
  • I like to specify the facets on circular objects right at the top of the file. This way, I can adjust the smoothness of the object by just changing just the exponent part of the $fn system variable.
  • Reasonably parametric. There’s some additional further optimization that could be done in the spring alternate end clipping.

Can’t wait to see what @rasterweb makes with a 3D printed spring!

#OpenSCADClub
  1. OpenSCAD 3D Printed Spring
  2. OpenSCADClub Week 2: Directional Pad
  3. OpenSCAD Render Times
  4. One Simple Trick Can Save You 30 Minutes…
  5. OpenSCAD Club Cookies
  1. And, please forgive the inside-baseball / OpenSCAD-speak []
  2. To display the code above I had to use the WordPress block editor. 🤮 []

RepRap Parts for Sale [Draft 04/07/2010]

[Yep.  This was the whole blog post.  I don’t know what happened to that set of parts, if I sold them, gave them away, or what.  I hope I gave them away.]

I’ve made all of one Mendel part.

Drafts Zero - The Lost Blog Posts

  1. The Lost Blog Posts
  2. Plastruder! [Draft 12/25/2009]
  3. UNTITLED [Draft 12/25/2009]
  4. Preparing to print [Draft 12/27/2009]
  5. More prints [Draft 01/04/2010]
  6. Prototype Pricing [Draft 01/19/2010]
  7. MakerBot tuning [Draft 01/20/2010]
  8. Plastic Screw Anchor [Draft 02/02/2010]
  9. Magic [Draft 02/03/2010]
  10. How are you printing with PLA? [Draft 02/16/2010]
  11. Rebuilding my extruder [Draft 02/16/2010]
  12. MY robot [Draft 02/18/2010]
  13. more things i learned [Draft 02/20/2010]
  14. First commissioned piece! [Draft 02/22/2010]
  15. MakerBot: Toy or Tool? [02/25/2010]
  16. Idea for Skeinforge settings… [Draft 03/27/2010]
  17. RepRap and MakerBot alternatives [Draft 04/05/2010]
  18. RepRap Parts for Sale [Draft 04/07/2010]
  19. Where is the Othercutter? [Draft 06/08/2015]

RepRap and MakerBot alternatives [Draft 04/05/2010]

[Holy cow.  Can you imagine a time when a person could singlehandedly have made a comprehensive list of all open source 3D printers in an afternoon?]

Here’s a list of all of the RepRap, RepStrap, and MakerBot open source 3d plastic FDM 3d printers I can find.  When possible I’ve tried to link to the official site, helpful derivative sites, instructions, and parts.  I’ve also included some notes.

  1. RepRap – The ultimate in DIY personal fabrication technology.  Source everything yourself and put it together!
    1. Mendel –
      1. parts on ebay
      2. bearings – http://www.vxb.com/page/bearings/PROD/kit9060
  2. Darwin –
    1. Ponoko Darwin Acrylic lasercut parts – http://www.ponoko.com/showroom/reprap/free-acrylic-reprap-v1-1–2083
  3. Mini-Mendel
  4. Isaac Mendel http://isaac-mendel.blogspot.com/
  5. Fab@Home
  6. MakerBot –
  7. McWire – http://reprap.org/wiki/McWire_Cartesian_Bot_1_2#This_project_is_no_longer_actively_developed.___For_newer_mcwire_info.2C_please_see_http:.2F.2Fobjects.reprap.org.2Fwiki.2FDevelopment:McWire
  8. ShaperCube –
    1. http://wiki.shapercube.com/wagn/Shapercube_Assembly
  9. Profound Devices –
    1. http://www.profounddevices.com/
  10. RepMan –
    1. http://www.bitsfrombytes.com/index.php?page=shop.product_details&product_id=168&category_id=5&flypage=flypage-ask.tpl&option=com_virtuemart&Itemid=100005
  11. Tommilese –

Drafts Zero - The Lost Blog Posts

  1. The Lost Blog Posts
  2. Plastruder! [Draft 12/25/2009]
  3. UNTITLED [Draft 12/25/2009]
  4. Preparing to print [Draft 12/27/2009]
  5. More prints [Draft 01/04/2010]
  6. Prototype Pricing [Draft 01/19/2010]
  7. MakerBot tuning [Draft 01/20/2010]
  8. Plastic Screw Anchor [Draft 02/02/2010]
  9. Magic [Draft 02/03/2010]
  10. How are you printing with PLA? [Draft 02/16/2010]
  11. Rebuilding my extruder [Draft 02/16/2010]
  12. MY robot [Draft 02/18/2010]
  13. more things i learned [Draft 02/20/2010]
  14. First commissioned piece! [Draft 02/22/2010]
  15. MakerBot: Toy or Tool? [02/25/2010]
  16. Idea for Skeinforge settings… [Draft 03/27/2010]
  17. RepRap and MakerBot alternatives [Draft 04/05/2010]
  18. RepRap Parts for Sale [Draft 04/07/2010]
  19. Where is the Othercutter? [Draft 06/08/2015]