I ordered a decibel meter from Amazon the other day so I could drop some science on the claims from various 3D printed whistles on Thingiverse. There are several that claim to be the loudest. Well, today, I began my quest to put these claims to rest.
The closer the decibel meter is to a sound source, the higher it registers. To eliminate some of these variables, I placed the decibel meter on a counter in front of me and a chair 24 inches in front of that. For each of the whistles I was testing I stood just behind the chair and gave the whistle three hearty puffs. The decibel meter, which was set to record and display the “max” reading, would then tell me the loudest reading for that set of three whistle toots.
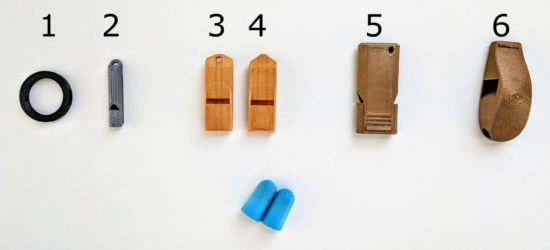
Without further ado, I declare the “Extremely loud and compact emergency whistle” by Whistleblower on Thingiverse the clear winner at 121.1 decibels. Both whistles by this designer took the top two scientifically determined spots.
| Name | Thingiverse ID | Mass (grams) | Price | Print Time (minutes) | Decibels | Subjective Rank |
|---|---|---|---|---|---|---|
| Extremely loud and compact emergency whistle [v1] | 2933021 | 3.9 | $0.12 | 22 | 121.1 | 1 |
| Extremely loud and compact emergency whistle [v2] | 2933021 | 3.7 | $0.11 | 18 | 111.5 | 3 |
| v29 (Over 118 db!) | 1179160 | 13.9 | $0.42 | 90 | 110.4 | 4 |
| 2 chamber whistle (LOUD) [w5] | 2616512 | 8.1 | $0.24 | 49 | 109.5 | 2 |
| Emergency Whistle with Solidworks 2014 source | 495172 | 1.2 | $0.04 | 7 | 101.8 | 5 |
| Whistle Ring Modified [v2] | 2027115 | 1.6 | $0.05 | 9 | 90.8 | 6 |
Just how loud is 121.1 decibels? 1 Well, for starters, it’s just above the pain threshold of 120 decibels. It’s louder than:
- Your iPod headphones at maximum volume
- A baby crying, next to your ear
- A full symphony orchestra
- The subway
- A sporting event
- A chainsaw
- A jetski
- A marching band
It’s on par with:
- Thunder
- A shotgun
- An ambulance siren
- A rock concert
And, if you didn’t have earplugs, you would exceed the daily safe exposure limit for 121 decibels in 7 seconds.
There may be louder whistle on Thingiverse2 and, if so, please let me know. I’ll print the model and test against the others in my arsenal.
Loudest 3D Printed Whistle- MOAR WHISTLES
- Loudest Whistle on Thingiverse… The Answer Might Surprise You!
- Loud 3D Printed Whistle Test, Take 2
- Loudest 3D Printed Whistle – now with 100% more science
- This page has several charts to help explain. [↩]
- Or some other online 3D design repository [↩]