MakerBot Origami

Or, “Design Constraints and Creativity”

Origami is another of my hobbies and it is all about design constraints. 1 The rules are simple2 – one square sheet of paper only manipulated by folding. 3  Yet, within these rules it is theorized that a sufficiently skilled artisan can design and fold any arbitrary figure.  I find folding origami to be at once cathartic and contemplative. 4

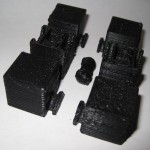
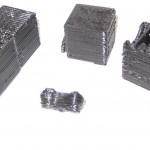
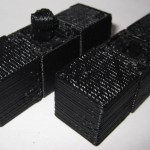
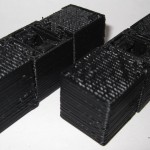
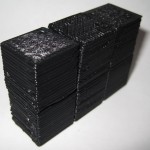
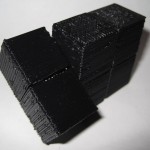
Pondering the design constraints within origami reminded me of one of my own recent designs – the 3x2x1 Rubik’s style puzzle cube.  Quite apart from the medium or subject matter, I really liked the idea of a single print job resulting in parts that could be immediately hand-assembled without tools to form a useful object.  Then I thought – if the design constraints are one of the things I like about this design, what else is possible within these same constraints?

Thus, I propose a new style of “MakerBot Origami”:  One MakerBot print5 , multiple components6 , no tools or hardware7 .

What’s the coolest most awesome thing you can design within these constraints?

Update:  Cyrozap – sory fore mispellnig yoru mane.

((I waffled on that title.))
  1. I waffled on that title. []
  2. Modern origami rules, anyhow. []
  3. Designing an origami model is not about figuring a way to cheat those rules – rather a way to work within them to achieve a desired goal. []
  4. I recall one origami master referring to the folding of a particularly difficult and rewarding model as invigorating. []
  5. Or, as Cryozap Cyrozap calls them, “production file.” []
  6. Otherwise, people would be making whistles. []
  7. Thus, no bottle openers []

MakerBot Teacher Giveaway detailed lesson plan submission

Oh, my prior submission wasn’t good enough?  COME ON!  My lesson plan included a mineshaft AND a tiger shark!  Here’s MakerBot’s description of a minimally detailed lesson plan:

  • Objectives: What do you expect the students to learn?
  • Structured Lead In: How will you engage the students and connect the new learning to their life?
  • Instructions: What are you going to teach? How are you going to do it?
  • Independant Practice: What will you have the students do to demonstrate their new learning?
  • Evaluation: How will students know if they have learned what you’ve taught them?

Pssh.  No problem.  I can bang out a lesson plan that covers those points.  How’s this:

  • Objectives. I expect the students of my lesson plan to learn self reliance, designing for novel problems, designing under less-than-ideal conditions, improvisation, and respect for endangered species.
  • Structured Lead In: Nothing is more immediately engaging that being thrown into a mineshaft.  Wait, correction, being thrown into a mineshaft with a tiger.  There will be a direct correlation between design efficacy and the application of their learning to their life in a very real and immediate sense.
  • Instructions: I’m going to teach my students using a series of mineshafts and large predators.  They will learn how to apply technology for problem solving, iterative design, and preservation of endangered species.
  • Independent Practice: Survive a mineshaft and a tiger.
  • Evaluation: One of the great things about this lesson plan is that there are many ways to successfully complete the assignment.  All are essentially the same in their inception, beginning with “Using a MakerBot the student…” and then quickly diverge to multiple “win conditions.”  The most common solutions found my my students are:
    • Using a MakerBot the student escapes the mineshaft, but leaves the tiger, shark, or tiger shark inside.  Extra credit:  Student expresses remorse for leaving said animal in the mineshaft.
    • Using a MakerBot the student builds a PLA tiger, shark, or tiger shark and has it fight (or woo!) the other tiger, shark, or tiger shark, student escapes in the confusion.  Extra credit:  While the PLA and flesh tigers, sharks, or tiger sharks fight (or flirt), you build a second PLA carnivore and ride it out of the mineshaft.
    • Using a MakerBot the student escapes the tiger, shark, or tiger shark by digging even deeper into the mine and builds a new civilization underground inside the mineshaft.  Extra credit:  The student gains the trust and respect of the underground dwelling mole people and teaches them how to use the MakerBot as well.
    • Using a MakerBot the student builds a new civilization of tiger, shark, tiger-shark, and robot hybrids.  Extra credit:  This new human/animal/robot civilization’s national currency is … love.
    • Using a MakerBot the student helps the tiger, shark, or tiger shark to escape, and stays on inside the mineshaft.  Extra credit:  Student increases the MakerBot’s print resolution and builds a tiny extension of MakerBlock University, populates it with a tiny PLA version of me, themselves, a mineshaft, and a tiger, shark, or tiger shark and repeats the lesson plan on a small scale.
    • Using a MakerBot the student teaches the tiger, shark, or tiger shark to operate the MakerBot, thereby demonstrating their own mastery of all things MakerBot-ish.  Extra credit:  The student, tiger, shark, or tiger shark form their own open source hardware company building human-tiger/shark/tiger shark translation devices.

If you use any of these lesson plans in your own classroom, please link to this blog post.

WordPress II

I tend to see the world through WordPress eyes.1 When I find (or write) a clever bit of script that would be useful to a WordPress website, I tend to convert it into a WordPress plugin.  I did this with my PieChart Plugin and a few other knick-knacky plugins.

I just noticed Cryozap Cyrozap‘s Amazon affiliate link converter PHP script.

It occurs to me that it would be relatively easy to build a WordPress plugin that searches through a post/page, finds Amazon links, and then turns them into affiliate links…  I think this could be useful in several of my sites, actually.

Update:  Cyrozap – sory fore mispellnig yoru mane.

  1. You see, the subject is WordPress double-I, as in WordPress I’s, as in WordPress eyes… []

New affordable 3D printer – the Ultimaker

Ultimaker
Ultimaker

Update 3/28/2011:  The Ultimaker is available for pre-order!

Erik de Bruijn along with a newly formed Dutch RepRap group have put together this new design for a low cost RepRap alternative.  The stated goal of their blog is “designing/developing an easy to build low cost 3D printer with a small form factor but large build envelope.”  Erik has invited everyone to comment on this beta design.  It’s interesting to see their progression of prototypes in their second blog post.

The interesting thing about this model is that it combines some of the best parts of Darwin and MakerBot and what appears to be a Bowden extruder.

The very nature of FDM1 means that the robot will only move the Z axis a little bit every once in a while.  One of the design drawbacks to the Darwin was that the heavy extruder head (motors, gears, heating elements) were so heavy that the entire robot would rock or vibrate with the lateral XY movements.  MakerBot got around the heavy extruder head problem by moving the platform in the XY and moving the extruder head only up and down.  This design decision isn’t without it’s tradeoffs, however.  One downside is that their build area is much smaller than a Darwin.  Another downside of the MakeBot design is that once the object being built reaches a sufficiently large volume or height, moving the object around quickly on the XY platform causes it to vibrate, shake, and become somewhat unstable.

One of the main improvements inherent in the Bowden extruder is that it allows you to take the heaviest parts of the extruder head, separate them from the rest of the extruder head, and move those heavy pieces to a different location.  Using a Bowden extruder makes a Darwin style robot much more feasible – the small moveable print head won’t have the mass to cause the robot to become unstable.

It seems that combining either of the X or Y movements with the Z probably won’t matter all that much, since the Z axis will only move about 0.33mm or so per layer and the Z axis typically doesn’t operate at the same time as either the X or Y axis.  Combining the as the new RepRap version II, Mendel, design shows us that combining the Z axis along with either the X or Y axis, but not both, can lead to a very stable configuration.

What I like about the Ultimaker design is that it would appear to incorporate some of the best parts of the MakerBot and Darwin designs. It appears to have a bolt/nut/T-slot MakerBot style assembly structure using thin lasercut wood pieces for the body.  I found these parts to bolt together very quickly.  Contrast this to the Darwin/Mendel structure using lots of nuts and threaded rod and printed plastic parts to hold it together.  At the same time, by making use of a Bowden extruder and the Darwin body shape, it appears to be able to use most of the interior volume for printing.

I suspect it probably uses fewer parts than a typical Darwin, but I can’t be sure.  I also have to wonder about the cost of lasercut wood versus the cost of nuts and threaded rod.

Nice find RepRap Log Phase!

  1. Fused deposition modeling – basically creating a layer and then fusing a new layer on top of that layer in succession to build up an object. []

MakerGear Enhanced Operator’s Pack

I placed my order for a MakerGear Enhanced Operator’s Pack on 8/11/2010, it shipped the same day, and arrived today 8/13/2010.  My extruder has been working really well and without problems with ABS since my last rebuild.  I’m really hoping I won’t need these bits any time soon…

Thanks Rick and Karen!!!

MakerBots for Teachers

MakerBot Industries is giving away ten MakerBots to ten teachers at any educational level.  Let’s just consider this my entry:

  • Your name
    • Uh.  I’ll stick with “MakerBlock” for now.
  • Your school’s name
    • Sheesh.  These are getting harder.  Okay, how about “MakerBlock.com”?  No?  “MakerBlock U”?
  • The address you’d like the MakerBot sent to if you are chosen
    • Same place as my last order.  ;)
  • A paragraph describing how you would integrate the MakerBot into your curriculum. Include some description of the learning environment and what you teach
    • I would integrate a MakerBot into my curriculum by using it as a demonstration of iterative design, digital fabrication, digital design, invention, and innovation.  The learning environment is the whole freaking internet. 1  I teach digital plastic AWESOME.
  • A lesson plan that you will implement if you get a MakerBot
    1. Pssh.  Just one?  I’ll give you THREE.
    2. You’ve got a MakerBot, a laptop, unlimited plastic and electricity.  You are trapped in a mineshaft.  How do you get out?
    3. You’ve got a MakerBot, a laptop, unlimited plastic and electricity.  You are trapped in a mineshaft with a tiger.  How do you get out?
    4. You’ve got a MakerBot, a laptop, unlimited plastic and electricity.  You are trapped in a mineshaft with a tiger shark.  How do you get out?
  1. Actually, according to Feedburner and Google Analytics, the number is just a few hundred people a day []

What’s the cost of printing with a MakerBot?

I’ve wondered for a while about the cost of operating a MakerBot.  Let’s break it down and see what happens:

  • Plastic. According to some calculations on the MakerBot Operators group, the cost of MakerBot ABS is around $0.03 – $0.04 per cubic centimeter based upon a price of $70 for 5 pounds (or 2268 grams) of ABS, a density of 1.2 grams per cubic centimeter. 1  Using the current prices of $81.36 for a 5 pound coil after shipping, I calculate the price of ABS at $0.035 per cubic centimeter.  Since we’re talking about such large numbers, let’s just round on up to $0.04/cc.
  • Time. Skeinforge has been estimating about 85 minutes to print 19 cc of plastic.  This comes to about 4.5 minutes/cc.
  • Electricity. At at $0.20/kWh, a MakerBot probably draws around $0.03 per hour.

Thus,we may estimate the cost of operating a MakerBot in terms of consumption of goods and resources (excluding computer, human, and MakerBot time and wear and tear) as follows, where V is the volume of the extruded object in cubic centimeters or “cc”:

Supposing I wanted to recoup the entire cost of my MakerBot to date and spread it across the entire life of a single 5 pound roll of ABS. 2  Let’s round the cost of the MakerBot, all repairs, and all extra MakerBot related materials up to $1,500.00.  One 5 pound coil would have 1890 cc’s of plastic.  This would come to $0.794 per cc of plastic.  So, I would suggest the cost of buying a MakerBot and printing off an entire coil of plastic would probably end up costing you about $0.85 per cubic centimeter of plastic.

Resource cost of printing a 19cc totally MakerBottable 3x2x1 Rubik’s Cube is $0.80.

Actual pro rated cost of printing a 19cc totally MakerBottable 3x2x1 Rubik’s Cube is $16.15.

Absolute cheapest MakerBot usage I’ve seen anywhere at Metrix:Create for members printing from Thingiverse is $0.30/minute, which would print the totally MakerBottable 3x2x1 Rubik’s Cube for $25.65.

  1. No one has yet quoted me a price on a pint of tears. []
  2. Printing an entire coil would take about 142 hours. []

3x2x1 Rubik’s Cube assembly pictures

The design should be pretty intuitive.  However, I went ahead and took some pictures of the assembly anyhow.

As I mentioned in an earlier post, I think this one came out really really well.  :)

3x2x1 Rubik’s Cube – done!

I’m so happy with the way this has turned out.

I’ve made a bunch of changes since the last revision of this printable 3x2x1 Rubik’s Cube puzzle:

  • I’ve totally redesigned the center barbell connector.  I simplified the design, removed the five support struts for each end and replaced it with a single support strut and a flat hexagon in the center of the piece.  The purpose of the hexagon is to give the barbell more contact area with the raft.  One of the earlier drafts didn’t have as many supports or this flat hexagon, and it tore off the build platform partway through the build.
  • I increased the diameter of the tube between the barbells.  This enabled it to print easier, made it a little more sturdy, and decreased the wobbliness of the barbell when everything is assembled.
  • I also shortened the entire barbell by 1mm, so that the entire puzzle is held together more closely.
  • I made the flat semi-circular tabs slightly thinner so they rotate a little more freely.
  • I significantly redesigned, thickened and simplified the two brackets that the barbell snaps into.  It’s been able to easily withstand numerous couplings/decouplings as well as numerous rotations.  With a few rotations, all parts now rotate easily.
  • All of the parts fit together SO much better than my first draft held together with a nut and bolt.
  • There is a slight bit of sideways flex that can occur with the use of the barbell.  It is really minor and it actually seems to help the puzzle be more forgiving as you manipulate it.  I see this more as a benefit than a design flaw.

The was one design choice on which I waffled.  I considered making the center cubes non-identical, with one having half a barbell stick out and with the other having the internal connector you see now.  This would have removed much of the sideways flex – since the barbell would be stationary.  I did not go with this design choice because whether the puzzle used one barbell and two connectors or male/female center cubes, there would always be some flex caused by the use of a connector rather than a static pin.  And, to be honest, I much preferred the symmetry of having everything assembled out of just three unique parts.

I know I’ve mentioned this before, but I really like the idea of a MakerBot printable toy that can be printed in one go and then assembled without tools or any additional hardware.  I also think this would make a great MakerBot print demonstration.

I’ll post some pictures of the parts a little bit later.