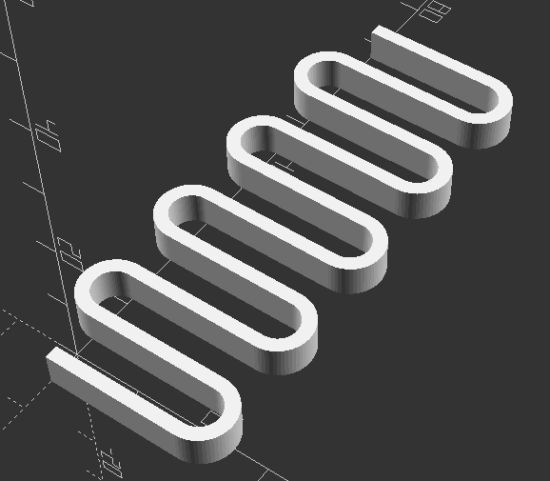
MOAR WHISTLES

The other day I was trolling Thingiverse1 looking for the best quick-printing model to show off DIY 3D printing to 3rd graders.

After a bit of searching, I found it: the simple whistle.

There are whistles a-plenty on Thingiverse, but the DarkAlchemist remix of the muddtt Emergency Whistle is easily the smallest by far.  I compared these two against several other options, tossing all of them into my slicing program and doing a visual double-check for good measure.

Emergency whistle, clear PLA as designed by DarkAlchemist

Emergency whistle in clear PLA as designed by DarkAlchemist

There’s no doubt about it – these are SMALL.  They are less than 2.7cc2 and weigh about 1.2 grams a piece.  Best of all, they print very quickly.  Printing just one whistle with 0.2mm thick layers, including printer warm up time, took 7 minutes.  10 whistles at once?  Only 47 minutes.

Naturally, I took the opportunity to print up 20 more whistles.  This is what 30 whistles looks like:

THIRTY emergency whistles, clear PLA as designed by DarkAlchemist

THIRTY emergency whistles in clear PLA

That got me thinking – could they be even smaller?!

Turns out they can.  I redesigned the whistle in OpenSCAD with a hacky thickness adjustment.  In doing so I discovered that the existing designs on Thingiverse used 1mm thick walls.  A one-millimeter wall thickness is pretty good if you have a small part that needs to be sturdy – but a bit of an overkill if you just need a small functional quick-printing thing.  By removing the little loop at the end of the whistle and creating a wide hole in the top of the whistle, I reduced a fair bit of plastic while keeping the ability to be connected to a cord.

I exported a version with 0.5mm thick walls and a copy with 0.4mm thick walls.  Printed at 0.2mm layers the 0.5mm thick walled version was functional – but the 0.4mm thick walled version was not.  The layers didn’t fully overlap, causing small gaps which prevented the whistle from making any noise.  Printing the 0.4mm thick walled version at 0.1mm layers3 turned out both beautiful and functional.  Best of all, they’re 1/3 the weight of the 1mm version!4

Three emergency whistle in black ABS as remixed by MakerBlock

Three emergency whistle in black ABS as remixed by MakerBlock

A friend recently suggested that his plastic filament supplier of choice ships via Amazon Prime for a ridiculously low $22-23 per kilogram.  Ignoring the amortized cost of the robot and electricity, I could make about 2,500 whistles for about 0.88 cents a piece!

Now, just imagine the following scene.  I take my HedonismBot ((As my MakerBot Replicator 1 Dual Extruder is named)) to my daughter’s third grade class.  I show off the robot printing a single whistle and call a random student up to test it.  Thank you, a pat on the head, and the whistle is yours!  Golly, I guess that’s the whole show everyone.  Oh, you want a whistle too?  Check under your desk.  You get a whistle!  You get a whistle!  You get a whistle!  You ALL GET WHISTLES!  What’s that?  Your sister is in second grade?  It just so happens it only took 80 hours of printing to make enough whistles for every damn student, teacher, and student teacher in the school.

MOAR WHISTLES.

  1. and Youmagine!  I can’t forget you Erik and Team Ultimaker! []
  2. Close approximate dimensions: 8mm x 8mm x 42mm []
  3. Basically, twice the vertical “resolution” []
  4. Just 0.4g each?! []

How to Enable WiFi on Dell Mini 9 Running Ubuntu

Dell Mini 9 (ours is red, not pink)

Dell Mini 9 (ours is red, not pink)

My elementary-school-aged daughter wanted her own laptop.  However, I wouldn’t want to spend several hundred dollars on a computer only to have her step on it, throw something at the screen, or snap the power cord off in the jack.  My solution was to dust off an old Dell Mini 9 that had been sitting around since it stopped recognizing its battery and load Ubuntu on it.  The reason for the Ubuntu rather than the native Windows that came with the laptop is that it would take forever to do anything with all the Windows updates.

And, Ubuntu1 was just fine – except that the wifi adapter wouldn’t work.  After a bit of searching, I finally found the solution and am documenting it here as much for myself as for you, dear reader.

  1. Connect the laptop to the internet via an ethernet cable
  2. Bring up a terminal window by hitting CTRL + Alt + T2
  3. Type “sudo apt-get update” into the terminal window and hit Enter.
  4. Wait for the update to finish.
  5. Type “sudo apt-get –reinstall install bcmwl-kernel-source” in the terminal window and hit Enter.
  6. Wait for the update to finish, restart the computer and you should be ready to go! 3
  1. This was actually my first foray into using Ubuntu []
  2. I learned how to do this here []
  3. The original site where I learned this fix appears to have been taken over by malware – so I used Archive.org to visit an earlier version []

How to Fix Broken Flip-Flops

We went to Hawaii last year and had all kinds of adventures.  While on these travels, I took a stance against the $40 flip-flops available at every corner and bought a pair of $1 flip-flops at the local Walmart when we stopped to buy water and supplies.  It wasn’t long after coming home from vacation that the plastic strap began come out of the foam sole.  While I wasn’t expecting a lifetime of use out of the flip-flops, I did find a way to quickly and cheaply fix them.

Occlupanid, bread clip, bread bag clip, bag clip, plastic bread bag clip

These ubiquitous plastic clips found on so many bread bags

Step 1: Find a plastic bread bag clip

This little bit of plastic is the only thing you’ll need to fix your flip flops.1 You may be fortunate enough to find a stash of these in your kitchen junk drawer.

This slideshow requires JavaScript.

Step 2: Push plastic strap through flip-flops

Before I attempted this fix, I was already just pushing the plastic strap through the hole in the foam sole.  This worked for a few days, but would eventually work itself loose all over again.  After several weeks, the plastic strap would come out after just a couple of steps.

All you have to do is push the strap back through the foam and have your plastic clip at the ready.

fixed flip flop, fixed flipflops

Just push the plastic bread bag clip around the plastic strap and wear the flip flops as normal

Step 3:  Place plastic bread bag clip around plastic strap

All fixed!  I broke off part of one of the “teeth” on the bread clip as I took it on and off the flip flops while taking these pictures.  Although it worked for several more weeks, I think it would have lasted much longer if I had never taken if off or if I had added a little bit of hot glue to keep it in place.

  1. There is WAY more written about these little plastic clips than I would ever have imagined.  But, that’s the internet for you. []

Your Restaurant Website Sucks

WHAT IS SO SPECIAL?!

WHAT IS SO SPECIAL?!

Dear Restaurant,

Your website is really bad.1  It is literally preventing me from giving you money.  Don’t take this the wrong way, all your competitors’ websites suck too.  Fortunately, I have come up with a quick and easy list of things you can do to make your website not suck:

  1. DO prominently display
    1. Phone number2
    2. Address3
    3. Hours of operation4
    4. Your menu in HTML with descriptions5
    5. Bonus points for also having a downloadable PDF of the menu6
  2. DO give important information such as whether you accept cash only
  3. DO NOT have a flash, music, or animations7

Thank you,

Your (soon to be) loyal customer,

MakerBlock

  1. Photo courtesy of Chris Blakely []
  2. So I can call you []
  3. So I can go to you []
  4. So I can be there when you are there []
  5. So I show picky eaters you have a good place to eat with things they will like []
  6. So I can give everyone a copy of your menu []
  7. I will close the browser window and never eat at your restaurant []

My eyes! The goggles do nothing!

This slideshow requires JavaScript.

While I’m not much one for impulse buys, I was unable to prevent myself from purchasing the Adafruit Trinket-Powered NeoPixel Goggle Kit Pack.  If you’re on the fence about dropping the $40 for this kit, let me help you out with the pro’s and con’s list I went through before buying my own.

  • Cons
    • I literally have no practical uses for these goggles
    • Other than flashing lights, they don’t actually do anything useful
    • Once assembled, they can’t be used as goggles since (a) the LED’s are too bright to expose to even your closed eyes and (b) if you’re able to close off the glare, you’ll have an incredibly narrow field of vision
    • The kit is $40
  • Pros
    • They are seriously badass animated LED flashy goggles
    • Sourcing all the parts separately would easily cost you $50, which makes this a deal at $40

Kit Review

As I have come to expect from Adafruit, the kit is, in a word fantastic.  The parts are all packed neatly, wrapped, protected, and in a nice black cardboard box.  If you’ve never purchased a kit from Adafruit or checked out one of their tutorials, you’re really missing out.  The tutorials have lots of high quality pictures, helpful step-by-step directions, and little tips along the way that will undoubtedly make you a better hacker.

I got the basic electronics up and running pretty quickly.1 From there it was relatively easy to install them into the goggles.  My wife and daughter, both skeptical when I first told them about the goggles, immediately demanded their own upon seeing mine.

If you end up buying this kit, I would recommend not doing what I did – hotgluing the Trinket and NeoPixel rings in place.  Don’t get me wrong, this is exactly what you need to do to make affix these parts in place for wearing.  The thing is – within 24 hours of completing the project my mind was boiling over with ideas of how to Make it Better.™

Hacking the Goggles

The thing is, the kit is actually capable of doing a whole lot more with very minimal hacking.  Assembled exactly per instructions, the goggles use just one I/O pin on the Trinket, leaving four unused.  The evening after I had assembled the goggles, I dismantled them in order to pull out the Trinket, and soldered additional wires to pins 2, 3, and 4 and spliced three new wires to ground.  After soldering a big 12mm tactile button to each of three sets of wires, I hotglued the buttons above the right lens.  Now I can use these buttons to interact with the goggles in some small ways.

If you’re thinking of modifying your goggles like my own, you’ll need a little more ribbon cable, three big tactile buttons, a battery extension cable, black craft foam, and a hotglue gun.  You don’t really need the extension cable, but it will make keeping the battery inside the goggles and recharging the battery much easier.2

The Adafruit website provides several other ways to extend these goggles.  You can their tutorials to make the goggles sound reactive, controllable by bluetooth, or if you’re using something more powerful than a Trinket you can add an accelerometer.

My Setup

If you’d like to use my animations, you can find my code on GitHub.  I’ve updated the code with several animations:

  1. Larson Scanner.  This is just a single LED lit up, travelling from the left to right and back again.
  2. Wave Scanner.  Two LED’s are lit up, one travelling along the top of the lens and another along the bottom, until it reaches the far side of the goggles, then back again.
  3. Infinity Scanner.  A single LED travels around one lens, then around the other in an infinity pattern.
  4. Spinny Wheels.  Four LED’s on each lens spinning.  This is part of the original sketch from Adafruit.
  5. Sparks.  A single LED on each lens lights up briefly.  This is part of the original sketch from Adafruit.
  6. Sirens.  One red spinny wheel and one blue spinny wheel.
  7. aStrobe.  The right and left lenses flash white on and off.

The buttons have specific uses as well:

  • Button 1 (on pin 2) makes the current animation brighter
  • Button 2 (on pin 3) cycles through the animations
  • Button 3 (on pin 4) makes all LED’s light up bright red (won’t destroy your night vision!)
  • Button 2 and 3 simultaneously make all LED’s light up bright white (destroy everyone’s night vision!)

If you are going to go through the trouble of building this kit, I would highly recommend adding buttons to it3 and leaving the USB port on the Trinket exposed for later re-programming.  There are a few little tricks you can do with just a single button – treating a button click differently than a button press of a certain duration – but I feel that these would probably be more difficult to use than just adding a second button.  With two buttons, there are up to three combinations4 , with three buttons would have up to seven combinations5 , and four buttons seven billion combinations.6

At this point, I’m still experimenting with with ways to make the goggles more useful/awesome.  Perhaps another post is in order?

Default Series Title
  1. It would have been even quicker if my Trinket skillz weren’t so rusty []
  2. Beats the hell out of trying to get your goggles right next to a USB cable. []
  3. Or, at the least soldering wires to the pins for later use []
  4. 1, 2, and 1 + 2 []
  5. 1, 2, 3, 1 + 2, 1 + 3, 2 + 3, 1 + 2 + 3 []
  6. I might have gotten carried away with the math on the last one… []

DIY Shrinky Dinks

Peter DINKlage

Peter DINKlage

The other day I stumbled across a method of making DIY shrinky-dinks.1 Today my daughter and I gave it a shot – they turned out really well!  Here’s how you can make your own:

  1. Cut Plastic Pieces
    1. Locate polystyrene which is easily identifiable by the number 6 in the recycling triangle
    2. You’ll find clear plastic polystyrene is used in plastic salad bar containers, to-go trays, and plastic cookie trays inside boxes of cookies
    3. Shape the plastic as desired with scissors and a hole puncher to round edges and make holes
  2. Decorate Plastic Pieces
    1. Color or draw with permanent markers (Staples usually has some kind of deal on a pack of colored Sharpies)
  3. Bake and Shrink
    1. Preheat oven to 375
    2. Place plastic pieces on a piece of parchment or aluminum foil (colored sides up) on a baking sheet
    3. Put the baking sheet in the oven
    4. You’ll notice the pieces curl or warp significantly, possibly even rolling around.  They will eventually flatten out.
    5. Once all of the pieces are flat, pull the baking sheet out, take the parchment off the baking sheet and let the pieces cool

When they shrunk down, the “hole punch” holes are the perfect size for adding a small metal ring for use in a necklace or charm bracelet.  With a slightly larger hole you could probably make a decent keyring fob.

  1. Credit to Alyssa and Cindy for the ideas []

Priceless Moments with a Crappy Burner Phone

Burner phones can be useful

Burner phones can be useful

A little while ago I purchased an LG 38c “Optimus Dynamic” Android based touch screen “pay as you go” phone.1 Frankly, this phone has come in WAY more useful than I ever though it would.  Here are a few ways in which I’ve actually used this phone recently:

  • Using a tripod adapter of my own design I set up the camera phone outside and captured a time lapse the full lunar eclipse on 10/8/2014.
  • I used a GPS map to navigate to a location I was unfamiliar with, and back again
  • I captured all of the preparation and dinner for Thanksgiving on a time lapse
  • My wife and I recently had a baby girl – I captured the entire frantic trip to the hospital in a time lapse
  • I had to stay up all night with my daughter a few weeks ago, captured all of that in a time lapse and set it to Daft Punk “Up All Night
  • I use it to take notes, send email, look things up on the web, while I’m using my regular phone for something important like Doctor Who Legacy
  • It’s a cheap movie camera, digital camera, and sound recorder for my eldest daughter
  • I used it to play an hour-long recording of ocean waves for our baby, to help her fall asleep
  • I used it to watch pretty much all of Californication on Netflix
  • An MP3 player
Default Series Title
  1. Photo courtesy of Cianginty []

The best apps for your crappy burner phone

Crappy phone, great apps

Crappy phone, great apps

I recently purchased a cheap pay-as-you-go Android smartphone with no intention to ever use the phone feature.  After removing several non-essential apps from the phone, I installed the following useful (and free!) apps:

  • UTILITY
    • Plane Mode Tweaker by Chislon Chow
      • This app allows you to let your WiFi through the phone’s “Airplane Mode.”  All cell phones, even those that have never been registered with any phone carrier, will periodically communicate with nearby cell towers.  Using this app, I can turn off that ability – while still leaving the WiFi untouched.  By turning off just the cell radio in the phone, I was able to extend the battery life significantly.
    • Tina Time-Lapse by B.nana Technology
      • This is a really great free app with lots of settings.  If you buy the paid app, it seems to have more settings and abilities.
    • Voice Recorder by Mamoru Tokashiki
      • I’ve been using this useful app for years to make notes to myself.  ((And once to record the sounds of a tiger.))1
    •  VNC Viewer by RealVNCLimited
      • Control any other computer running a VNC server.
    • GPS Navigation
  • ENTERTAINMENT
    • Chess Time – Muliplayer Chess by Haptic Apps LLC
      • Great app if you enjoy the occasional chess game.  I use it to play against friends2 all the time.
    • IMDB Movies & TV
      • Sometimes you just have to know the name of the actress who’s playing the barrista.
    • Shazam
      • Sometimes you just have to know the name of a song playing in a movie or TV show.
    •  Netflix
      • It is downright ridiculous to me that I can buy a $20 appliance for watching movies over a wireless connection.

Also, once you install apps on the phone, you’ll want to go to the app manager and move them to “internal memory.”  Although it sounds the phone is asking you if you want to move all the apps to the very limited 1GB of the phone’s internal memory, what you’re really doing is moving the apps to the “internal memory” of the 4GB microSD card.

Default Series Title
  1. True story. []
  2. And enemies []

Why You Should Buy a Crappy Burner Phone

LG Dynamic Optimus (LG 38c)

LG Dynamic Optimus (LG 38c)

I recently purchased a cheap “pay-as-you-go” Android smartphone after reading about it on Slashdot.  The phone in question is an “LG 38c” being sold under the name, “LG Optimus Dynamic” with triple “Tracphone” minutes which you can pick up from Amazon for $19.99.

Before you rush out and get one, the processor is underpowered, the screen is small, it only comes with a 4GB microSD card and very limited internal memory, the viewing angle is relatively narrow, the touchscreen is a flexible plastic rather than sturdy glass, and runs an older version of the Android operating system that can’t handle many apps.12

That said, you would be hard pressed to be able to build or buy a device for $20 that is as capable as this little phone.  The phone can use WiFi, can run the Netflix movie viewing app, be used as a web browser, alarm clock, MP3 player, digital camera, digital video recorder, GPS navigator, send and receive email (over WiFi), and run many useful apps available from the Google Play store.  Also, you may not be aware of this or not, but every single cell phone out there – even those without any cell phone plan – is capable of dialing 9-1-1.  ((Obviously, this phone can be as cheap as it is because the phone company is subsidizing the cost, hoping you make it up by buying phone minutes.  Although I’m basically breaking this business model on a small scale, I just don’t seem to feel that guilty about it.))

Default Series Title
  1. One amusing downside to buying a crappy burner phone is that your wife will look at you like you’re crazy.  She’s not going to think you’re a super spy or a drug dealer or anything cool like that. []
  2. Right, Honey?! []

Maker Faire Checklist

Maker Faire Checklist

Maker Faire Checklist

Between taking most of “Maker Faire” week off work and getting ready1 for MakerCon and Maker Faire, May was a hectic month. I remembered pretty much everything I needed for a successful2 – except “maker cards” and a metric ruler.  With a few additional tweaks, I’m sure it can be even better next year.

In case you’ve never set up a booth at Maker Faire, you get an area with several folding chairs, a few long folding tables, and a chain link fence on at least one side of you.34 To have an interesting booth, you’ll want something to put over your table and on the chain link fence.

Since my entire booth was basically a wooden box that unpacked into a robot that made decorations for my booth, set up was rather easy.

  • Attending the Fair
    • Cash5
    • A MakerBingo card
    • A list of things and people you want to see6
    • Backpack7
    • Food or snacks8
    • Phone charger9
    • Warm weather clothes – shorts, t-shirt
    • Warmer clothes, stowed in backpack, for when it gets dark and cooler10
    • Laptop, power cable11
  • Booth Setup
    • One large table covering per table12
    • One large display board to explain your project ((Like the kind for science fairs))
    • One booklet of information13
    • Caution tape14
    • Zip ties
    • Hot glue, glue sticks
    • Some kind of swag15
    • Some way to make your project interactive16
  • Booth Interior
    • Cooler, water, ice17
    • Paper bags or swag bags18
  • Feedback
    • Suggestion box, 3×5 index cards, pens19
    • Notepad for email list signup
    • LOTS of maker/business cards
    • Update the website before Maker Faire!20
  • Robot
    • Hardware21
    • 3mm hex wrench22
    • Metric ruler23
    • Paper ((One $5 roll is good enough to run a PlotterBot around the clock all entire weekend))
    • Pens and markers24
    • Blue painter’s tape and masking tape
    • Extra fishing line25
  1. Photo courtesy of Daniel Kulinski []
  2. Editor’s choice blue ribbon! []
  3. I heard an amusing anecdote from someone at Make who said they put a lot of time and energy into figuring out a good spot for all the makers.  Apparently they were a little concerned about having three drawing / art style robots next to one another!  I had a great time hanging out near PicassoBot and PancakeBot! []
  4. My daughter later pointed out there were three robots, in a row, all with a “P” in the start of their name []
  5. As a Maker, I could eat at the Maker Lounge, but the credit card machine was intermittent []
  6. This could be a whole topic in itself.  Two days is not enough to catch all the talks from just one stage.  With multiple stages, multiple demonstrations, mini-concerts all happening at the same time  []
  7. Or not.  There were several booths giving away these stringy sack kind of backpacks []
  8. Maker Faire is big and there’s a lot to see.  Although there are a lot of food options, you don’t necessarily want to drop what you’re doing just to go find food []
  9. Ideally, a portable one []
  10. Just a hoodie should be enough []
  11. These were necessary for my particular robot, but may not be for you and definitely not if you’re just attending []
  12. $15 each at KMart []
  13. Printed with clear plastic cover, spiral bound, about $7 []
  14. About $3 for a huge roll – perfect for keeping kids from rushing into your booth []
  15. Business cards, stickers, t-shirts, to any other kinds of trinkets out there []
  16. These are really the most fun kinds of exhibits/booths/projects at Maker Faire []
  17. It gets super hot and stuffy if you’re indoors, so water is key []
  18. To stow extra clothing and supplies []
  19. Pens can be donated from the hotel []
  20. Ideally, with a link to the mailing list and/or squeeze page []
  21. Bolts, washers, wingnuts []
  22. The entire robot can be assembled or disassembled with a single 3mm hex wrench []
  23. 1 meter stick or yard stick with metric markings []
  24. A whole new pack []
  25. This has never broken or tangled on me, but it’s not a bad idea to bring extra []