Speedier DrawBot Drawings

When using my DrawBot to draw pixelated drawings (versus TSP or vectors)1 I don’t really notice a pause from the machine between each pixel.  It takes a few seconds to shade each pixel, then it moves to the next spot and starts over again.  However, when trying to draw TSP art I discovered that the time spent shading a picture obscured the amount of lag time that occurred between each drawing point!  As I tried to draw a TSP portrait of my family I found it was taking about 3 seconds between each little point – which translated to a VERY VERY long time for a VERY small drawing.

When I asked Sandy about this, he suggested that this lag would be eliminated by drawing from an SD card.

Sandy’s current setup, which allows for computer free printing, consists of an Arduino Mega 2560 R32 , a MicroSD card breakout board3 , and an Adafruit Motor Shield4 .  Thus, the electronics setup would cost about $100 if you were starting from scratch, or another $80 if you have been following along at home and have a similar setup to mine.  Apparently the problem is you can’t just shove a MicroSD card into an Arduino.  If you try to add one to an Arduino, then the card shield will end up taking up the pins necessary to use the Motor Shield.  Since the Arduino Mega has a lot of extra pins, some of those can be used towards accessing the MicroSD card.

However, I thought I had seen an Arduino that had a MicroSD slot on board. 5  When I searched around Adafruit, I found this Ethernet Shield R3 with MicroSD connector6 .  Not only does this little shield fit my existing Arduino Uno, have a MicroSD slot, and have an Ethernet port, but it also has input pins so that it can be stacked!  This makes me then wonder…  Could I just pop this $45 board between my Arduino Uno and Motor Shield, add some software and get cooking?  I have to admit, the idea of spending $45 more, rather than $80 more for a Mega and MicroSD breakout board appeals to me.  I suppose there’s the added benefit that I might be able to run a REALLY long ethernet cable to the ‘bot if I so desired since it would have a built-in ethernet port on the Ethernet Shield.

Now, I’m the first to admit that I know next to nothing at all about programming Arduinos or fiddling with such things.  I’m just a fair hand at slavishly following some other person’s excellent directions.  Please do me a favor and let me know whether you think adding this Ethernet shield between my Uno and the Motor Shield will or will not work.

Default Series Title
  1. Actually, the TSP drawings ARE vector graphics… []
  2. $65 at Adafruit []
  3. $15 at Adafruit []
  4. $20 at Adafruit []
  5. Spoiler alert: I was wrong []
  6. $45 at Adafruit []

TSP FTW!

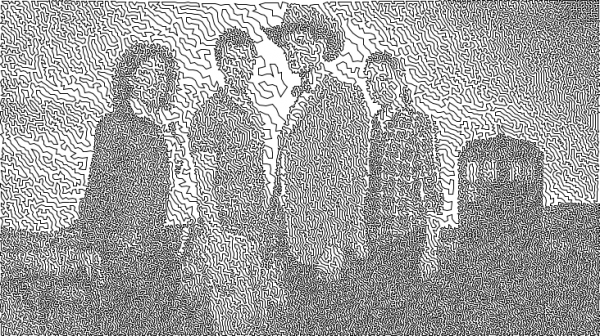
Doctor Who Season 6 TSP Single Line Drawing

Doctor Who Season 6 TSP Single Line Drawing

I have been having SO MUCH FUN with traveling salesman problem / single line art!  I can’t wait to draw some of these with my DrawBot!

And, really, how much more perfect could this project get?  It’s a TSP nerdy math single line art drawing of my favorite sci-fi show for drawing with a robot I built using printed parts from my 3D printing robot. 1 2 3

Default Series Title
  1. Oh, nirvana! []
  2. I suppose the only way to make it better is to draw the image on a pizza using spray cheese. []
  3. Actually, I take that back.  Ew. []

Restarting a Stalled DrawBot Drawing

Over the last two days or so I’ve drawn the largest picture yet with my DrawBot.  I started it on Friday night and, with numerous pauses and other misadventures, finished it this morning.  The drawing is roughly 12″ x 18″ or so. 1  With no apparent rhyme or reason the drawing would pause numerous times.  I would estimate about 25 or so.  Also, the pen had a difficult time towards the end.  I believe this was in part due to the angle of the pen on the drawing surface and the quantity of the ink left.  As of this morning I was still using version 1.1.2, but I’m installing version 1.1.4 right now. 2

Here are some additional thoughts:

  • In an earlier post I had mentioned I was having stalling problems while drawing.  Sandy asked whether I was able to change serial ports to a different one and back again.  The answer is “sort of.”
  • When there’s a stall, here’s what I do:
    1. Click “SETUP->SERIAL PORT…
    2. Click on some other serial port other than the one I’ve been using
    3. Disconnect and then immediately reconnect the USB cable from the computer
    4. Click on the original serial port I had been using
    5. As soon as the Drawbot reestablishes a connection with the Polargraph controller software, it starts drawing right where it left off
  • I used to export a copy of the existing queue before doing all of this, and while it is still a very good idea, it doesn’t seem necessary.
  • This exact process has worked several times in a row without a problem.  Interestingly, step number 3 above3 is critical.  If I exclude this step the program crashes.
  • For this drawing I used a Pilot Precise Rolling Ball V5, extra fine tip, black.  I had used a red pen of the same make for a prior drawing and it worked reasonably well.
  • I’m in the process of designing a new pen gondola.  I think something that can angle the pen downwards would help the pen apply ink to the page.
  • Interestingly, I noticed after about 80% of the drawing was done the pen had a little bit of paper fuzz on it.  Once I removed this, the pen seemed to work a lot better.
  • The pen stopped drawing completely after about 85% of the drawing over all.  This was a bit disappointing.  However, since I was drawing from the top right to the bottom left and the version of the Polargraph controller I was using allows you to specify which area to start from, I just restarted the same drawing from the bottom right corner and ended up with a very satisfactory result.

In other words, it’s a nice day to start again.

Default Series Title
  1. I rolled it up and gave it to a friend before I thought to take a photogram []
  2. One of Sandy’s latest posts suggests there’s a 1.1.5 available, but I couldn’t find it. []
  3. The disconnect and reconnection of the USB cable from the computer []

DrawBot – Another Successful(ish) Drawing!, and an Update

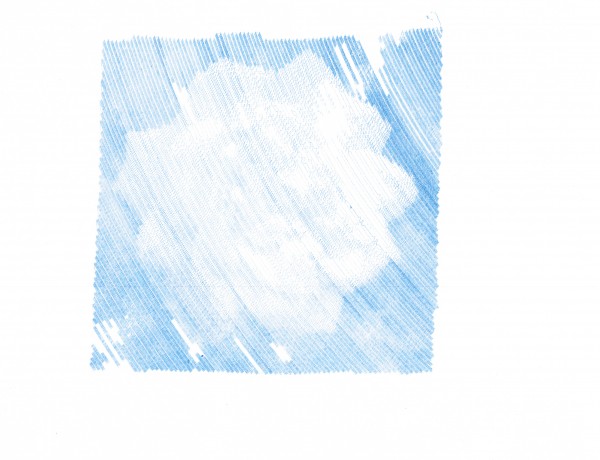
A summer rose from our garden, drawn by a freakin’ narcoleptic robot

A summer rose from our garden, drawn by a freakin’ narcoleptic robot

The drawings are getting better with a little tinkering.  I’ve designed, printed, and installed new motor spools.  These have a thicker central core, so they should be able to collect more monofilament line with slightly less distortion.  I’ve made a few changes to the setup.  Dialing in the starting area and calibrating the starting home point were pretty important.

I’m still having a little trouble with the robot occasionally stalling out.  Although, now I think it is a symptom of the controller software rather than a problem with the Arduino.  There’s no set time after printing, no set time after running the program, or other noticeable precipitating event which seems to cause this problem.  At some point during a drawing, the controller software just reports the Arduino as being busy. 1  Here’s what I do to correct the problem:

  1. Disconnect the USB cable from the laptop
  2. Click “Queue->Export Queue” and save as a text document
  3. Open the text document and perform the following operation
    1. Select, copy, paste the first line above the first line – so now you see a duplicate.  So, for instance in the image above I had to copy “C05,2700,2370,10,247,END” and paste this above the same line – so that it would look like the robot would be receiving the same command twice.
    2. Edit the line “C05,2700,2370,10,247,END” so that I change the command to start with “C09” and delete the last two numbers and the “END” statement, so that it now looks like, “C09,2700,2370,END”
    3. Save the text document with these changes
  4. Shut down/close the controller software
  5. Restart the controller software
  6. Reconnect the USB cable to the laptop
  7. Click “Setup->Serial Port…” and click on the serial port of choice
  8. Click “Queue->Import Queue” and choose the text document I just edited
  9. Start the queue again!

The reason I suspect this is a controller software and not an Arduino firmware issue is that I don’t have to reset the Arduino at any point – just disconnect the USB, restart the controller software, reconnect the USB, and start the queue again.  I would think that if there were a problem with the Arduino firmware, I would need to reset the board itself.

The lowest you can specify as the “grid size”2 in the Polargraph controller software is “20,” but you can use a smaller value by editing the “polargraph.properties.txt” file.  In the image above I used a grid size of “10” which appears to cover 1/4 the area of the size 20 pixel.  That image probably took about five hours to draw.  I think it looks really nice.  The image above seems to have been distorted by my scanner.  It came out almost perfectly square with a slight warp to the top right corner. 3  You can see some bare spots in the image above – that’s where the pen, for whatever reason, just wasn’t making a mark on the paper.  I suspect it has something to do with that region of the paper being either slightly smoother and/or slightly more depressed than the surrounding regions.  Otherwise, there would be no reason why the next row would have a similar defect nearby.

I’ve noticed the controller software also tends to forget the machine width, page size, and page position.  I’ve updated this, saved it, and uploaded it to the Arduino several times, but it doesn’t seem to stick past a reboot of the software.  Ultimately, these are very minor concerns and really just something to be aware of when I’m printing.  I just about couldn’t be happier with the controlling software.  That piece of software plus the Arduino sketch together have basically made this a nearly effortless project.  Besides a hiccup soldering a circuit board wrong, this entire project went together very quickly and yielded almost immediately gratifying results.

I’ve done several drawings in the last few days.  I’m still having trouble getting a perfectly rectangular and centered result.  I may have to adjust the Y offsets and double-check my machine measurements.  I still also notice a slight upwards warp to a drawing in the top right corner.  But, I’m looking forward to additional experimentation – it’s all part of the adventure!

Last, but certainly not least, I want to make it clear that Sandy Noble’s software for the Polargraph/drawbot is really really great.  That I am having some minor calibration troubles speaks more to my incompetence than Sandy’s excellent program.  So, a great big thank-you to Sandy for his continued hard work on this software!

Default Series Title
  1. Aren’t we all, Arduino?  Aren’t we all? []
  2. What is essentially the pixel size []
  3. This one was commissioned at the request of my daughter and now hangs in her room. []

DrawBot – Onwards and Upwards!

A few thoughts about operating a DrawBot, in semi-organized fashion:

  • Vertical Surface Drawing.  There is an interesting tension in the design of a vertical line-driven drawing robot.  As the drawing surface orientation approaches horizontal, the easier time the robot will have using a standard pen to draw, the more difficult it will be to control the drawing component via a line system, the  greater the weight that would be required,1 a greater weight puts a greater stress on the line and the motor and has some effect on the responsiveness of the drawing component, and the more the weights on the drawing component would be in contact with the drawing surface – possibly causing smudges.  The closer the surface is to vertical, the easier it will be to actually operate as a line-driven robot, the less weight required,2 but the more difficult it would be to have a pressure from the drawing component on the drawing surface.
  • Robot Portability.  Right now my robot is quite portable – and, of course, there are costs and benefits associated with this.  Right now I’m limited to the “size” of my robot at 2’x4′ since that’s the size of the piece of plywood I bought and on which the motors are mounted.  However, it is very easy to just move the robot by putting the plywood in a different location in the house.
  • Robot Location.  This is, in some senses, the flip side to robot portability.  I’d love to put the ‘bot up on the wall and draw something really really huge.  I don’t see that happening until I’m more comfortable running the robot, have found a better pen/paper combination, and – perhaps most importantly – figured out how to run the robot wirelessly or off an SD card.
  • Drawing To-Do’s:  Ideally, I’d like to put the robot to work drawing something on an epic scale.  A high resolution photograph of earth, moon, or pretty much anything from NASA.  Perhaps a map of middle earth, the 100 acre woods, or the Princess Bride story?  A photograph of the world at night, with highlights of the world’s electricity consumption.  Or, some of the INSANELY awesome super sweet posters from various XKCD comics.
Default Series Title
  1. This my theory, anyhow.  My reasoning is that as the surface approaches horizontal, the more weight you’d need to pull at the drawing component because more of the force of the weight would be absorbed directly by the drawing surface itself – along with some friction as it passes over the surface as well. []
  2. See reasoning regarding weight above. []

DrawBot – Pen Selection, Part II

I believe my next challenge, aside from better DrawBot calibration, is to find a good pen and paper combination.

This afternoon after I got back from a meeting, but before I went back to the office, I stopped off at an office supply store.  The local craft/hobby store near work didn’t have any really big rolls of butcher/craft paper – which was very disappointing.  Luckily, the office supply store had a slightly larger roll of white paper. 1

I really went there to check out the pens.  And, there were a LOT of these pens.  An entire side of one large aisle was devoted to pens.  However, since this was an office supply store, you could only buy these pens in office supply quantities for office supply amounts.  I was not about to drop $20.00 for a five pack of multi-colored pens only to find out that that style of pen just doesn’t work in a near-horizontal drawing robot kung fu grip.  I even checked out the pen refills, which were more reasonable – but the selection wasn’t there.

One thing I did while I was there was write down the name of every brand name pen manufacturer I saw.  Here’s the list I came up with:

  • BIC
  • Cross
  • Montblanc
  • Paper Mate
  • Parker Quink
  • Penatia
  • Pentel
  • Pigma
  • Pilot
  • Sharpie
  • Uni ball
  • Waterman

While I understand Montblanc and Waterman pens to be on the expensive side, I would gladly pay for a pen that “just worked.”  I would point out that the Pigma was no where to be seen at the office supply store.  This is a really nice quality art pen and I’m actually surprised I didn’t see any of them when I was at the craft/hobby story yesterday.

One other side note… while at that craft/hobby store I noticed fountain pens.  I’ve never tried to write with one, but I did wonder how effective they would be in a nearly horizontal orientation.  It could result in some very cool drawing effects.

But, for now I think I’ll focus on robot calibration for the moment while I ponder this move.  In the meantime, if you’ve got a pen suggestion, please let me know!

Default Series Title
  1. For slightly cheaper than the craft store too! []

DrawBot – Drawing Success(ish)!!!

Starry Night by Van Gogh, drawn by a freakin’ narcoleptic robot

Starry Night by Van Gogh, drawn by a freakin’ narcoleptic robot

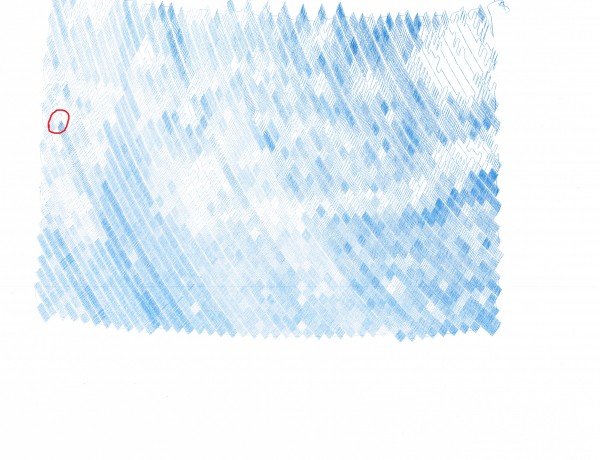
I think that turned out rather well!!!  If you look closely at the area circled in red in the next picture, you’ll see where there is a discontinuity in the line.  You may have to look at the large version to really see where this happens.

Starry Night by Van Gogh, drawn by a freakin’ narcoleptic robot, with the error circled

Starry Night by Van Gogh, drawn by a freakin’ narcoleptic robot, with the error circled

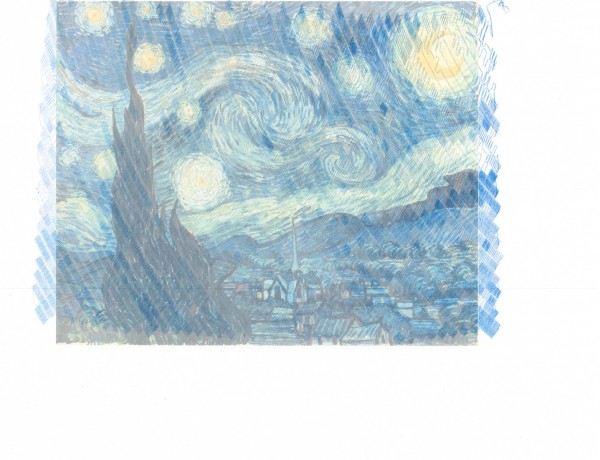
I suspect that my attempt to fix the stalled drawing probably did not have a role to play in the robot drawing off the top edge of the paper.  I think that is my fault for badly centering the paper on the robot.  Let’s see it again, without the red circle, with the original image overlaid.

Starry Night by Van Gogh, drawn by a freakin’ robot with narcolepsy, overlaid the subject image

Starry Night by Van Gogh, drawn by a freakin’ robot with narcolepsy, overlaid the subject image

There is clearly some calibration and whatnot to be done, but I’m still amazingly pleased with the results.  As much as I’ve blogged about drawing robots, the entire process from assembling parts ordered online to having a machine that actually draws stuff has been amazingly painless.  Based on the image above, it looks like I need to:

  • Adjust the aspect ratio, so that the image isn’t made too wide by the drawing process.  I suspect this has something to do with the “Setup->Machine Width” setting.  That was the setting that caused the drawing to be unnaturally narrow.
  • Adjust the amount of line that is unspooled in the center of the drawing.  I suspect this has something to do with the “Setup->MM per Rev” setting.  I have nothing upon which to base this suspicion except that my feeling is the robot is spooling out too little line.  I suspect that if I tell it that the spool is slightly smaller (closer to 47 than the 50 I’m using now) I would end up with a better result.
Default Series Title

DrawBot – How to Recover from a Stalled Print!

I should really have entitled this post “How to mostly recover from a stalled print.”  Several times now I’ve had a problem with the DrawBot stalling out and stopping a print.  When this has happened, hours can pass and the little ‘bot will do nothing at all.

Such as last night.  It was probably 80% done drawing Starry Night when it … just… stopped.

Here’s what I saw and here’s how I (mostly) fixed it:

  • The Symptoms
    • No DrawBot movement1
    • No scrolling of the command queue
    • The ‘bot status read “BUSY [insert normal seeming string command I didn’t write down]”2
    • The motors were quite warm
    • And the poor little Motor Shield was warm as well3
  • The Fix45
    •  I figured that, for whatever reason, the little ‘bot just seized up – but that perhaps if I could get it to respond to commands I might set it back on track.
    • The control software was responsive enough that I could “Queue->Export Queue“, which I did.
    • The problem with trying to reset the board or the control software and just feeding it the remaining part of the queue is that it wouldn’t remember where it was.  So, I figured if I could convince it that it was already where it was supposed to be, it might just continue on as if everything were okay.
    • I had seen from prior command queues that the code, “C09,NUMBER1,NUMBER2,END” appeared to be the way the machine would apply “Input->Set Pen Position.”
    • I then looked at the code that I had exported from the queue.  The first item was:
      • C05,3103,4350,29,133,END
    • So, I edited the text file so that it read as follows:
      • c09,3103,4350,END
      • C05,3103,4350,29,133,END
      • …the rest of the command queue
    • Which I believed essentially tell the ‘bot that it was where it was supposed to be and to continue on as if everything was normal.
    • I then disconnected the USB cable
    • Closed the control software
    • Restarted the control software
    • Reconnected the USB cable
    • Reestablished contact with the ‘bot, “Setup->Serial Port” and selected the port of choice for my laptop
    • Clicked the queue to start it up again…
    • It seems to have worked – but may possibly have shifted up one pixel.  This is why I say this was mostly a recovery.  I suspect that if I should have moved the pen down a little and see if I could get it to draw the next pixel in line.

I’ll scan and post this drawing as well and will point out the spot where I tried this little fix.

Default Series Title
  1. Doctor, she’s been acting listless… []
  2. … and unresponsive… []
  3. …and has a fever!  What should I do?! []
  4. VERY nearly almost called this the Cure and linked to a YouTube video.  It’s really just too damn early in the morning for me to write such a thing or you to read such a thing.  As much as I like the Cure, they’re not morning music, you know? []
  5. Like the Smiths []

DrawBot – Pen Selection

I just tried several pens.  Here’s what I’ve found:

  • “Fine point” Sharpie, black.  This is the kind you typically use.  It makes a huge, stinky, black line that leaks all over.  Not recommended.
  • “Ultra fine point” Sharpie, black.  This also leaked right through the paper, made a super thick line, and made such a mess I stopped the drawing.  Not recommended.
  • Pilot Precise Roling Ball V7, Fine, red.  I really like this style of pen for writing.  These gel pens feed ink easily, the ball point rarely gets messed up, and it’s just all-around easy to use.  Unfortunately, as you can see from some of the drawings, it didn’t like drawing at a nearly horizontal angle.  Even though I can see through the side that the pen has sufficient ink and that it is reaching the pen tip, it just wasn’t working very well.
  • Piolot G-2 10, black.  While excellent for writing, this pen was miserable for use in a DrawBot.
  • Uni-ball Deluxe Micro, blue.  So far, this pen is AWESOME.  It seems to write amazingly well on a nearly horizontal surface, no bleeding, and it draws a very fine line of blue.  I fully intend to buy several different colors of this pen.  I believe it comes in all kinds of colors – black, blue, green, and red.  If the drawing I’m having the robot work on now turns out, you’ll get to see just how awesome this pen really is.

As an FYI, Sandy recommends:

Very smooth paper (like Bristol board) with hard-tipped fineliner pens.  In the UK he uses ZIG Millennium pens.  He suggests that Pigma MICRON pens may be a good choice for those in the states.  I’ve used Pigma Micron pens for years and really like them for pen-and-ink drawing.  They’re great on regular photocopy paper as well as serious art paper.  I would have tried a Pigma pen, but I couldn’t find any around the house.  I know I’ve got a stack of them – I just can’t find ’em.  If and when I do, I’ll update this post.

Default Series Title

DrawBot – Calibration

Polargraph Calibration by Sandy Noble

Polargraph Calibration by Sandy Noble

Calibrating my DrawBot was apparently important to its operation.  Who knew?!  If you’re following along at home, you’ll definitely want to check out Sandy Noble’s instructible on Polargraph calibration.  I’ll put my settings here, but they probably won’t be that helpful to you unless you’re using the same exact equipment and hardware as I am.

  • Setup->MM per Rev = 50
    • Based on the actual spool center diameter, this should be 47.  But, with some line wound onto the spool, it should be more like 54.  So, of course, I chose something that was neither.
  • Setup->Steps Per Rev = 400
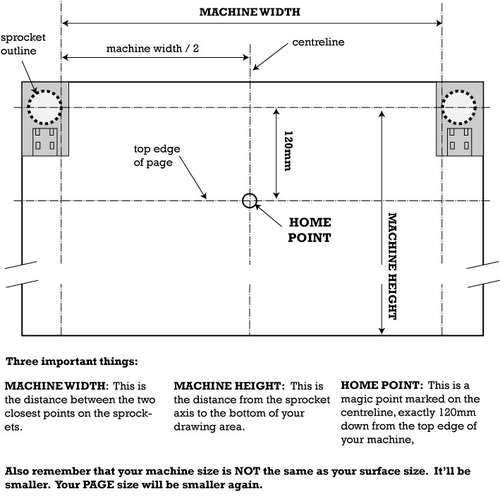
  • Setup->Machine Width = 844
    • Although the “Machine Width” is defined by Sandy as “The distance between the two closest points on the sprockets,” I used a different figure.1  Since my machine uses spools, rather than sprockets, and the spools are unwound on the far side of the spool, I measured from the far edge of the spool’s core the the other far edge of the other spool’s core.  I figure this is probably the best measurement of the width of the line available to the machine.
  • Setup->Machine Height = 848
    • This is a relatively arbitrary specification given that my spools have about four times as much filament than I could use in my current configuration.  I intended this to be 844, but must have typed it in wrong.  :)
  • Setup->Page Width = 216
    • Rounded up from 215.9, which is 8.5 inches converted to millimeters.
  • Setup->Page Height = 279
    • Rounded from 279.4, which is 11 inches converted to millimeters.
  • Setup->Pen Tip Size = 0.12
    • With my 2’x4’x0.5″ board covered in butcher paper, I’ve marked out on the paper the locations of the various important lines for my machine.
Default Series Title
  1. Heaven forbid I do something normal, right? []