Counter proposal for MakerBot Industries

Sometimes you just need to turn a problem on it’s head.  I see that’s it been over a week since I submitted my job application1

So, here’s my counter proposal – I will continue to blog incessantly UNTIL you hire me!  Ha – and you thought it was going to be irritating to have me camp out outside, not showering, and stinking up the joint.2 Just wait until I clog up the RSS feed with every bit of nonsense I can dream up. 3

  1. That’s right, I stayed up until 1:27am on Wednesday morning writing it, overslept, and was late to a meeting the following morning…  Worth every moment. []
  2. You see, I’m not above harrassment. []
  3. For those astute readers, you’ll notice I actually added a new category to this blog.  Some posts are now categorized as “Random nonsense.” []

MakerBot woes

Building my MakerBot and getting it printing reliably was challenging, but totally doable by a technical novice such as myself.  I have lots of people on the MakerBot Operators group to thank for their patience and help in getting my MakerBot online. 1  Looking back, I spent about a month building and then calibrating my ‘bot. 2

It’s easy for me to forget that first month of occasional frustrations and triumphant victories, now that I’ve been printing successfully for more than eight months.  It actually makes me a little sad when I read people writing about their own frustrations and how they’re ready to throw in the towel.  The most recent example was noobcake getting frustrated with her ‘bot and getting ready to sell it off in parts.  Thankfully, Spacexula swooped in to help her out.

This brings me to We Alone On Earth‘s recent post.  WAOE are a group of introspective, philosophically and technologically minded twenty-somethings.  To give you you an idea of their frustration with their ‘bot, the post was entitled, “MakerBot: not very much fun at the moment (caveat emptor)”  Yikes. 3  I realize that WAOE has revised their original post several times since the original publishing date – but they have a lot of legitimate concerns.

WAOE list off seven problems with the MakerBot.  I’m not going to refute these points – but rather offer another perspective on them.  After several updates, WAOE offer additional comments, I’ll include them here in “[]”.

  1. The PTFE is prone to melting.  [WAOE expects the new MK5 Plastruder will resolve this issue]. I have never heard of a PTFE barrier melting.  I’ve heard of them deforming from a blockage and had one develop a clog which I had to remove.  Several people have purchased MakerGear PEEK replacements – but these are far from necessary.  I clogged my first barrier once, cleared it, clogged it again, and am now using a slice of it as an insulating washer.
  2. Inexplicable printing behavior due to noise.  [WAOE fixed this issue by twisting wires and installing a resistor]. I’ve never had this problem, but I know others have.  Like WAOE, I’ve heard of people fixing these issues by twisting wires, using resistors, or ferrite beads.  Perhaps my workstation has less electronic noise, but I haven’t had to do any of these things.  Then again, perhaps my prints suffer from a certain degree of noise?
  3. Printing large objects is hard without a heated build plate.  [WAOE notes this isn’t an issue if you’re good at soldering]. Totally true for ABS, but not PLA.4  However, this is really a problem with the print media – not with the printer, right?  ABS will warp as it cools, unfortunate but true.  I’ve had less warping problems in warm weather or during with a second print – basically when the build platform is already warmed up.  Zaggo’s printruder is one of the largest things I’ve printed.  Interestingly, his design takes into account that certain parts are expected to warp. 5  Or check out Clothbot’s train track – it was designed with a lattice/correlated bottom to prevent warp problems.  Plastic warps – but with careful and thoughtful designing, this shouldn’t be a limitation.
  4. The heated build platform is difficult to build and requires a relay kit. [WAOE notes this isn’t an issue if you’re good at soldering]. I can’t dispute either point.  I just got both and haven’t had a chance to assemble them yet.  I’m assuming the heated build platform, which requires SMT soldering, will be challenging.  Frankly, fear of SMT soldering was the big reason why I didn’t jump into buying a MakerBot sooner. 6  The MakerBot HBP is just one option for a heated platform – there’s several others out there.  Don’t like SMT soldering?  Try out Rick’s platform over at MakerGear.  More into DIY?  Well, use the plans posted for any of several other variations.  As for the relay kit – it’s not a requirement – but it will prevent MOFSETs from burning out on your extruder motherboard7
  5. Calibrating Skeinforge is hard.  [WAOE notes this is still an issue]. I like to use the word, “challenging.”  A better way to look at MakerBot calibration is that you get out of it what you put into it.  I have my MakerBot tuned to the point that I get reasonably good looking durable parts.  Sure, I could spend more time and get even better looking parts.  However, once I got it printing reliably I was much more interested in printing new things than refining the printing process.  I’ll get around to improving the print quality even more – but I’m having too much fun right now.
  6. The Plastruder MK4 feed system is unreliable. [WAOE expects the new MK5 Plastruder will resolve this issue]. Getting the tension on the MK4 idler wheel is just one of those aspects of my MakerBot I had to experiment with and get just right.  I’ve been printing reliably for eight months using the same idler wheel and gear.  With proper maintenance, flossing the extruder, and clearing chips out of the extruder the current setup is serving me well.
  7. The threaded rods are of poor quality. [WAOE are getting new threaded rods, which should fix their problem.]. Of my four threaded rods, one is definitely warped and two have very minor warps.  By experimenting, rotating them just so, and printing a few wobble arrestors I’ve eliminated most of these issues.  You can definitely get more expensive and straighter threaded rods and improve your build quality.

A MakerBot Cupcake CNC kit is not for everyone – but the kit can be build and operated by anyone who is willing to invest the time to do so.  It is a cheap, hackable machine that is literally going to be just as useful as you make it.  Want less warpage, higher resolution, more reliable extrusion?  You can buy an upgrade, build one from their plans, or design your own solution. 8  Want a CNC mill, CNC pencil, or CNC music box?  Design the very first one!  Then again, you don’t have to do any of these things.

A MakerBot kit is just a platform for your creativity.  It’s just that big. 9

As for you, WAOE, if you want some help – drop me a line!
  1. If I had an acceptance speech, I’d go on and on while the music played. []
  2. My first successful print was on 12/31/2009. []
  3. Don’t get me wrong – I love my MakerBot, but I readily acknowledge its limitations. []
  4. From what I heard.  :)  []
  5. It was designed before availability or widespread use of heated build platforms. []
  6. Well, that and a little thing called “money.” []
  7. Did I get that part right? []
  8. I haven’t installed a single non-printed upgrade. []
  9. Or that small.  :)  []

MakerBot Cyclops scanner, and 3D scanner alternatives

Looks like MakerBot has been quite busy on the wiki of late.  Clothbot just pointed out a new section on their wiki devoted to documentation for a 3D scanner called “Cyclops.”  From the documentation they system appears to work by projecting a series of stripes onto the subject.  An iPhone or similar camera then captures video of the object, and software extrapolates the size and shape of the object by detecting how and where the stripes fall on the object.  From a cursory reading of the wiki, it looks like Cyclops is essentially a lasercut wood framework for mounting the camera and pico projector – with all the heavy lifting being done by software.

Nearly a year ago I saw a video for Qi Pan’s student project, called ProFORMA, where a simple webcam was used, without the need for lasers, special backgrounds, or projected stripes, to capture video and extrapolate a point cloud to create a 3D image of a physical object.  Qi Pan’s page on the Cambridge website explains much more about the process and developments since it’s publication.  (Spoiler:  He uses math.)  The video showing the video capture and scan along with some wicked augmented reality effects.

Ever since seeing the demo video (See below), I’ve been hoping a MakerBot 3D scanner would use this software engine.  Apparently the only additional piece of hardware it would require would be just the webcam.  On a slightly related note…  a while ago I wanted to run my MakerBot in the other room but was too lazy to want to run back and forth to monitor it.  Solution?  I grabbed a webcam and clipped it to the Z axis platform.  I could now watch the XY platform zip around as it printed.

Unfortunately, there’s been almost no discussion of ProFORMA since November of 2009.

However, I did notice a similar product called Vi3Dim.  It appears to work similarly to ProFORMA – except that it requires a black and white checker pattern underneath the object to be scanned. 1 I was expecting it to be $529.99 or something, but it turns out that the software has a free demo and a full version for $20.  At that price, you really could have a MakerBot webcam 3D scanner on the cheap right now.  I haven’t tried it out yet, but their website says it can scan and export to a 3DS file, a fairly universal format.  The demo is almost as impressive as the ProFORMA video.  :)

What I like about both the ProFORMA and Vi3Dim scanners is that they:

  • Don’t require a steady rotation as with many of the open source 3D scanners out there
  • Don’t require a laser
  • Don’t require a special setup, beyond a black and white printed sheet or, in the case of the ProFORMA, nothing
  • Don’t need milk
  1. Fortunately, that checker pattern can be downloaded and printed from their website. []

Why should you buy a MakerBot sooner, rather than later?

A fair number of people I polled are waiting to buy MakerBots not because of money, but because they are waiting for the technology to mature.1  Is this you too?

If so, let me ask you this – would you be willing to spend $235 right now to play with a current “immature” technology MakerBot for an entire year before buying a full price MakerBot that’s more “mature” next year?

If you said yes, you need to buy a MakerBot today.

I bought my Batch 9 MakerBot in late November 2009.  In the nearly 10 months since then MakerBot has come out with a $50 heated build platform and the brand spanking new 2  more reliable $185 Plastruder MK53  The only “difference” between my MakerBot and one you buy today with all the upgrades is that I got to play and experiment with a MakerBot for 8 full months more than you for an extra $235.  On top of that, I have all the parts for a complete Plastruder MK44

$235 is a small price to play with a MakerBot for nearly a year.5 6 7

  1. Not to mention a small percentage of people whose parents were killed by awesome robots… []
  2. As in released about 11 hours ago! []
  3. I’m not counting the MK5 Drive Gear Upgrade Kit because that MK5 Gear is included in the Plastruder MK5 kit. []
  4. This way, if any part of the MK5 fails, just drop the MK4 back in! []
  5. Not to mention having a Plastruder MK4 on standby. []
  6. That’s a $125 value FREE!!!  That’s right – FREE!!! Order now and we’ll throw in these high tech atmospheric pocket buffer equipment safety enclosures FREE!  That’s right – FREE!!! Just pay shipping and handling! []
  7. High tech atmospheric pocket buffer equipment safety enclosures is bubble wrap. []

Plastruder MK5, now with 85% less heartache!

Of all the bits to get working on my MakerBot, the Plastruder MK4 was the most challenging.  There were so many ways for some critical component of the Plastruder to go wrong.  You could:

  • Cut the wrong length or resistance of nichrome wire
  • A small patch of nichrome fiberglass insulation is scratched off, creating a short
  • The nichrome is not wound close enough to the barrel, requiring extra power to heat
  • There’s too much space between the barrel and nozzle, creating a gap where plastic and build up and cause a blockage
  • Heat can travel up the barrel and plastic can ooze up the threads
  • Heat can travel up the barrel, plastic can pool and then cool causing a blockage, bulge the PTFE
  • The thermistor can burn out or short out
  • Heat can cause the thermistor or nichrome to become unsoldered or lose connectivity

From the description of the new Plastruder MK5, it sounds like the improved designs solve all of the above potential problems!

Update: Beak90 offered several other possibilities!

  • one could not heat it up enough and strip the PTFE threads.
  • one could heat it too much and cause the PTFE threads to fail.
  • one could put the thermistor in the wrong place and have it read the wrong temp.
  • one could wind the nichrome in 2 layers and have it not heat enough.
  • one could tighten the nut on the barrel too much and cause extra stress on the PTFE causing it too fail.
  • one could forget to say the required magical incantations before firing up the plastruder causing everything to fail.

And, one more I just thought of:

  • Fail to play Daft Punk

Plastruder MK5 plans released!

The plans for the Plastruder MK6 look downright wicked

The plans for the Plastruder MK6 look downright wicked

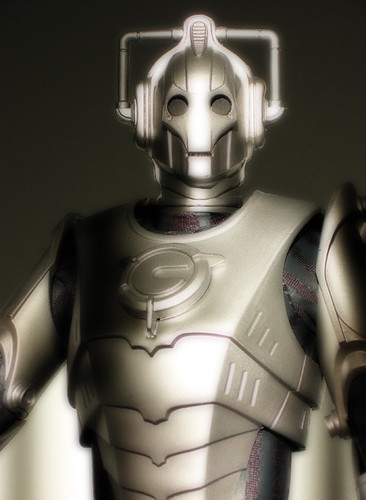
MakerBot just released the photostream and wiki instructions for the Plastruder MK5. 1 This looks like a total overhaul of their original designs. 2

It is based on Charles Pax’s Paxtruder which has such a small form factor that it is possible to squeeze two extruder heads into one Makerbot.  The Paxtruder also uses a delrin plunger which is used to push the filament against the extruder pulley, rather than the previous idler wheel design.  I like the delrin plunger idea since it would be a lot easier to adjust tension and remove/insert filament.  The idler wheel held in by a large bolt and nut works… but is finicky and sometimes prone to fussiness.

Out are the big/small/weird and whimsical dinos in favor of lasercut acrylic “arches.”  There may be a benefit to the arches over the dinos, but I’m not sure what it would be.

The entire heater element and extruder head has been redesigned as well.  I don’t recall seeing any published designs which reference this new system.  We’ve all seen power resistors in use in RepRap/MakerBot projects – but they’ve usually been relegated to heated build platform designs.  Now a pair are being used as the full heating element in place of tempermental3 nichrome wire.  The problem with the old nichrome wire wrapped around the barrel system is that if you need to rebuild the heater, you’ve got to toss out the old nichrome since the insulation is going to get peeled off as soon as you pull it off the barrel.

The new MK5 system uses a PTFE sleeve to feed the filament down into the heater.  Interestingly, the PTFE sleeve is encased in a snug metal tube which should prevent any bulging problems.

My understanding of the instructions is that the MK5 is far less prone to failure than the previous MK4 model Plastruder.  I’ll grant the Plastruder is easily the most4  challenging component of the Makerbot to get working.

The instructions also hint at Generation 4 electronics.  Right now I’m rockin’ the Gen 3 which have served me quite well.  I wonder what the Gen 4 has in store?  One thing I have to really like about the electronics is that I know they’ll never really be obsolete. 5  If I wanted to upgrade to Gen 4, I can always print off a Mini-Mendel or Mendel, and swap in the new electronics.

However, if this new system is as resilient as the instructions describe, I’m on board.  I’m probably not going to have a good excuse to test out this new Plastruder design for a while since my Plastruder has been behaving itself since the last time I rebuilt my Plastruder and I just scored some spare MK4 parts6

  1. Photo courtesy of Johnson Cameraface []
  2. A close tie for the photo was “Number 5 is alive!” a la Johnny 5 from Short Circuit.  I’m just too much of a Doctor Who fanboy to NOT use an “You will be upgraded” joke. []
  3. Pun intended!!! []
  4. Dang.  I’ve already used temperamental, finicky, and fussy…  Where’s my thesaurus?  Oh, that’s right – he’s out EATING Tony Buser’s Laser Dinosaur! []
  5. Bite me Cybermen! []
  6. Thanks again guys! []

MakerBlock’s MakerBot setup

I’ve posted about other people’s MakerBot work space set ups,1 but not much about my own yet.

Right now there’s a bunch of junk2 in the way so no pictures of the setup for now.  My MakerBot – “Bender,” a laptop3 , and a large long cardboard box with a wooden dowel running the length with badly cut cardboard spools holding what was once a 5 pound coil of black ABS4 , a very nearly 5 pound coil of clear PLA5 , and a full pound of white ABS I’ve never used. 678

All of this resides in our living room on an enormous former-library card catalog.  For those of you youngsters out there, a library card catalog is the kind of thing you see in the background scenes of Warehouse 13.  Imagine a huge chest about four feet tall that has lots of small, deep, drawers.  It is what libraries used to use to store information about their collections – an analog database.  Frankly, I didn’t realize the one I bought was quite so large. 9  It’s literally big enough for about six identical MakerBot/laptop/plastic coil setups to the one I have. 10  The drawers beneath the area where my Makerbot resides are devoted to tools and spare parts.  Right now the surface is covered in a number of unfinished projects and some totally finished projects.

Library card catalogs are super handy and useful ways to incorporate storage and a raised level surface for working.  The only problem is that these things are absolutely enormous and way way heavier than they look.

  1. Mattpr’s MakerBot cart , Tony Buser’s “Tea” #481 []
  2. FYI, junk = stuff waiting to be made into other, more useful or more amusing stuff. []
  3. Named Bleys, if you must know. []
  4. I would guess I’ve used about a pound over the last 8 months.  5 pounds is a LOT of plastic.  Dear faithful ABS, oh how I love thee… []
  5. Polly!!!!!!!!! []
  6. Though, I have very specific and immediate plans for it. []
  7. More on this later if you remind me.  I have a tendency to get lost in nested footnotes and parenthetical references. []
  8. Seriously, just imagine what my PHP code looks like.  Yikes! []
  9. Or far away.  Or would become so expensive.  That’s a story unto itself. []
  10. I best get printing more MakerBots, no?  Hmm…  I might have to print more laptops too… []

Anticipation

I remember waiting for the letter which would tell me whether I got into grad school.  Once you send off your application, it’s out of your hands and just need to be patient.  I was waiting to find out if I would get the small envelope1 or the large envelope.2

I hadn’t thought about the small/large envelope anticipation for a while now.  I was only really reminded when I recently applied for a job.  I saw the posting about 8pm or so and stayed up way later than I’d like to admit writing up my application.

Of course, I had to follow up my application with a post about dinosaurs and lasers…  Both of which I happen to just have lying around here at MakerBlock headquarters. 3

Will I get the small or large envelope???

  1. Boo!!! []
  2. Yay!!! []
  3. aka my living room []

Thank you MakerBot!!!

Fluorescent red ABS and spare parts kit!

Fluorescent red ABS and spare parts kit!

Thanks to the generosity of my family I placed an order for a bunch of the MakerBot1 parts for which I’ve been pining away.  Ordered on August 10th, the box arrived on August 16th.  One of the things ordered was the MegaRainbow ABS plastic pack.

However, the box contained something else – fluorescent red ABS and a spare parts kit!

Thank you MakerBot Industries!!!  I have, indeed, had a happy birthday.  :) 2 I promise to only use these parts for good. 34

  1. And MakerGear! []
  2. I would have posted this a lot sooner, but it’s been a crazy busy week. []
  3. As for the black ABS that came with my Deluxe Kit I’m sorry to say that I cannot make similar promises…  that stuff just has a life of it’s own. []
  4. Is it an EVIL Rubik’s cube? []