Is a lasercutter for me?

After consideration, maybe not.  Following Maker Faire Bay Area 2011 I was again prompted to investigate the feasibility of a lasercutter.  Now, I don’t have any great big grand plans for one – I just think it would be awesome to have one and I would be able to think of some pretty sweet uses for it if I had one lying around.

In any case, from what I can see there are some small and very professional looking fully assembled models starting around $8000. 1  As a hobbyist with no actual plans for immediate use of a lasercutter, this is way way too much for random projects.

I’ve seen a few websites that purport to have models for around $2,500 or so with kit options starting around $1800.  The way I look at it, there’s not a lot that can go wrong with a 3D printer.  A laser on the other hand…  could blind, burn, and cut from an arbitrary distance.  Besides, if a company can’t put together a simple WordPress website, I’m hesitant to drop thousands of dollars on their product. 2

There’s also two DIY options – the open source BuildLog.net and the promised-to-be-open-source Lasersaur.  It’s not exactly fair to criticize them for incomplete documentation.  BuildLog.net appears to be a collection of people documenting their laser cutter builds and aren’t advertising themselves as a complete tutorial.  Lasersaur started off as a very popular Kickstarter project but their site was almost devoid of information or developments until they re-surfaced at Maker Faire Bay Area 2011.  Going through the Lasersaur’s bill of materials I stopped tallying the cost once it hit $4,000.00.  At that point, it probably doesn’t make sense for me to try building my own.

For the time being, I don’t think I’m going to invest in a lasercutter, DIY kit, or open source project.  Besides, there are plenty of places in the Bay Area nearby I could have something cut or rent time on a machine.  If there was a project for up to, say, $2500 and had really great documentation, I might reconsider – but I don’t see that happening soon.

 

  1. I was thinking of the lowest Epilog model and one referred to as a “Turnkey Laser Business.” []
  2. And, really guys, come on. []

DIY laser cutting

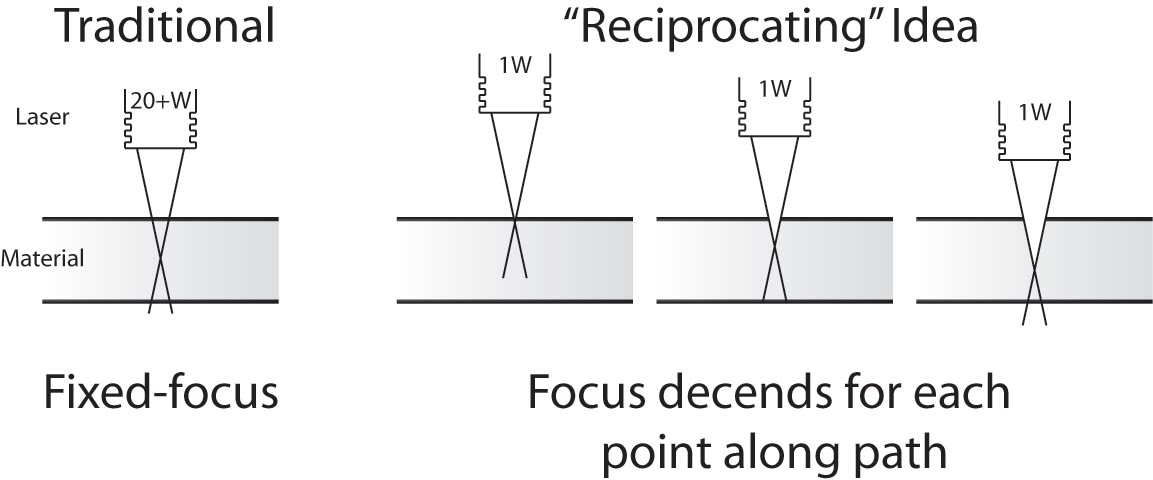
Peter Jansen's reciprocating laser concept

Peter Jansen's reciprocating laser concept

Peter Jansen’s latest post about selective laser sintering (SLS) is nothing short of amazing.  Most of his posts on the RepRap Builders blog posts deal with his adventures and research into SLS fabrication – basically directing a laser over a bed of powder to fuse powder in successive layers into a 3D object.  Since the object is being created in a bed of powder and any new layer is supported by the powder above it, the powder print media becomes it’s own support material.

His latest post diverges from his adventures with SLS 3D printing and details his efforts at building a DIY laser cutter.  His idea is for a “reciprocating laser” which would change the focal length or the height of the laser above the material being cut.  Peter points out that commercial high power laser cutters essentially brute force burn through the entire depth of the material to be cut.  They’re so powerful that it doesn’t matter that the laser is out of focus and “cooler” at different depths.

He has demonstrated a proof of concept using much lower power laser to cut material by lowering a much lower power laser as it cuts material.  The downside is that the lower power laser requires a much longer time to burn through the material – having to hit the same area several times at different depths to cut all the way through.  His proof of concept setup was about the size of a CD/DVD drive – since CD/DVD drives, motors, and housing provided most of his building materials.  So far he’s been able to burn through most of two CD case backs – about 2mm together.  He’s hoping to push it to cut thicknesses up to 3.0mm to 4.5mm.

The incredibly small size of his setup means that it can only very small pieces of material.  However, this gave me two ideas:

  1. If the low power lasers are so cheap, why not install multiple lasers at different focal lengths?
  2. If the entire setup is that small, what about making the entire setup mobile? 1  Think hexapod CNC mill.  If a laser cutter wheeled or hexapod robot was as small as a CD drive, you could conceivably just take out a large sheet of acrylic or thin plywood, set the robot in the dead center, and let it go. 2
  1. This reminds me of one of my favorite sayings.  “If Mohammed won’t go to the mountain, the mountain must come to Mohammed.” []
  2. The robot could stay oriented in any number of ways.  You could draw a grid on the material, the material could have a thin paper coating with LeapFrog style micro-dots that told the robot it’s location, you could project a grid onto the material with light or guide it with another laser like a laser guided missile. []

New MakerBot upgrade!

This most recent Z-Woggle arrester/eliminator is one of the most interesting.  Unlike the super-fantastic Z axis crank, this part does more than just make the MakerBot easier to use – it will almost certainly improve the quality of your prints.  Also, unlike it’s predecessors it does not require the installation of a second set of Z axis rods.

It’s pretty amazing how quickly upgrade parts can evolve.  The first version of this upgrade was posted on April 7, 2010 and this pretty nifty version was posted on May 10, 2010.

Another thing I like about this part is it easily made with a 3D printer, but much more difficult to manage with just a laser cutter.

One possible issue I could see with this part is that it may cost you a slight bit of Z axis resolution.  Since the part doesn’t appear to fit snugly in the Z stage, the Z axis rod will have to rotate a little before it will “catch.”  (Or, so I suspect).

Who needs lasercut acrylic when you have a MakerBot?

Printable extruder and now printable dinos!  I had tried my hand at printable dinos, but I’m not in Zaggo’s league.  While my designs were for printable dinos that could be as a single piece each, his are clearly more elegant and use much less plastic.

What’s interesting about the differences between our designs is that mine were based on trying to replicate the existing dinos in a printable manner.  However, the dinos themselves were designed based upon the constraints of having to design three dimensional parts by layering and fitting lasercut acrylic pieces.  The question I completely failed to answer, and which Zaggo addressed perfectly, is “How would you redesign this object if you only had to be concerned with the constraints of a MakerBot, not a laser cutter?”

If you aren’t constrained by having to assemble lasercut parts, why not print them in such a way that it uses less plastic?  Why not print them on their sides?  Even with a non-heated platform it should be trivial to get the bottom of these dinos flat.  If anything warps it will be the parts that hold up the extruder.  And even then the warp would only serve to keep a tight fit on the extruder by squeezing it together.

If you examine a plastruder you can see the filament and heater assembly are not perfectly centered within the unit.  My guess is that’s  why there are two dinos – one which reaches towards the center.  However, there’s no reason a printruder couldn’t be designed so that the heater assembly was in the middle of the printruder.  If this were the case you could just print up two sets of printable dinos – instead of a left/right or big/weird combo.  Zaggo’s design allows for supporting either a printruder or a layered lasercut acrylic plastruder.

And we’re one step closer to a printable MakerBot!