
Awesome Paper Mache Hats
A few weeks ago a friend of mine had a “bad movie night” where he was showing the film “Sharknado.” Inspired by the theme for the party, I decided I had to wear a shark hat for the event. After making my hat, my daughter requested a monkey hat. This was not a request I could refuse.
I took pictures of the process to show you how you can make your own. I haven’t ever tried to make paper mache hats before, so this was not only a lot of fun – but a great learning experience. While I own the really great paper mache monster books by Dan Reeder, I only used them for inspiration and tried out a few new things on my own.
Even though I used this process to make hats, the directions here could easily be adapted to making anything out of paper mache.

All the things you need to make your own awesome paper mache anything
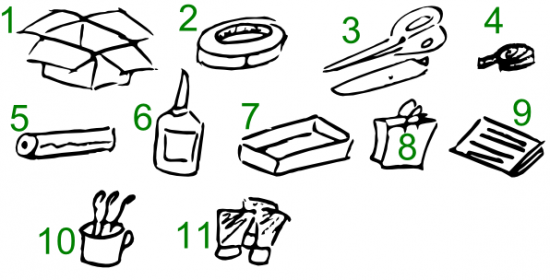
Here’s what you need to get started:
- Cardboard Boxes. Cardboard forms the “skeleton” of the structure. It’s cheap, ubiquitous, sturdy, and easy to cut and form.
- Masking Tape. Once the cardboard has been cut, liberal use of masking tape will keep your creation together until it can be covered with paper mache.
- Scissors and Utility Knife. Scissors can be very helpful in cutting cardboard or paper. While scissors can be helpful, and appropriate for kids, I find a utility knife gets the job done faster.
- Measuring Tape. If you’re not making a hat (or other apparel or armor) you won’t need this. But it is helpful when making measurements. ((In a pinch, you could just use a piece of yarn or string to mark lengths, and then put the yarn on the cardboard for reference.))
- Plastic Wrap. Whether you’re working with gluey paper or paint, the process is messy. I would recommend covering the work surface with plastic wrap. I happened to have a really large plastic bag, which I taped directly to the table.
- Glue. I just used a big bottle of Elmer’s white glue from the hardware store, but I’m pretty sure wood glue would have worked as well, if not better. It’s also more versatile and sturdy.
- Plastic Tray. The next time you get take-out or have a plastic liner from inside some packaging, save it. It makes a great wide tray for mixing water and glue or when your project is dry, it is also great for mixing paints.
- Paper Grocery Bags. The “twist” with this process is that I used torn up grocery bags, rather than the traditional newspaper. It turned out this was a really good idea for a number of reasons. Paper bags are a cheap and plentiful material. When thoroughly wet strips of paper bags are easy to place, mold and shape. However, the most important features of paper bags is that they hold glue and water really well and then dry quickly into a sturdy hard shell. In fact, they form such a sturdy surface that I only had to do a single layer of paper mache around the entire hat. This means that you can quickly put down a single layer of paper bag strips all over your cardboard form, wait a few hours for it to dry, and then get to work finishing the project.
- Paper or Newspaper. While grocery bags work really well to cover your cardboard form, they can leave some small gaps where they overlap. When I found gaps in the project, I simply used a few thin strips of the newsprint style paper to cover the holes and smooth out spots on the rough paper bag layer.
- Cup of Water and Paintbrushes. An old mug is best and pile of cheap dollar store brushes is probably fine.
- Paints. I prefer acrylic paints. They are cheap, can be diluted with water, easy to mix, they stay wet long enough for you to blend, but not so long that you have to wait days for it to dry. They also clean up well with water.

Process for creating awesome hat
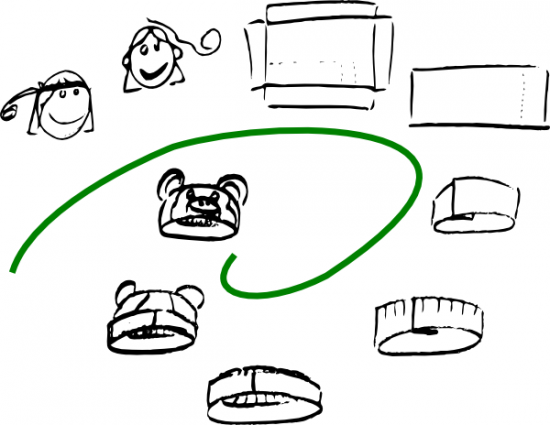
The process I used to create the cardboard forms for the hats was pretty quick and easy. I measured the circumference of my daughter’s head and then the distance from her ears to the top of her head. Using these measurements, I cut out a strip of cardboard as tall as the distance from her ears to the top of her head and as wide as the circumference of her head – with a little extra to allow for overlap.
Measure out a strip of cardboard longer than the circumference of the person’s head and as wide as the distance from their ear to the top of their head
Cut out the strip of cardboard
Cardboard cylinder
In the pictures above you can see the strip of cardboard cut out and then taped into a cylinder with the masking tape.
Using scissors or the utility knife, cut about half way down the cylinder about an inch apart or so
Fold down every other strip of cardboard
Fold down the other strips of cardboard and add a liberal amount of masking tape to keep it all in place
Cut strips into the cardboard cylinder, fold them down, and add enough masking tape to mold it into a hat-shape.
3. Step 3: Add Embellishments
If you want to embellish the hat with ears, a shark fin, or anything else, draw it out on cardboard
Cut the forms out of cardboard
Shape the cardboard forms as necessary
Tape the cardboard ears (or fins or whatever else you like) to the hat-shape
A paper mache hat is way more interesting with some kind of embellishment, like ears, shark fins, wings, or whatever else. Here I cut ear shapes out of cardboard, curved them slightly, taped them to hold the curve, and then taped them to the hat. When I made the shark hat, I cut a long slit into the hat through the tape and inserted the shark fin through the underside of the hat. Don’t be afraid to use a lot of tape.
4. Step 4: Prepare the Work Surface, Paper Strips, and Glue Mixture
Spread out some plastic sheeting, plastic wrap, or a large plastic bag to protect the work surface
Get a paper grocery bag
Tear off the handles
Pull the paper bag apart at the seams
Tear the bag into strips
Pour about a tablespoon of white glue into a shallow plastic pan
Add about a half-cup of warm water to the glue – enough that it has the look of milk when you mix it up
Cover the work surface with plastic sheeting. I used a big plastic bag from a helium balloon order from my daughter’s birthday. However, a big garbage bag or plastic wrap would also work well. Paper bags from the grocery store work really well – but there are too thick in places. Tear off the handles and pull the paper bag apart at the seams. You’ll probably need to discard some of the sections where the the paper bag is too thick to use.
Add some glue (I used about a tablespoon) and warm water (about a half cup or so) to the plastic pan. It should look like milk or heavy cream once you’ve mixed it up.
Soak strips of the paper bag in the glue mixture
Cover the cardboard form with the gluey paper bag strips
Keep covering
Why not cover the inside too?
Completely soak the strips of paper bag in the glue mixture. They should be completely soaked all the way through until they’re nearly translucent. Unlike paper mache with thin pieces of newspaper, you won’t need to put layers and layers of paper on the form – just one layer where the pieces overlap a little should work fine. The excess glue from the strips of paper will soak into the cardboard and help make the entire structure sturdy.
5. Step 5: Set Model to Dry, Patch Holes with Paper
Get some newspaper, paper, or newsprint paper
Tear into thin strips
Look for holes or uneven spots in the dried form
Use the newspaper soaked in the gluey mixture to cover holes and smooth wrinkles and warps
Since the cardboard helps soak up the water, the entire structure should dry relatively quickly. I put the shark hat outside in the sun for a few hours and it was ready for painting. Once the hat is dry (or dry enough), you’ll probably notice some holes and gaps from the paper bag strips. Tear up some newsprint paper, soak those in the gluey mixture, and cover and smooth out any defects. Once these pieces dry, the project will be ready to paint!
6. Step 6: Paint to Suit
Painting the monkey head
Painting the face
Paint the back of the head
Paint the face
Done!
The great thing about acrylic paints is that they are so easy to work with. They dry really quickly, so you can paint one side of the model, work on the other side, and then come back to the first side to add details. In any case, just paint the project to suit and you’re done!
Each hat went together really quickly. I put the cardboard form together in about 15 minutes, covered it with the gluey paper bag strips over maybe 30 minutes, let it dry for several hours, and then paint it over the course of maybe an hour.
If you make your own paper mache hat (or other sculpture), let me know in the comments!