Years ago one of my kids had a pirate themed birthday party. I interpreted it as a “space cowboy pirate” and went with a slightly Firefly-meets-Treasure Planet theme. My outfit included a 3D printed telescoping monocle / eyepatch and a katana that collapsed into the handle. I was going to install some Neopixels in the eyepatch / monacle, but ended up just putting more LED’s into other projects. Anyhow, here’s a slightly blurry picture from May of 2016 featuring a print of this steampunk telescoping monocle / eyepatch, a Chromebook, and my MakerBot Replicator 1 Dual extruder in the background.
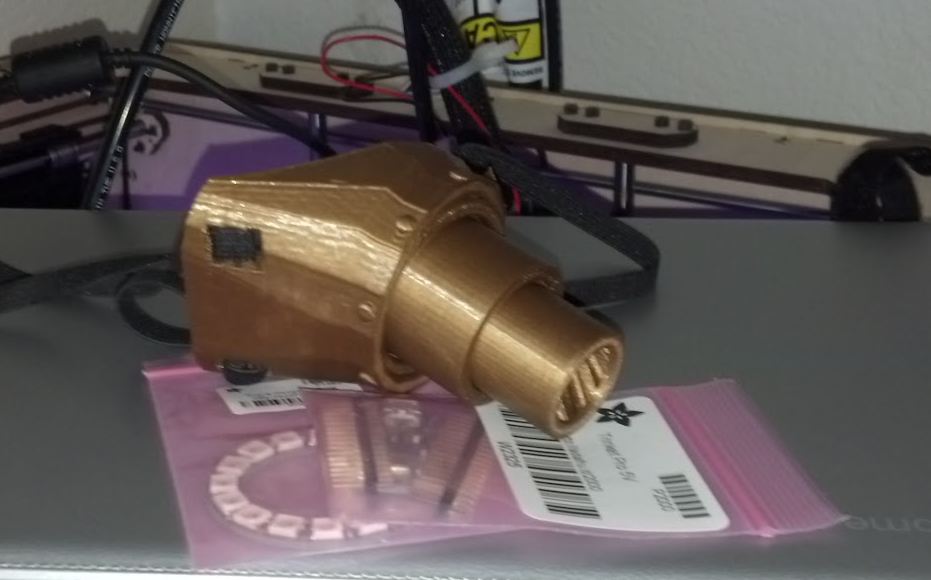
This lead me to trying to track down the files for the monocle which had been originally sized to house a Circuit Playground and a battery, then the telescoping components as well.
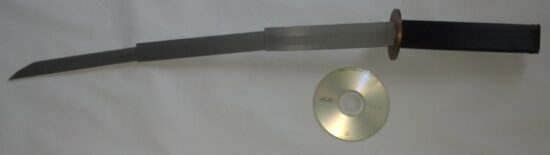
If you look at the bottom edge of the telescoping components, you’ll note several1 angled “teeth” which permitted the tubes to spiral against one another – and that the top interior edge of the tubes are blocked off – creating a stop. As you can see from the image of the assembled monocle, there was enough play between each tube that they would kind of bend downwards. This was probably due to too much space between each tube (probably by only 0.5mm) and too little overlap at the ends (there’s probably only about 2mm overlap). I was also able to track down the katana I designed.
Looking back at all of these things, the collapsing blade segments of the katana, the spiral extension of the monocle, I can’t help thinking that I’ve solved most of the problems inherent in a collapsing light saber design already.
Some other thoughts after letting this project turn over in my noggin:
- The (original) TwistSaber Kickstarter made copious mention of not just a Discord channel, but one of the Instagram videos actually discussed a place where people could discuss assembly, waitlists, the future of the project, etc. Unfortunately, these all seem to be closed off and all the Discord invites posted no longer work. I put in a request to join the <shudder> Facebook group, but this hasn’t been approved yet.2
- The tolerances on these part need to be really dialed in. I don’t know for sure, but I got the sense from the various Reddit posts that some of the parts had very thin overhangs / ledges / latches that could break easily. I could definitely see this happening with thin plastic tubes and tight tolerances.
- The Kickstarter from 11/16/2024 was modest, pulling in a little north of $4k. That’s pretty good for mostly digital goods, but probably not enough to build a whole business. Interestingly, at the launch of TwistSaber2 the creator said “Over 1,000 people now own Twistsaber version 1.” The first Kickstarter had only 116 backers, but they must have had significantly more direct sales through their website afterwards. (Or, perhaps they just manufactured and sold or gave away a lot of those versions)
- I’m glad the creator went all-in on the idea with TwistSaber2. I think it’s great they are focusing on building injection molded polycarbonate blades and metal hilts. 3 The TwistSaber2 is interesting in that it has a ~28.5″ blade design (723.9 mm) which is right in between the first TwistSaber 1 length of ~23.5″ (597 mm) and the first TwistSaber 2 length of ~30.9″ (785 mm). My guess is this new length is probably a decent compromise between production and tooling costs as well as stability when extended.
- I had theorized in a prior post the holes in the base of the TwistSaber core was likely to permit air flow in and out of the blade section, to prevent too much suction or pressure from impeding the function. My guess was that if you did not include these holes, you would be creating something of a vacuum within the extending blade chamber due to the tight tolerances between the blade sections, which would prevent extension. Then, once extended, if you tried to collapse the blade you would be fighting the compression of the air inside. One of the videos I saw4 referred to these same features as “speed holes.” I note the base of each of the blade sections is flat, with a hole through the center for the spiraling core, and holes in that flat section. I’m guessing these are necessary to permit airflow throughout the blade.
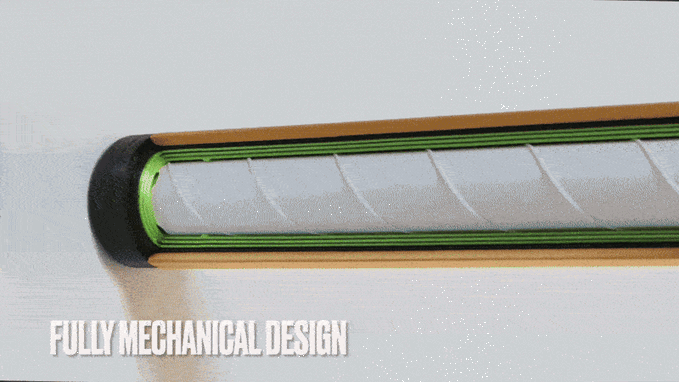
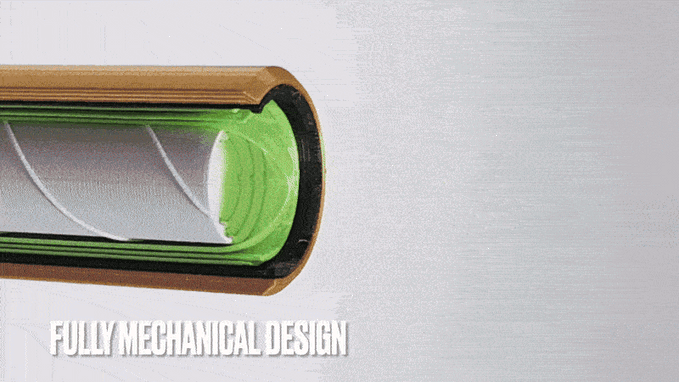
- I really like the new system of a more interesting looking blade core. It has this cool khyber crystal looking
cutout through which you can see the bladesticker which shows the blade color, some faint tracing patterns along the edge, and an interesting new and easier assembly system.
TwistSaber 2 core assembled into hilt - The new assembly procedure seems to be sliding the top half of the hilt onto the blade core, followed by the bottom half which is then secured in place with a screw or bolt. This probably makes more sense than using a twist mechanism just at the very base of the toy.
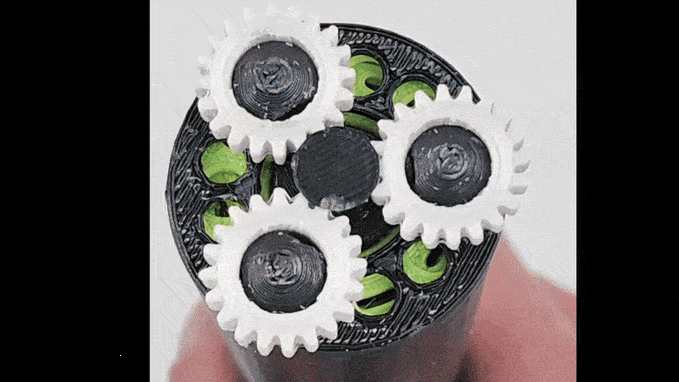
- Obviously for maximum central core rotation and speed, it would be best to maximize the gear differentials between the ring gear to the planetary gear to the sun gear. However, in order to not shear the sun gear off the central core, it is likely advisable to have it a minimum diameter for strength. Thus, perhaps “maximum” rotation isn’t necessary – just a lot of rotation.
- The nice thing about designing with OpenSCAD is that I could reuse much of the knowledge I built into my monocle designs above and even just steal some of my own design code. A twisty core at the center, probably using an OpenSCAD screw thread library, sliding blade outside, planetary gears ideally using double helical gears to increase contact and reduce backlash.
In case anyone is wondering, I have no intention on commercializing these ideas. I just like thinking about neat designs, making cool stuff, I want a cool light saber, and I would rather spend a ridiculous amount of time 3D printing my own than buying a pre-built / mostly pre-built one. Patented or patent pending doesn’t prevent someone from reviewing a patent or reverse engineering an object or even building one or a thousand of something – it just prevents them from profiting from doing so. Since the STL’s for the TwistSaber aren’t likely to be available ever again or any time soon, well, I guess buying the STL’s isn’t an option so…

I’m not quite prepared to really dive into the particulars on the thread sizes, since I don’t have a great sense of the more important design aspects. I suspect the core has an outer diameter of 37.0 mm and an interior diameter of 34.6 mm. I would probably place between 3 to 7 ridges for the the blade and screws to slide. Assuming an outer diameter of 37.0 mm, the circumference of the blade core would be ~116.18 mm. However, we want to fully articulate the blade using only half a turn, so let’s say ~58.09 mm. Now, we know we want the 250 mm blade to move all the way out – but reserve 50 mm for overlap. Thus, each segment only needs to move 200 mm. Each of the blade sections should probably advance at the same speed, so they probably need the same screw pitch. The three blade segments are probably 1.2 mm thick (At least, that’s about what I would choose. I like to use wall thickness of multiples of the nozzle diameter to maximize plastic in a minimum space. With a nozzle diameter of 0.4 mm would give us three walls or a thickness of 1.2 mm. Each blade will probably require 0.3 – 0.5 mm space around all moving parts for each movement. While I feel 0.3 mm is a realistic clearance on all sides for a good printer, let’s use 0.5 for ease of calculation. If the internal diameter of the core is 34.6 mm, the central blade section would be (1.2 mm + 0.5 mm clearance) * (2 sides) * (3 blade sections) = 10.2 mm smaller than the diameter of the largest blade piece 34.6.
If we sketch out a triangle…
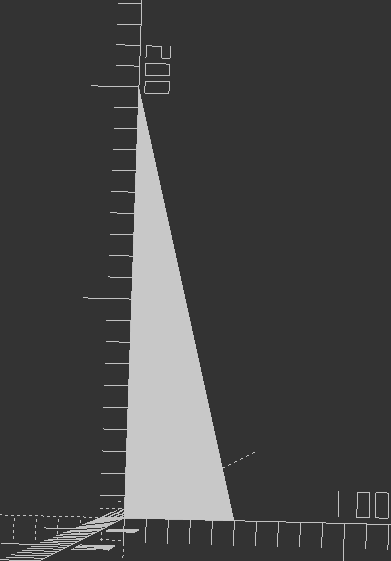
This triangle, wrapped around the interior of the core, should describe the approximate path of the screw thread. This is all just guesswork, but I feel it would be a good starting point to come up with some designs and test models.
DIY Lightsaber Build- TwistSabers
- DIY Lightsaber Thoughts
- Wait, haven’t I worked on this before?!
- Considering the design elements of a DIY light saber
- More Musings on Lightsabers, Mechanical Components
- Slow Progress…
- Capstan Drives as alternatives to Planetary Gears?
- Six total [↩]
- I just don’t get why so many people trust Facebook groups to act as a community or knowledge base. I feel like this was a lesson-learned from the Google Groups shutdown, Myspace shutdown. If you don’t own your community location, like a wiki or a forum, there could be a rug pull at any point. [↩]
- But, even so … damn if I just don’t want to build my own, you know? [↩]
- I watched all of them on YouTube, Instagram, and Tiktok [↩]
 There is probably a sweet spot between enough threads to keep the blade in aligned, but not so many that the extra friction causes the blade to bind.