Maker Faire Application: Vacuum Forming Workshop

DIY Vacuum Formed Arc Reactors

DIY Vacuum Formed Arc Reactors

I’ve been making some notes as I work on my vacuum former and the proposed workshop for this year’s Bay Area Maker Faire.  Here’s some ideas and thoughts, in no particular order.12

  • Workshop Proposal
    • I’ve demonstrated my bucket vacuum former at my daughter’s school a few times – and it is always a huge hit.  The vacuum formed result looks like so much more than the product of very cheap and accessible materials.  Two years ago I put on a presentation at Maker Faire about how to build a vacuum former – and this year I want to try something even more ambitious.  Here’s the slideshow from 2017.

    • I want to do an entire workshop on how to build and operate a vacuum former – and then let people try to vacuum form their own objects.  One of my favorite things to vacuum form is an “Arc Reactor” and then augment it with an RGB flashing LED and a coin cell battery.  However, I think people would also enjoy making goggles and phone cases.  It takes about 30 seconds to heat up the plastic and just seconds to actually vacuum form a shape and let it cool down.

https://www.youtube.com/watch?v=9Prj04gPeLw

This slideshow requires JavaScript.

  • New Developments
    • Several months ago, just before Thanksgiving, our stovetop stopped working.  Yeah.  I know.  Talk about timing, right?  While we scrambled to get a new cooktop ordered, delivered, and installed, we also purchased an inexpensive hot plate from Amazon.  I had originally used an old hand-me-down large toaster oven to heat up the plastic, but wondered … is there a better way?  That toaster oven is huge and takes a long time to heat up.  This weekend I was delighted to learn the hot plate heats up very quickly, gets hot enough to soften the plastic, and works as a fantastic and compact replacement for the toaster oven.
      • There are a few caveats to using the hot plate.
        • The heat was more localized, causing the center of the plastic to become thinner and saggier.  When the plastic plates were heated in the toaster oven, they tended to heat more evenly.  Perhaps if I tried a lower heat setting or held the plastic plate higher, this might be mitigated.
        • It’s hard to get a sense of the plastic without actually watching it get soft and wobbly.  This is especially true when the plate is inside the toaster oven – there’s only room enough for one or two people to see what’s going on.  However, with the hot plate, there’s no enclosure3 to obscure an audience view.
        • I was somewhat paranoid about letting the plastic droop down onto the heating element.  I’m pretty sure it would smelled horrible, made a huge mess, been nearly impossible to clean, and made the hot plate unsuitable for any other purposes.  I may try to locate a cheap hot plate from a second hand / thrift store / goodwill to take to Maker Faire.  Though, now I’m also wondering if it might be possible to repurpose an old coffee maker, grill, griddle, or panini press, into the heater for this project.  Maybe if I covered the heating element in aluminum foil first, that would protect the surface?
      • The power switch of the vacuum head / bucket head is conveniently placed right on top for normal operation.  For unusual operations such as this, where the vacuum is upside down, it is decidedly inconvenient.  I used a power strip with a switch which made it much easier to operate the vacuum.  I think I may invest in a dedicated foot switch extension cord for this project.  It’s a very cheap upgrade that would make it a lot easier to do.
    • I also have a prior post discussing some additional ideas on how to improve this process.
  • Accessories / Things to Bring to Maker Faire.  There are SO many little parts to a project – forget any one little thing and you’re going to be making a last minute trip to the hardware store.4 Here’s a few lists of things I will need:
    • Parts
      • Bucket
      • Vacuum head
      • Hot plate
      • Power strip or foot switch extension cord
      • One or two wire coat hangers
      • 6x Small to medium binder clips
      • Wooden dowel (1x 6″ riser, 3x 8″ legs)
      • 3D printed parts (1x plug, 2x riser caps, 3x leg holders, 3x feet)
      • Hot glue
    • Building Tools
      • Drill (for drilling holes)
      • Ruler and / or paper grid
      • Chisels
      • Hacksaw (cutting the wooden dowels)
      • Hot glue gun
      • Sharpie
    • Presentation Tools
      • Heat gun
      • Scissors (cutting plastic plates)
      • Old socks (DIY oven mitts)
    • Materials
      • Examples of plastic plates in various stages of the process
      • Examples of items made, also in various stages of production
    • Consumables
      • Plastic plates
      • Tape (clear packing tape works well)
      • Fishing line
      • Elastic cord
      • Pens (metallic permanent markers)
      • LED’s
      • Batteries
      • Maybe stickers to give away?
Bucket Vacuum Former
  1. How to Make a Vacuum Former
  2. How to Use a Vacuum Former
  3. Vacuum Former – Things to Form
  4. Vacuum Former – Ideas to Improve Vacuum Former
  5. Maker Faire 2017 How to Make a Vacuum Former Presentation Slides
  6. Vacuum Forming an Arc Reactor
  7. Maker Faire Application: Vacuum Forming Workshop
  1. As always, as much to inform you, dear reader, as to order my own thinking and jot things down before I forget them []
  2. DOCUMENT!!! []
  3. And, now that I think of it, it may be the enclosure which causes more even heating… []
  4. Not that this is a bad thing.  But, I’d rather have to go because I want to do go []

Vacuum Forming an Arc Reactor

https://www.youtube.com/watch?v=9Prj04gPeLw

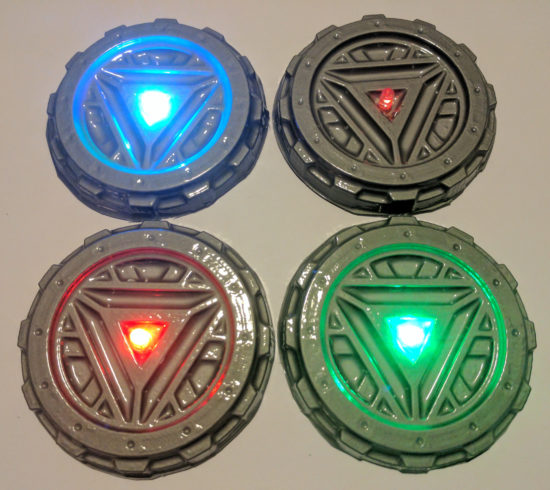
If you see me at Maker Faire this weekend, you will likely catch me wearing my vacuum formed goggles and arc reactor.  I was inspired by my vacuum former and this awesome Instructable by dgrover.

Once you have everything set up, this neat little “arc reactor” only uses about 50¢ of materials and doesn’t require any special soldering skillz.1 Here’s how you make your own:

This slideshow requires JavaScript.

  1. Make the form
    1. I specifically bought a stack of silver plastic plates for this project.  50 plates for $10 was a pretty good deal. ((In case you care, I use affiliate links))
    2. You could use dgrover’s lasercut files or design your own model.  I designed my own, based on their designs and added 10 degrees of draft to the edges to help it release from the mold.
    3. You’ll also notice lots of little holes in the nooks and crannies of the model.  Those serve a dual purpose of allowing the vacuum to pull the plastic down into those parts and then letting air in when you’re ready to release the 3D printed part.

    This slideshow requires JavaScript.

  2. Add the LED and Battery
    1. Gather the tools and materials
      1. 5mm fast flashing RGB LED ($7 for 100 LED’s!)
      2. 3V Coin Cell battery, CR2032 ($25 for 100 batteries!)
      3. Push pin
      4. Optional: Hot glue gun and glue
    2. Poke two small holes in the center of the form for the LED leads.
    3. Push the LED through the holes.  I would recommend adding a drop of hot glue just under the LED moments before you pull it against the vacuum formed part.  This will help keep it in place.
    4. Bend the two leads as shown just using your fingers.  Notice the bottom lead is bent roughly 90 degrees and the top lead is curved.
    5. Add the battery.  The LED is polarized, so it will only light up when the battery is properly connected.  So, just put the battery in, then flip it over if it doesn’t light up.  :)
DIY Vacuum Formed Arc Reactors

DIY Vacuum Formed Arc Reactors

I really couldn’t be happier with the results.  It looks way more impressive than the 57¢ worth of materials would suggest.

Bucket Vacuum Former
  1. How to Make a Vacuum Former
  2. How to Use a Vacuum Former
  3. Vacuum Former – Things to Form
  4. Vacuum Former – Ideas to Improve Vacuum Former
  5. Maker Faire 2017 How to Make a Vacuum Former Presentation Slides
  6. Vacuum Forming an Arc Reactor
  7. Maker Faire Application: Vacuum Forming Workshop
  1. You could easily adapt these instructions to add some sweet LED color changing lighting to any other project []

Maker Faire 2017 How to Make a Vacuum Former Presentation Slides


In case you missed me at Maker Faire Bay Area 2017 this year, here are my slides!  Don’t forget to check out all the blog posts with even more detail and pictures.  You can find all the links, including to the 3D printable files, below.

Bucket Vacuum Former
  1. How to Make a Vacuum Former
  2. How to Use a Vacuum Former
  3. Vacuum Former – Things to Form
  4. Vacuum Former – Ideas to Improve Vacuum Former
  5. Maker Faire 2017 How to Make a Vacuum Former Presentation Slides
  6. Vacuum Forming an Arc Reactor
  7. Maker Faire Application: Vacuum Forming Workshop

Vacuum Former – Ideas to Improve Vacuum Former

This is less a post and more about just brainstorming some ideas about how to improve my vacuum formed objects:

  • Main holes, plus smaller holes
    • Perhaps additional, smaller, holes in the center of the vacuum former would allow for additional suction and more detail.
  • Taping unused holes
    • My thinking is the most useful holes in the vacuum former are those that are just under and immediately around the objects being formed.  Other holes beyond those immediately around the object are probably something of a waste of suction power.  Perhaps by placing tape over the extra holes, it would apply a greater vacuum force on the plastic immediately over the object, leading to a more detailed form.
  • Rigid top
    • When the vacuum is turned on, it causes the bottom of the bucket (or, rather, the top surface of the vacuum former) to bow in slightly, going concave.  This hasn’t been a big problem for anything I’ve formed thus far, so I’m not that worried about it.
  • Build a dedicated vacuum box
    • There are tons of plans out there for flat boxes with holes on top and a round hole for a vacuum attachment.  There’s no doubt in my mind, that a dedicated flat vacuum box for a vacuum former would work better than the bucket top I’m using.  That said, the bucket setup is working just find for now.  :)
  • Plastic frame holder and/or a dedicated oven mitt
    • I’m still using mini binder clips and a bent coat hanger.  This works just find for my purposes right now.  However, my fingers get pretty toasty as I’m holding the coat hanger.  Right now I’m just using a large sheet of vinyl shower liner to insulate the coat hanger handle and protect my hands (a little) from the heat.  I’m going to pick up an old oven mitt I can dedicate to this project.  It would be nice if I had a better way of holding the plastic than a coat hanger, but it’s the best I have right now and probably better than most ways for holding a circular piece of plastic.
    • Also, as a public service announcement, if you get a chance, pick up a foot wide sheet of the vinyl shower liner.  It’s cheap and you’ll find all kinds of uses for it.
  • Virgin plastic
    • Plastic plates are great because they’re free/cheap depending on how you use or source them.  But, they’ve already been heated, molded and formed.  That means that when you re-heat and re-mold and re-form them, they’ll be more brittle than they used to be.  I haven’t priced out plastic sheets for vacuum forming, but they can’t be that expensive.
  • Better designed forms
    • I managed to design a 3D printable arc reactor with “draft,” so that the molded parts would release easier from the molded plastic.  I used a draft angle of 10 degrees, which seemed to work pretty well but still required a little effort to remove the part from the molded plastic.  However, I think I’ll design my next part with even more draft; perhaps as much as 15 or 20 degrees.
Bucket Vacuum Former
  1. How to Make a Vacuum Former
  2. How to Use a Vacuum Former
  3. Vacuum Former – Things to Form
  4. Vacuum Former – Ideas to Improve Vacuum Former
  5. Maker Faire 2017 How to Make a Vacuum Former Presentation Slides
  6. Vacuum Forming an Arc Reactor
  7. Maker Faire Application: Vacuum Forming Workshop

Vacuum Former – Things to Form

DIY Vacuum Formed Arc Reactors

DIY Vacuum Formed Arc Reactors

Here’s a list of things I’m thinking about vacuum forming:

  • Arc Reactor parts
  • Star Trek communications badge
  • Cell phone case or cell phone stand
  • Hair clip accessories
  • Replacement emblem
  • Goggles
  • Paint or small part tray
  • Molds from play dough, sculpey, or model magic
  • Molds for soap, candy, ice, lollipops, or popsicles
  • Light switch cover, electrical outlet cover
  • Christmas ornaments
  • Lego toy car shells
  • Rocket nose cone and fins
  • “Shrink wrap” parts to make them smoother and/or watertight
Bucket Vacuum Former
  1. How to Make a Vacuum Former
  2. How to Use a Vacuum Former
  3. Vacuum Former – Things to Form
  4. Vacuum Former – Ideas to Improve Vacuum Former
  5. Maker Faire 2017 How to Make a Vacuum Former Presentation Slides
  6. Vacuum Forming an Arc Reactor
  7. Maker Faire Application: Vacuum Forming Workshop

How to Use a Vacuum Former

This is the second post in a short series about vacuum formers.  You can start with the first post about how to make your own inexpensive and easy to use vacuum former or skip to the bottom of this post with a list of all of the posts in this series.

  1. Theory

    This slideshow requires JavaScript.

    1. I discussed the theory behind a vacuum former in the prior post.  This post is really about how to actually use a vacuum former in conjunction with a heat source.
  2. Parts

    This slideshow requires JavaScript.

    1. “Buck”
      1. The things you’re going to create molds of with your vacuum former are called the “bucks.”
    2. Wire coat hanger
      1. The coat hanger will be bent out of shape and won’t be usable for hanging clothes after this.  A coat hanger from your local dry cleaner would do just fine.
      2. The good news is that this is the only thing, besides the consumable plastic plates, that you can’t put back into its ordinary service as soon as you’re done vacuum forming.
    3. 4 or more binder clips
      1. Pretty much any size binder clips would work, as long as they can get around the thick gauge wire of the coat hanger.  I only had four on hand, (which is probably the minimum necessary) but the more the better.  As you heat the plastic, it will contract and deform.  The more clips you have, the more circular you can keep the plastic as you lay it on top of the object.
    4. Oven mitt
      1. I used a cotton oven mitt that has a silicone rubber grip.  This is probably overkill, but better safe than sorry.
      2. Everything you’ll be touching with the oven mitt will be cool to the touch within about a minute of taking it out of the toaster oven.  I’m pretty sure a thin towel which has been folded over several times would work just fine.
    5. Toaster oven
      1. Preferably one that can do small round pizzas.  If you’re out shopping for one, try and find one that will fit the 10″ diameter plastic plates.  You can find a cheap toaster oven for about $30 on Amazon and about $15-20 on Craigslist.  If you’re short of funds, I’m pretty sure garage sales or Goodwill would have a bargain.
      2. Out of an abundance of caution, I was using my toaster oven outside on the off-chance that heating the plastic was giving off some undesirable fumes.  I’m also utilizing a used toaster oven donated by my brother.  I’m pretty sure the process of heating a few pieces of plastic in the toaster oven don’t make it unsafe for cooking food, but again, I’m erring on the side of caution here.
      3. There’s nothing special about the toaster oven; it’s nothing more than a convenient and cheap heat source.  If you were a more daring sort you could probably use your standard kitchen oven.  I suppose in a pinch you could also use a cheap heat gun, but I haven’t tried this yet.
    6. Pliers (Optional)
      1. I got these out to help shape the coat hanger.  In the end, I didn’t use it very much and it probably wasn’t necessary.
  3. Consumables
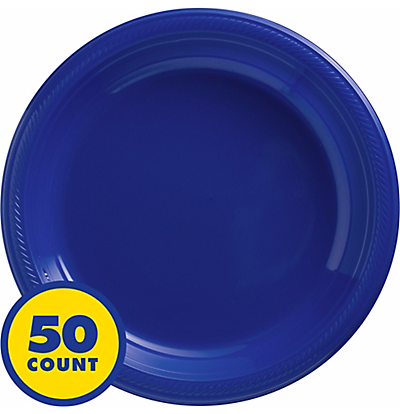
    Round plastic plates, 10 - 1/4"

    Round plastic plates, 10 – 1/4″

    1. Round plastic plates (~10″ diameter, without dividers?)
    2. These are just the bulk plastic plates we had left over from Party City.  Next time I’m there, I’ll check and see just what kind of plastic they’re made of.  Their website suggests they carry plastic plates with diameters from 9″ to 10.25″ to 10.5″.  The plates I had were 10.25″ and they worked out really well.  You can probably find a pack of 50 plates for less than $10.  You might be able to do even better by hitting up a dollar store.
  4. Make the Plate Holder

    This slideshow requires JavaScript.

    1. Using your hands or a pair of pliers, bend the coat hanger as pictured.  The goal is to get it to fit around the underside of the rim of the plate.
  5. Clip the Plate to the Plate Holder

    This slideshow requires JavaScript.

    1. Using four or more small binder clips, clip the coat hanger to the paper plate.  Put two clips on either side of where the coat hanger handle meets the plate.  Put the other two clips approximately 180 degrees from the first two clips.  If you have more than four binder clips, they would be helpful since the plastic will pull away from the frame as it heats up.  (I only had four on hand)
  6. Turn on the Toaster Oven
    1. Remove all the racks, except for the bottom drip tray, from the inside of the toaster oven.
    2. When it’s empty, turn it all the way up.
  7. Ready the Vacuum Former
    1. Set up your vacuum former as close to your heat source as is practicable.  You want to be able to transfer the molten plastic plate to the vacuum former as quickly as possible so that it doesn’t cool down in transit.
  8. Prepare Buck and Turn on Vacuum Former
    Vacuum former at the ready

    Vacuum former at the ready

    1. Organize the bucks (the things you want to mold) on top of the vacuum former, then turn on the vacuum.
    2. You may notice the vacuum pushes or pulls some of the objects out of the way.  Just rearrange them as necessary.  I try to place things so that they’re surrounded by the holes in the top of the vacuum former.
    3. Basically, you want the vacuum pulling on the hot plastic plate, but not sucking air freely from around it.  If the holes in the top of the vacuum former are spaced out way outside the perimeter of the plate, you’ll want to cover those holes up with some tape.  Regular masking tape worked just fine for me.
  9. Heat and Vacuum!

    This slideshow requires JavaScript.

    1. Put on your oven mitt, open the toaster oven, and hold the plate in the oven near the top heating element.
    2. The plates I used went through several physical changes before they were ready.  First they softened a little, then they actually flattened all the way out, then then pulled away from the wire frame, then, finally, the plastic got very droopy.  This whole process took less than a minute with the oven at full power.
    3. Once the plastic is nice and droopy, pull the frame out and place it on top of the vacuum former.
    4. The vacuum should pull the hot plastic around your objects.  After a few seconds the plastic should no longer be flexible and warm.  Once it’s cool, turn off the vacuum.

That’s it!

Bucket Vacuum Former
  1. How to Make a Vacuum Former
  2. How to Use a Vacuum Former
  3. Vacuum Former – Things to Form
  4. Vacuum Former – Ideas to Improve Vacuum Former
  5. Maker Faire 2017 How to Make a Vacuum Former Presentation Slides
  6. Vacuum Forming an Arc Reactor
  7. Maker Faire Application: Vacuum Forming Workshop

How to Make a Vacuum Former

First, a huge thank you to Airship Noir and their Maker Faire Kansas City 2016 project, “Make Your Own Vacuum Formed Steampunk Goggles.”  They were kind enough to post pictures and instructions about how they made an incredibly cheap, but effective, vacuum former.

Inspired by their project, I wanted to pay-it-forward and help others build their own vacuum former.  Here’s how I built mine:

  1. Theory
    1. A “vacuum former” is a device which allows you to create thin plastic molds of objects by heating a sheet of rigid plastic until it is very malleable, placing it over an object, and applying a suction to pull the flexible plastic around the object.
    2. The plastic shell can be used for a variety of purposes such as actual tools, creating reusable molds, or just a simple form fitting shell for another project.
    3. This set of instructions will teach you how to create a suction device for use with a heat source of your choice.
  2. Parts

    This slideshow requires JavaScript.

    1. Home Depot “Bucket Head” ($23)
      1. I had no idea this thing existed until I saw Airship Noir’s post.  It’s basically a vacuum that clamps onto a bucket, turning it into a cheap low-power shop vac.  I believe “Bucket Head” is the Home Depot branding for this, but that you can find alternates under the title of “Power Head.”
    2. 5 Gallon Bucket ($5)
      1. I bought a Home Depot brand bucket for this exact task.  Although I have other 5 gallon buckets, it was worth the $5 to me to make sure I had something that would easily attach and detach from the vacuum top.
    3. 1/2″ wooden dowel, 4′ in length ($2)
      1. My own design uses 3D printed parts, a length of a 1/2″ wooden dowel, and a little hot glue.  However, you can substitute whatever you have on hand.  The Airship Noir vacuum former used wood shims, some nuts and bolts, and PVC pipe.
  3. Tools
    1. Chisel
    2. Drill and 1/8″ drill bit
    3. Hot glue gun / hot glue
    4. Ruler
    5. Pen / pencil
    6. Hacksaw
    7. Sharpie
    8. Masking tape
  4. 3D Print Parts

    This slideshow requires JavaScript.

    1. You can download all the 3D printable parts from Thingiverse.
    2. Print one vacuum cork.  This will just be placed into the vacuum where the hose would normally go.  This will cause the vacuum to suck air through the bottom of the bucket.
    3. Print two dowel caps.  These will go on either end of a short length of wooden dowel, to keep the “float” inside the vacuum from falling into the vacuum.
    4. Print three bucket attachments and three “toes.”  These will be used, with wooden dowels to elevate the bucket off the ground.
    5. Print the PDF of a 1″ grid on paper.  This is actually a 1/2″ grid, with bold lines forming the 1″ grid.  I searched for more information about optimal hole size and placement, but didn’t find anything dispositive.  I think as long as you get close, you’ll be fine.
  5. Cut Wooden Dowels
    1. Use the hacksaw to cut three pieces of wooden dowel to approximately 8″ each.  These will become the feet for the bucket.
    2. Cut a fourth piece of wooden dowel to approximately 6″.  This will be used to keep the vacuum float from falling into the vacuum, when the bucket is turned upside down.
  6. Prepare the Bucket

    This slideshow requires JavaScript.

    1. Turn the bucket upside down and, carefully, use a chisel to remove as much of the raised areas at the bottom of the bucket.  Working slowly and carefully, it took me about 30 minutes to move the rim at the bottom of the bucket and all the little raised areas.
  7. Add Feet to the Bucket

    This slideshow requires JavaScript.

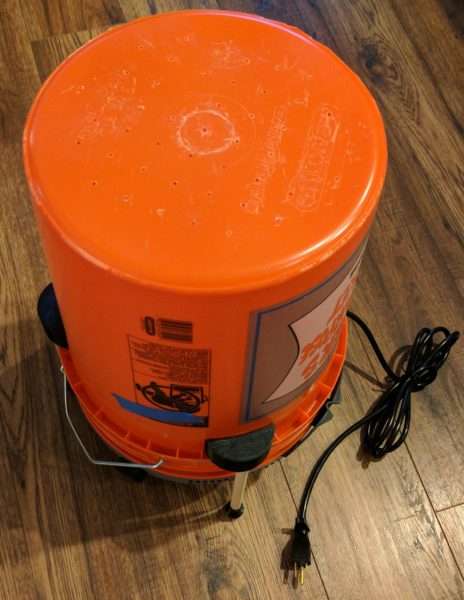
    1. When the “Bucket Head” attachment is on the bucket, the top will be rounded.  However, we’re going to need to turn the entire thing upside down to use the bottom of the bucket as the surface of our vacuum former.  This means we’ll need to raise the vacuum top of the bucket off the ground so that it can stand flat – and so we can access the power switch.
    2. I designed the three bucket attachment parts so that they will slide snugly into the rim under the bucket.  The rim has approximately 24 little fins under the rim.  Place each of the three feet equally around the bucket – approximately 8 fins apart.  Mark the outline of the part on the bucket with a Sharpie, remove the part, add hot glue, and slide the part back into place.
    3. Add a little hot glue to the end of each of the three 8″ wooden dowels, then some hot glue to the inside of the “toes,” then slide the gluey end of the dowel into the feet.  You should end up with three short “drumsticks.”
    4. Don’t glue these into the attachments at the bucket sides.  The attachment and bucket feet parts were designed to be as minimally obtrusive to the function of the bucket as possible.  If placed properly, they shouldn’t interfere with the handle or bucket usage.  The newly formed feet can be placed into the holes in the bucket attachments when you’re ready to start vacuum forming – and placed back inside the bucket for easy storage.
  8. Drill Holes

    This slideshow requires JavaScript.

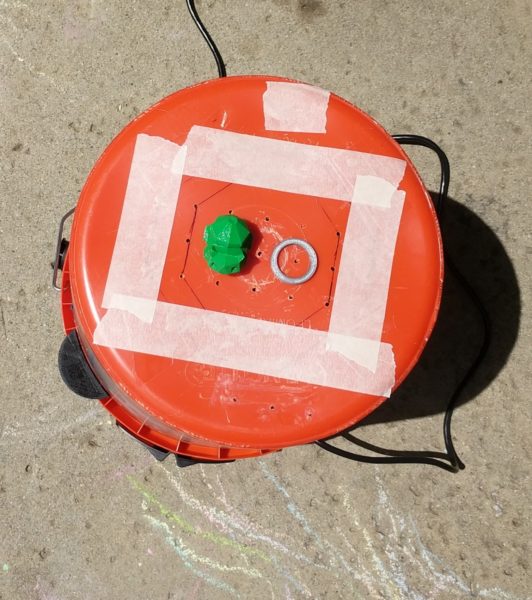
    1. Print the PDF of 1″ ruled grid paper from the Thingiverse page, courtesy of Kent State.  Center the paper on the bucket, then tape it down.
    2. Drill 1/8″ holes 1″ apart along the grid.
    3. A word about these holes.  The more holes you drill, the more holes you might have to cover up when making parts later.  However, the more holes you drill now, the bigger the parts you can make later.  It’s a little bit of a trade off.
    4. Once the holes are drilled, use the chisel to remove the burrs off the bottom of the bucket.  You don’t need to remove the burrs from the inside of the bucket, but I did to keep the inside of the bucket as clean and useful as possible.
  9. Raise the Float

    This slideshow requires JavaScript.

    1. Underneath the vacuum top there is a plastic cage surrounded by the filter, held in place by a big rubber band.  Remove the rubber band and filter and you’ll see a little plastic cup that is designed to act as a “float” inside the cage.  If you turn the vacuum upside down, the float will fall against the vacuum – and would prevent it from working.
    2. Holding the vacuum upright, insert the 6″ length of wooden dowel through the plastic cage and above the float, pushing it against the bottom of the cage.  Use the plastic dowel caps to hold the ends of the dowel in place so it won’t slip out or rattle.
  10. Completed bucket vacuum former!

    Completed bucket vacuum former!

    Put it All Together

    1. Place the Bucket Head on the bucket.  You may need to rotate the Bucket Head slightly to make sure you can insert the feet into the plastic parts glued to the sides of the bucket.
    2. Insert the feet into the holes in the bucket attachment parts.
    3. Invert the bucket and you’re done!

I’ll do another post soon about how to actually use the device.  If you’ve read the Airship Noir post, you know the basic steps are to place things on the bottom of the bucket, heat a plastic plate with a toaster oven, and lower the heated plate over the things you want to mold while the vacuum is one.

Bucket Vacuum Former
  1. How to Make a Vacuum Former
  2. How to Use a Vacuum Former
  3. Vacuum Former – Things to Form
  4. Vacuum Former – Ideas to Improve Vacuum Former
  5. Maker Faire 2017 How to Make a Vacuum Former Presentation Slides
  6. Vacuum Forming an Arc Reactor
  7. Maker Faire Application: Vacuum Forming Workshop