Retractable Measuring Tape – Exploded View

Retractable measuring tape

Retractable measuring tape - exploded view

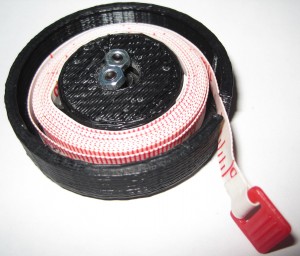
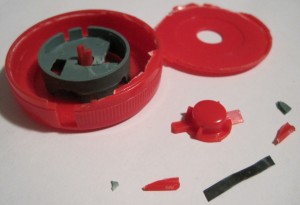
I suppose the title is a bit of misnomer.  There was no actual exploding involved.  What you see to the right are most of the interior parts from my retractable measuring tape.  It had a spring that kept the little red button pushed out – but that disappeared as soon as I opened the plastic shell.

Breakaway multipart prints

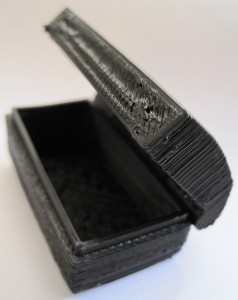
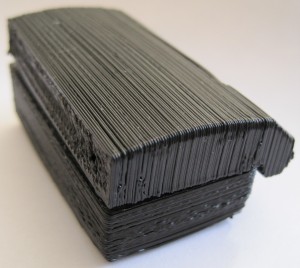
I’ve already said how much I appreciate Zaggo’s designs.  Watching his treasure chest being built on my ‘bot was really really cool.  The hinge pins were printed already inside of the hinge – something made possible by the nature of fused deposition modeling.

While this toy car by kparanya was probably the first captive breakaway multipart print I’ve seen on Thingiverse, I was more inspired by Zaggo’s treasure chest.  :)  It should be possible to print entire geared assemblies using this kind of system.  Admittedly, you’re probably not going to get precision geared parts, but you could probably make a decent toy or rough tool.  Once you start using the piece it should essentially grind out any extra plastic threads.

Anyhow, something to think about.

New Print: Zaggo’s Treasure Chest

Treasure Chest Open

Treasure Chest Open

It’s hard to pick a favorite design from Zaggo.  Some are fantastic upgrades – such as the Z axis crank.  Some are functional – such as his whistle.  But, his treasure chest is a special case.  This design contains two parts which are printed simultaneously – with the hinged lid being printed with the pins inside the hinge.  Just print, pop the lid off of its support pieces, and close the model.

One truly amazing thing about Zaggo’s models are his gcode files.  A gcode file is created when you take the digital image file as an STL (which basically describes the exterior volumes of the model) and feed it into Skeinforge (which creates instructions for the printer to operate the extruder and move the 3 axes).

Although Skeinforge settings are typically considered to be unique to a ‘bot, everything I’ve ever printed using Zaggo’s gcodes has turned out perfectly.

Treasure Chest Closed

Treasure Chest Clos

New Print: Retractable Measuring Tape

A broken measuring tape reel that won’t retract isn’t any more useful than a measuring tape without a reel.  Thus, there was no harm in cracking thing open to see if I could repair it.  Inside I discovered some parts were broken/missing and some parts were lost in the process of delicately opening the case. 1

Measuring tape

Measuring tape

The modeling of these replacement parts was a very different task from prior replacement parts.  As some of the original  parts were either missing or too damaged to examine, I had to design replacements from the working/intact parts I did have.  The best part is that this involved far more creativity than my prior printed replacement parts such as the window latch and toy fire truck swivel.

My fix started off by modeling a new interior metal coil spring holder.  However, the axle from the original plastic part had become so damaged that it was no longer usable.  I had to redesign the exterior piece as well.  Unfortunately, the printed exterior piece had its own spindle which promptly popped right off.  This lead me to use the two bolts/nuts as the axle.  This provides more friction than is ideal – but the entire assembly still works.

I know exactly how I would redesign this with a few additional parts.  If I had a single skate bearing and some longer bolts, I’d build a far more robust version.  As if I needed an excuse to go out and pick up a pile of skate bearings and an assortment of metric bolts/nuts.  :)  Alternatively, I can conceive of a version without a bearing that has a foldable crank similar to the foldable Z axis crank.

  1. Read: jamming a screwdriver into the case and prying apart []

New Print: Darth Vader

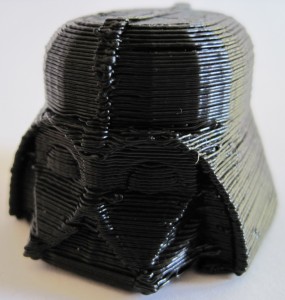
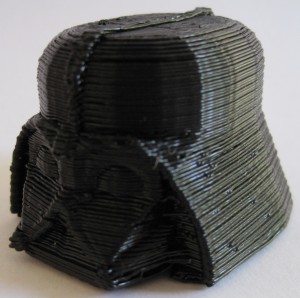
I tried to print Bre’s Darth Vader head but there was either a problem with the STL or my gcode.  When arhimed uploaded a smaller cleaner version of Darth Vader’s head I just had to print it up.  (Just updated to add another picture of this piece).

Darth Vader Head

"I find your lack of faith disturbing."

Darth Vader Head

"The force is strong with this one."

Sweet, no?  Again, this is a pretty extreme close-up.  While there are very minor striations created by a super small Z axis wobble, the model is smooth – nearly silky in texture.

Open Source Interconnecting Building Blocks

I’d really like to see a robust printable open source interconnecting building block system for the MakerBot.  Something than can build large (or small and intricate) rigid structures with moving parts.  So far there’s:

  1. The lazzor-cutable metabrick from metalabs.
  2. Lego compatible laser cut blocks by clothbot
  3. The printable metabrick by wizard23

Of the one printable variety, it doesn’t really lend itself to rigid structures as it uses a round clamp to attach to a round pole.  Don’t get me wrong, it is a very cool piece and I’m really glad someone designed it – it just isn’t what I’m looking for.

I’m wondering if a slot/groove system might work – similar to the system used in Zaggo’s prinstruder or the modular boxes by Domonoky.

Legos versus Construx

As a kid I preferred Construx to Legos.  Construx allowed me to build large objects with moving parts in three dimensions.  Whereas Legos main point was that it came in better colors.

I’ve designed a few Construx pieces I’m looking forward to building.  The only problem is that at least one of them may be too large for me to print with my current set up without significant warping.

MakerBot and Legos

Update 5/26/2011: MakerBots, DIY 3D printing, and the science of calibration has come a long long way in the year since this post.  I’ve been distracted with other projects, but I’m pretty confident that I could print some very reasonable lego-compatible bricks.

Having printed a few legos, I haven’t printed any more.  I’d certainly like to – but the print resolution isn’t quite there yet.  The pieces don’t stick to each other very well and stick to real legos even less well.  Official legos are engineered to ridiculously exacting standards, so they always fit together.  I mean, have you ever seen a lego piece that didn’t fit other legos?  I’ve never even heard of such a thing.

My latest batch of MakerBot tweaking may have brought me closer to the dream.  I printed up a new Vader head, which turned out beautifully.  I had lowered the one particularly warped Z axis rod below the top toothed pulley edge by about 1mm – which has nearly eliminated the Z axis wobble.

With printing from an SD chip, eliminating wobble, reducing slack on the X and Y belts…  I think I’m ready to take another run at printing up a lego piece.

By the way, as fun as it was to print up four 2×2 lego blocks using the Skeinforge multiply feature, I don’t recommend it.  There’s a lot of cleanup between pieces that just makes it not worth it.
News from MakerBot!

MakerBot posted Bre’s interview with Shapeways the other day.  There were some things that really resonated with me:

  1. Starting a business, surviving on Ramen, forgoing sleep, and rushing a prototype to market. I started my own business three years on a shoe-string budget by working on my idea during my off hours.  Doing something I love and earning money doing it is an incredibly rewarding experience.  I highly recommend it.
  2. Most MakerBot owners are not just engineers and architects, but people who are just excited about personal manufacturing. I’m not an engineer, architect, or any kind of sciency-techy kinda guy by trade or training.  One thing I try to remind people is – if I can build and get a MakerBot up and running, so can you.  In any case, I may not  be someone sick of waiting on a jet pack, but I’m totally psyched about having a robot that can build anything I can dream up.
  3. If you’re bored, you’re not living life. Find something you love and believe in and do it every single day, whether or not you get paid to do it.  Start doing it right now, because you don’t have a moment to lose.
  4. Crowdsourcing. I have a batch 9 MakerBot which came with printed pulleys.  However, by the time batch 9 rolled around there was no longer a need for printed pulleys.  Bre hints that the crowdsourcing program is going to come back later this year.  I suppose in the meantime I could put together a big pile of Mendel parts – but I’m going to wait until I’m printing ABS on a heated build platform or finally got the nerve to try out some PLA.

My MakerBot has violated ALL three laws of robotics

I suppose it was inevitable.  Azimov’s immutable Three Laws of Robotics are:

  1. A robot may not injure a human being or, through inaction, allow a human being to come to harm.
  2. A robot must obey any orders given to it by human beings, except where such orders would conflict with the First Law.
  3. A robot must protect its own existence as long as such protection does not conflict with the First or Second Law.

My bot has injured a human, me.  The other day I leaned in too close to observe a build and the ‘bot’s Z axis pulley/belt yanked out a hair from my head.

My bot has refused to obey the orders of a human.  Refusing to obey my orders is kinda the default mode for my ‘bot.

My bot has harmed itself despite my numerous verbal commands to the contrary.  When aborting a build my ‘bot has occasionally tried to carry out additional orders – by pushing the Y or X carriage so far that either the pulley, belt, or both are shoved out of whack, thus damaging it’s own alignment.