

It was hard for a beginner like me to imagine that an Arduino actually requires a whole lot less than all the stuff you would see on an Arduino Uno. Assembling a MintDuino – and slowly pulling parts out to see what was really necessary – helped me understand what was truly critical to its operation.
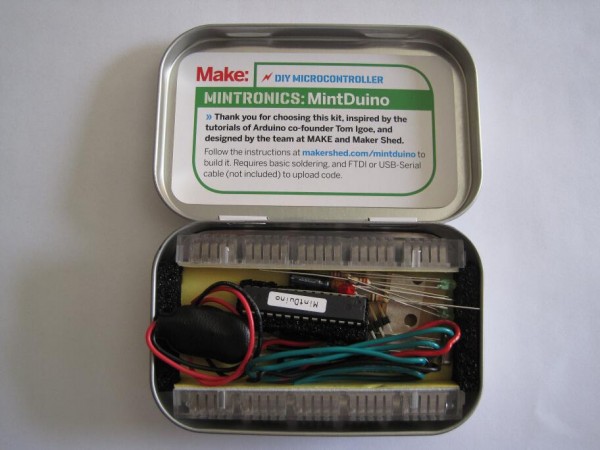
I found it useful to know what the (near) minimum necessary components of an Arduino were so that I could build a small project directly around just the chip and whatever critical parts were absolutely required to run the circuit.1 I wanted to build the circuit as small as possible – not to save on parts or cost, but to make sure everything could fit into an Altoids tin.23
As a side note, there is a very definite monetary benefit to figuring out how to build a minimal Arduino compatible device. A brand new Arduino will run you about $30 – whereas soldering a chip into perfboard with the least amount of parts required would probably only cost you about $9 or less if you source the pieces carefully. While an actual Arduino form factor makes a lot of sense when you’re using off-the-shelf shields, it’s not nearly as important when you’re building a very simple or completely custom project that you don’t intend to take apart. And, when you’re talking about leaving a chunk of electronics in a project, it’s a lot easier to leave $9 in parts inside rather than a $30 Arduino board.
Here’s what I found to be the (near) least number of parts and (basically) the smallest configuration for the programming MintDuino:
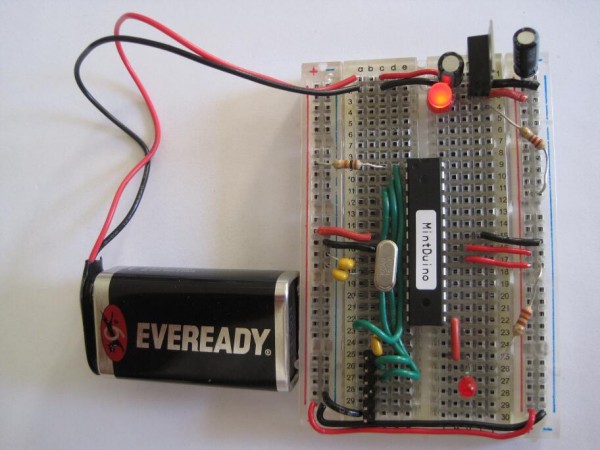
This is the “almost” minimum since the configuration above includes (1) a red power indicator LED and a 220 Ohm resistor and (2) a red wire, another red LED, and another 220 Ohm resistor for running the “Blink” sketch. Once you remove those parts, you could still upload a sketch to the Arduino – but it wouldn’t be able to do anything. You’ll notice that this configuration doesn’t even include the usual reset button for the Arduino.4 It’s not pictured, but you’d also need a way to communicate with the Arduino, such as a USB cable plus FTDI Friend or FTDI cable.
Here’s what I found to be the (near) least number of parts and (basically) the smallest configuration for running a sketch on the MintDuino:
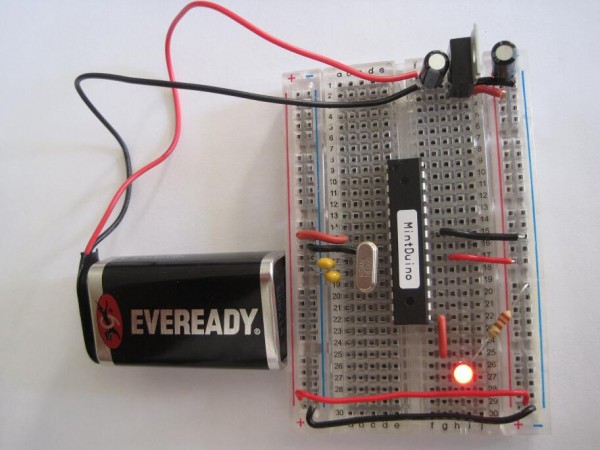
Again, I’m qualifying the statement with an “almost.” This nearly minimum configuration above again includes a red wire, another red LED, and another 220 Ohm resistor for running the “Blink” sketch. You could remove all of these parts and connect whatever else you wish the Arduino to do for you. While the power LED indicator is useful to know that your project has power, I could see some situations where you wouldn’t want it – such as for a project that needs to work in the dark without drawing undue attention to itself.
Besides fiddling around yanking parts out of my MintDuino to see what would happen, I also found some interesting tidbits about building a minimum possible Arduino. If your project is tight on space or you are tight on parts or budget, you might find some of the following useful:
- Really REALLY Barebones Arduino by jackzylkin on Instructables ((I omitted several “really”‘s from the title here))
- This tutorial points out that you don’t really need the crystal/clock and two capacitors for your Arduino if you use its internal clock. To use the Arduino’s internal clock, you would have to accept two important compromises. First, you would have to accept that the internal clock is not as accurate as the external clock from these additional components. If timing is important for your project – perhaps something that deals with communicating with another device in some fashion or is otherwise time-critical – you don’t want to do this. Secondly, you would have to use a different bootloader other than the Arduino bootloader for your project. The author of the Instructable suggests the Lilypad environment would be reasonably compatible with an Arduino project, but would make use of the chip’s internal clock. (He also suggests you may or may not have to disable your board’s auto-reset feature).
- This page on the official Arduino tutorial site suggests how you can eliminate the external clock to simplify your project.
- This page provides several schematics, pictures, thoughts, and other resources for setting up a minimal Arduino.
I’m still very new to this whole Arduino thing, so if you notice something wrong here, please let me know so I can fix it.
My very next Arduino project is going to be something that fiddles with my television’s IR (infrared) control codes. You can expect some definite wackiness soon…
Default Series Title- Since I wanted to include a picture of the MintDuino inside and out, I couldn’t help putting a spin on this classic Groucho Marx quote. [↩]
- I ended up using the Mintduino tin – and actually recycling some of its packaging into the project as well [↩]
- What project am I referring to? Stay tuned… [↩]
- I discuss this more below, but I don’t think you need the crystal and two capacitors for the “external clock” functions of the Arduino if all you’re doing is uploading a sketch. [↩]
