
While I’m a big fan of paper and circuits, I’ve never really given paper circuits/circuitry a shot. Unfortunately, I have no good excuse for this. (Fair warning: I’ve been collecting links and ideas on this topic for several weeks now, and even though I intend to break up the post into more manageable chunks, I have a feeling this is going to be a doozy)
Table Of Contents
1. Aluminum HVAC Tape – Benefits and Limitations
2. Taped Edges – Contact Points
3. Paperclips – Alternatives to Alligator Clips
2. Evil Mad Scientist Labs and Paper Electronics
1. One Sided Circuit Board – paper, conductive ink, and soldering
2. Electronic Origami – several methods for electrifying paper
3. Paper Circuits / Paper Circuitry / Electronic Notebook
1. Jeannine Huffman’s Notebook
2. Lessons from Jeannine Huffman
5. Project Daffodil (Update 10/26/2016)
1. Lessons from 21st Century Notebooking, Circuit Stickers, and Project Daffodil
1. TapeTricity
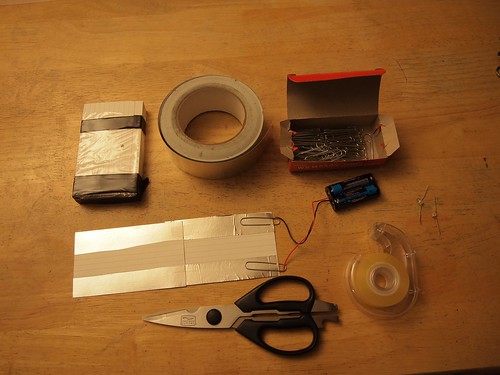
Years ago Chris Connors, a STEAM educator/maker and friend, had posted some photos and videos about something called, “TapeTricity” and helped hundreds of kids as young as 3 and 4 years old build their very first circuit at Maker Faire 2013. TapeTricity is all about making electronics accessible to people by showing them how to make real circuits using cheap and common components while removing the need for specialized tools and materials. This system of designing circuits made use of several very interesting innovations: aluminum HVAC tape and paperclips along the edges to form electrical contacts.
1. Aluminum HVAC Tape – Benefits and Limitations
Back in 2013 copper tape was reasonably common in artistic settings for use with soldering stain glass. However, the copper tape wasn’t readily available with conductive adhesive and tended to be more expensive than the aluminum HVAC tape used in Chris’ projects. While the prices of copper tape with conductive adhesive have fallen over the last few years and conductive inks/paints have become more common, pretty much nothing is going to beat aluminum HVAC tape for price per project. However, HVAC tape is not without its limitations. The adhesive is a decent insulator rather than a conductor, the tape only comes in strips about 2 inches wide and must be torn or cut to much thinner strips, and has a tendency to curl at torn edges, and aluminum tape does not take solder well.1 I expect that the non-insulation properties of the underside of the aluminum tape could actually be very useful in conjunction with copper tape – to essentially make for circuit board traces that can cross over one another.
2. Taped Edges – Contact Points
As you can see from some of the photos above, the edges of the cards had foil tape wrapped over some edges which were then connected to some of the components. The result is that the edges of the paper essentially become functional I/O pins. The nifty thing about this is that it could allow TapeTricity cards to be wired/rewired/networked together.
3. Paperclips – Alternatives to Alligator Clips
Another interesting feature of TapeTricity comes from the use of paperclips. Paperclips are ubiquitous and cheap23 and, with a little bit of wire, become cheap DIY alligator clips replacements. While individual alligator clips aren’t that expensive (let’s say around $0.25 each?), the cost of providing a number of them to a room full of students would quickly add up.
These TapeTricity cards allowed kids to color and draw on one side of an index card – then bring their designs to life with electronics on the back and through the card.
4. Lessons from TapeTricity
- HVAC tape is a great choice for paper electronics with a few limitations. The adhesive is an insulator which allows HVAC tape to be leveraged in bridges and there aren’t easy ways to solder to it.
- Edge conductive pads from HVAC tape allow for cards to be powered or networked
- Paperclips and wire are a great cheap DIY alternative to alligator clips
2. Evil Mad Scientist Labs and Paper Electronics
Evil Mad Scientist Labs is one of my all time favorite open source arts/electronics designers/manufacturers ever. Not only do they enable other people to realize their plans for world domination, they’re pretty cool people. I had the good fortune to be able to visit Evil Mad Scientist Labs (now celebrating their 10th birthday!) a few years ago.
1. One Sided Circuit Board – paper, conductive ink, and soldering

While there Windell Oskay and Lenore Edman gave me a tour and showed off their awesome single sided mobiüs circuit board.4
2. Electronic Origami – several methods for electrifying paper
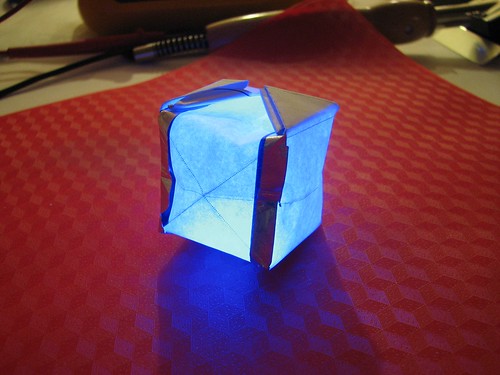
More recently, while researching for this blog post I discovered their simpler, but perhaps more spectacular, origami balloon circuit. EMSL posted several possible methods for electrifying paper. Since the post explains each of these methods in detail, I’ll only list them:
- Using dry mount adhesive to glue aluminum foil to paper
- Using an iron to fuse aluminum foil to freezer paper
- Using an iron to fuse aluminum foil to the toner on laser printed paper
- Lessons on resistors and simple LED/battery combinations inspired by LED throwies
This circuit is beautiful and eerily reminiscent of a certain other cube. If someone hasn’t made an origami LED paper circuitry companion cube, well, this is just a thing that needs to exist in the universe.
3. Edge-Lit Cards

Another particularly cool post from EMSL is their piece on edge lit holiday cards. The electronics are essentially the same as a simple throwie or TapeTricity circuit, but the use of scored sheets of plastic allow incredibly interesting display possibilities.
4. Lessons from EMSL
In no particular order, here are some of the lessons I’ve learned from EMSL:
- The conductive ink in the mobiüs circuit has enough resistance that the LED’s don’t really require actual resistors
- Electronic paper projects need not be merely two-dimensional and adding a third dimension can be truly transformative
- Scored or scratched plastic plus paper and carefully designed LED circuits can create amazing display possibilities
3. Paper Circuits / Paper Circuitry / Electronic Notebook
Just before Maker Faire 2016 I saw a tweet from Jeannine Huffman showing off her development of a paper circuitry robot panda which would cost about $5 per student.
It works! #papercircuitry Panda robot prototype #ATtiny85 servo = $5.00 robot per student pic.twitter.com/oDuzRTzQH5
— Jeannine Huffman (@HuffmanJeannine) February 7, 2016
I was astounded by what Jeannine was doing. Where TapeTricity was a great way to introduce kids to electronics, making those same electronics smart by adding a microcontroller could make those same pages smart and interactive. Moreover, a TapeTricity project could be “leveled” up by just wiring the aluminum contact pads to a microcontroller.
1. Jeannine Huffman’s Notebook
I was fortunate enough to be able to catch up with Jeannine at Maker Faire Bay Area 2016 this year and we compared notebooks. Here’s some pictures of her work:
I regret that I didn’t take more pictures of Jeannine’s notebook, she’s been kind enough to post much of her designs on her website, her Twitter account, her Google Plus page, and in the 21st Century Notebooking Google Plus community.
2. Lessons from Jeannine Huffman
To just jot down some of the problem solving and ideas I noticed in the few moments when we compared notebooks:
- Mixing off the shelf electronic components and circuit stickers with conductive ink, copper tape, and soldering
- Incorporating electronic components, sensors, and microcontrollers with DIY sensors, switches, and other solutions
- Melding a notebook and electronics – by sketching in, around, and through circuits to provide annotations and instructions
- Finding a way to create a copper tape hinge that could survive repeated opening and closing of the notebook
4. 21st Century Notebooking
The ideas shared in the 21st Century Notebooking Google Plus community are just too numerous for me to do justice. Since my blog posts are as much about me documenting my own discoveries as it is about sharing with you, gentle reader, perhaps you’ll forgive my jotting down just a few of the ideas found within a 30 second scan of this community:
- Paper electronics with mixed media arts crafts
- Paper electronics mixed with origami
- From +Jie Qi and @Chibitronics:
- Conductive fabric to create conductive hinges for use in circuits spanning more than one page in a notebook
- Light up paper helicopters
- Copper tape paper speakers
- UPDATE 10/26/2016: Jie Qi’s “paper-based electronics for creative expression” tutorials have some really great ideas for getting started with paper circuitry. Frankly, this is to be expected from the lady who created Chibitronics and circuit stickers. :) These tutorials are great – and you can see exactly how she refined these ideas to become circuit stickers and the kind of skill building projects seen in Chibitronics books. These tutorials include:
5. Project Daffodil (Update 10/26/2016)
Project Daffodil is the work of Sian Geraghty, Robert Foster, and Christine Ho as their graduate thesis project for the Masters in Multimedia Program at CSUEB. Their project combines pop-up books, paper circuitry techniques, and 3D printing to provide an interesting introduction to electronics for kids. When I saw them at Mini Maker Faire Rocklin on 10/5/2016 they had combined their work with an iPad app which could interact with some of their 3D printed models infused with conductive material. They’ve been interviewed on the Make Magazine website and published a tutorial on building pop up paper crafts with electronics.
1. Lessons from 21st Century Notebooking, Circuit Stickers, and Project Daffodil
I think what I learned most out of these projects is that there’s a lot of ways to combine paper circuitry with other interesting and creative ideas like origami, paper crafts, greeting cards, pop up books, and 3D printing.
6. What’s Next???
Smart sketchbooks, electronic origami, and the ability to program anything. With all these incredible designs, pieces of code, and ideas – where can we go next?
Well, I have a few ideas…
Default Series Title- When I googled “how to solder copper wire to aluminum foil” the top result was a YouTube video which suggested applying a thin layer of oil to the foil, using a soldering iron with solder to heat up the foil, with the oil supposedly preventing the aluminum from oxidizing, then the wire could be soldered to the foil. [↩]
- Or free when you are at a Kinko’s [↩]
- Perhaps the better phrase is “complimentary”? [↩]
- I hope you will, once again, forgive me as I present these items in the order of my discovery, rather than chronological order? [↩]