
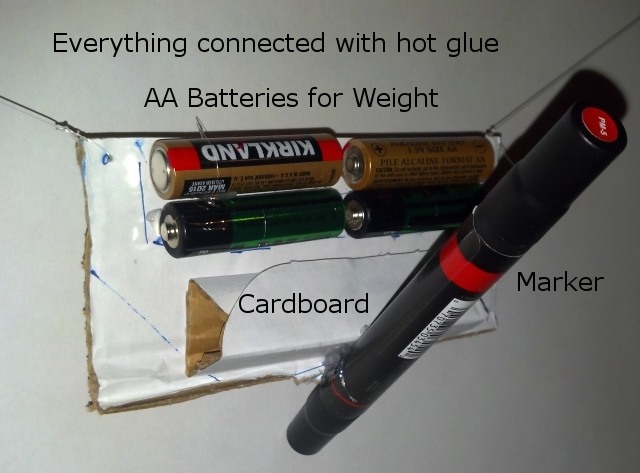
MakerBlock’s Cardboard Gondola, Annotated
The pen holder for a drawing robot is one of the most deceptively simple aspects of the entire machine. Stripped down to the most basic elements, the pen holder is nothing more than a small device used to connect to both cords from each motor to the pen. However, there are a number of extremely important, and subtle, design considerations that are not immediately evident.
Since Hektor’s debut in 2002, and arguably as far back as SIGGRAPH in 1988, people have been working on vertical pen plotters. In that time
I guess I should start this post with a discussion of the different gondolas out there.
In no particular order they are:
- Binder clip. One version of the AS220 DrawBot used a simple binder clip holding a pen as the gondola/pen holder. It doesn’t get a whole lot simpler than that. It appears from the video associated with this post that the pen is held on a somewhat rigid rail. Similarly, Dustyn Roberts’ SADBot also used a big huge clip as a pen holder/weight and James Provost’s InternBot used a few binder clips. However, the most hacked together system is easily Josh Myer’s Muralizer which consisted of a lump of Play-Doh enveloping the pen.

AS220 Labs Pen Holder
SADBot Pen Holder
Muralizer Pen Holder – Powered by Play-Doh
- Clip Stabilizer plus Binder Clip. The “production version” of the AS220 DrawBot included lasercut spool parts, motor mounts, and a “clip stabilizer.” The setup described in the assembly instructions appears to indicate that the pen can be held reasonably steady using this design. However, having spoken to Shawn Wallace about these designs, he advised that this is really a non-optimal setup that has a lot of wiggle to it.

AS220 Labs Clip Stabilizer Design

AS220 Labs Clip Stabilizer plus Binder Clip
- Der Kritzler by Alex Weber. This “gondola” made use of several lasercut parts creating a long wooden “cage” which held the pen in place along with a servo activated pen lift. I can’t quite tell how the “pen lift” operates, whether it retracts the pen itself or whether it pushes something in front of the pen’s tip preventing the pen from leaving a mark. Either way, this drawing robot pen holder has a feature that I never really appreciated until now – the wooden cage is suspended by two wooden “wings” which keep the point of attachment to the toothed belt at it’s midpoint. I’ll discuss this feature more later.

Der Kritzler Pen Holder
- My first gondola was one of my own design and it was a miserable failure. The central ring was too large to accommodate the marker pens I was using. Also, it wasn’t heavy enough to make the monofilament hang in a straight line.
Crappy Gondola
- Sandy Noble’s Polargraph. Sandy has probably logged more hours with his drawing robots than just about anyone else. So, when he uses a particular setup for his pen holder, there’s got to be something to it. The interesting features of his gondola are that the weight is concentrated around the pen tube by use of several large bearings and, as with several other designs here, the cords to the pulleys are centered over the holder’s center of gravity. After I published this post, I found a printable Polargraph-style pen holder by Lanthan on Thingiverse.
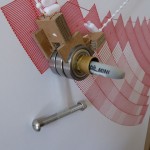
Sandy Noble’s Polargraph Gondola
- John Abela’s Gondola. I used John’s designs with my first drawbot, but without the blank CD. For the first time today I noticed that all of John’s pictures show the printed gondola glued to a blank CD for stability.1 When I used his design I just tied the top of the printed gondola to the monofilament line and added a ziplock baggie with dead batteries for weight. The result was a reasonably decent gondola that was pretty finicky. If the robot started drawing too close to one side or the other, the holder tended to twist and the pen made little to no contact with the paper. I can see why the blank CD was such a good idea.

John Abella’s Polargraph Gondola
- Dealywhopper’s Dr. Scratchy Polargraph Gondola. Similar to John Abella’s Polargraph derivative is Dealywhopper’s Mr. Scratchy setup. It’s an amusing mixture of high tech 3D printed parts and hot glue hackery. There’s just something about its simplicity that really tickles me. Print the part, add some glue, slide the binder clip into the groove, glue the holder, some pennies for weight, and a micro servo to an old CD and you’re done. The interesting thing about this one is that the majority of the weight is off-center towards the drawing surface.

Dealywhopper’s Dr. Scratchy Polargraph Gondola
- Dan Royer’s Makelangelo. In the spirit of open source Dan Royer has been working on and blogging about his Makeangelo and Makelangelo 2 robots. Dan’s Makeangelo is, like my first Polargraph derivative ‘bot, based on an Arduino Due and Adafruit Motor Shield. If you check out his Youtube channel, there’s about two dozen uploads documenting Dan’s experiments with different pen holder configurations. The version he’s shipping with his latest kit, which you can see below (the image is also a link to the video), uses three lasercut pieces to hold a pen and allow for an interesting pen lift. Although you can’t see it in the image below, there is a third lasercut piece which appears to slide forward and backwards with the micro servo. In the forward position it would push the pen holder top off the wall. The holder includes two rows of holes along the top for attaching the motor strings above the holder’s center of gravity.

Makeangelo 2 New Pen Holder
- Drawing Machine by Ragnar. This drawing robot by Ragnar, a co-founder of Havtek, is exceptional for its incredibly high quality drawings and bespoke pen holder. Ragnar provides a detailed description of his setup in two posts. This may be the single most beautiful pen holder of the bunch. With heavy brass pieces, there appears to be no further need for any additional weights. As you’ll notice from his other photographs, the two brass arms are in the centered along the body of the pen holder. This pen holder looks like each of the parts came off of an assembly line just destined to be part of an awesome drawing robot.
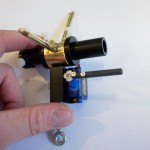
Ragnar’s Drawing Machine Pen Holder
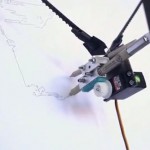
- GarabatoBot (aka DoodleBot) by Made by Miguel Ángel de Frutos. This is one of the most interesting drawing robot pen holders ever made – if for no other reason than it integrates almost all of the critical components into the pen holder itself. As I recall, several other projects had tried to use integrated motors but found that the resulting pen holder/robot combination was too heavy to lift itself. Miguel’s design is well documented on his site and the printable parts are shared on Thingiverse.

GarabatoBOT robot by Miguel Ángel de Frutos
- Harvey Moon’s Drawing Machine. What makes Harvey Moon’s drawing robot pen holder particularly interesting is his choice to have the pen actually move up and down. The pen holder incorporates a second non-drawing point and a rack-and-pinion system to advance and retract the pen. I have to admit, I really like the aesthetic quality of having a no-foolin’ pen lift.
Harvey Moon’s Drawing Machine Pen Holder
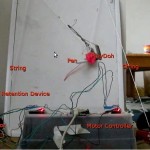
- Darcy Whyte’s Mr. Drew. Darcy Whyte aka Mambohead has been blogging about his own Polargraph variant2 for quite some time and worked through several different pen holders, including one designed specifically for a smaller drawing robot. His designs use layered clear lasercut acrylic to build up a gondola which incorporates a springy clamp for holding the pen in place. This video gives a really good tour of Darcy’s pen holder and explains several of the more important features.
- There are two pieces of threaded rod on either side of the pen holder. By stacking pieces of acrylic you can adjust the position where the wire connects to the gondola.
- There is a pen clamp using a rubber band, as indicated above. The best part about this clamp is that he uses varying pieces just below the pen to adjust the tilt on the pen, in case it requires a slight angle to draw on a more vertical surface.
- There is a third piece of threaded rod at the bottom of the gondola where additional weights can be attached.
- The clear acrylic and strategically placed holes in the top of the pen clamp allow the operator to see where the pen contacts the paper.
Darcy Whyte’s Mr. Drew Pen Holder
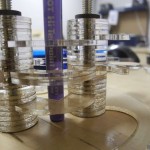
- Stuart Childs DRBO. Stuart Childs sells a lasercut Polargraph-compatible robot kit. Once assembled it is a stand-alone drawing robot. The most interesting difference between Stuart’s robot and Sandy’s setup is the construction of the pen holder. I’ve included a picture of the front and back of the pen holder below to give you an idea of what it looks like. Per Stuart’s comment below, his own gondola was inspired by Darcy’s Mr. Drew.3 For a better idea of how it is assembled and how it operates, you should definitely check out Stuart’s excellent step-by-step assembly photographs. This pen holder has a small circular lasercut piece which attaches to the business end of a micro servo, to push ahead of the pen’s tip – allowing for “pen lifts.” There are two features in particular that I really like.
- First, I like how the “arms” which connect to the motor cords can swivel. This is a very clever way around several potential problems. When tying the two cords to points on the pen holder, there are issues with placing them too far or to close together. Too far apart makes the pen holder extra stable, but the image drawn are distorted. Too close together minimizes distortion, but the pen holder can start to swing like a pendulum, causing wibbly wobbly lines. Additionally, if the cords from the motors have too much “twist” in them, the entire pen holder can actually be turned sideways and will stop drawing entirely. (I suspect just about any Polargraph-style pen holder which uses a large wide flat surface would be sufficient to combat the cord twisting/torquing problem.) Looking back to the AS220 Labs pen holder, you can see that it appears to use two rigid rails instead of string. The arms in Stuart’s robot essentially allow the cords from the motors to act as if they’re very close together – but probably wouldn’t allow much in the way of pendulum action.
- Second, I appreciate his spring-loaded pen holder. This feature would allow his robot to accommodate a variety of pens or drawing implements. While a rubber band would obviously work as a quick hack, a true metal string would stand up to repeated use.
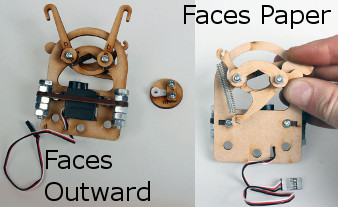
Stuart Childs’ DRBO Pen Holder
- DrawBot Quick Change Pen Holder by UechiMike. Thingiverse user UechiMike designed his own pen holder which he identified as a derivative of Dan Royer’s Makeangelo. You’ll notice that UechiMike’s pen holder, like the DRBO immediately above, uses a rubber band in place of a spring as a way to accommodate a variety of pen sizes. UechiMike’s pen holder has holes on either side for routing the monofilament wire which, it looks like, are tied around. I have to wonder if the holder has any problem with torquing. You’ve got to love the recycling of dead AA batteries here. The only “gripe” with the design is that there isn’t any room for a micro servo to for pen lifts.
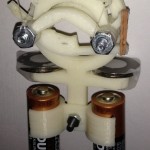
DrawBot Quick Change Pen Holder by UechiMike
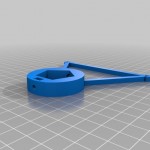
- Screwless Sharpie Holding Gondola by Bluemetal. Simple and sweet, this design doesn’t seem to have any weights or moving parts. Just a bit of printed plastic and a push-fit hole designed for Sharpies.
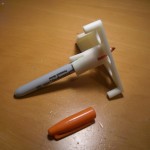
Screwless Sharpie Holding Gondola by Bluemetal
- MakerBlock’s Cardboard Gondola. Okay, now the most intricate, well designed, and durable feat of engineering ever to meet a marker. My very own cardboard gondola. As you can see, I slapped four AA batteries and a pen to a jagged piece of cardboard. While it worked for several drawings4 it’s clearly nonoptimal. The cord attachment points are wide enough to cause distortion and not well balanced enough to prevent swinging. The only reason I slapped this together was that I was anxious to put my drawing robot to work.
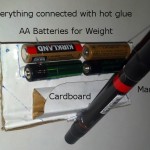
MakerBlock’s Cardboard Gondola, Annotated


Frankly, my crappy gondola is a testament to the how forgiving DrawBot setups are. Even though I’ve been admiring drawing robot setups for probably a year and a half now, I’ve really only started to understand some of the design decisions. I’ll go ahead and publish this post5 and get to work on the next one laying out what I’ve learned from the different pen holders featured above.
Default Series Title- Face palm [↩]
- How awesome is it that Darcy worked with Sandy on pen holder designs?! [↩]
- TeamTeamUSA created his own variation on Stuart’s pen holder and made the plans freely available on Ponoko [↩]
- Four Deathstars and a Firefly class starship [↩]
- I’ve been sitting on it now for a few days [↩]