DIY laser cutting

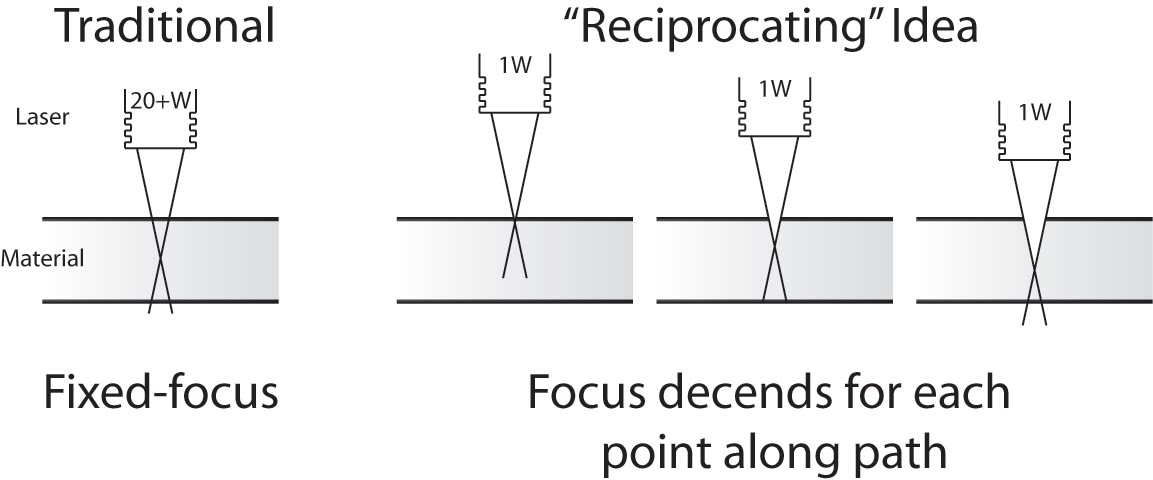
Peter Jansen's reciprocating laser concept

Peter Jansen's reciprocating laser concept

Peter Jansen’s latest post about selective laser sintering (SLS) is nothing short of amazing.  Most of his posts on the RepRap Builders blog posts deal with his adventures and research into SLS fabrication – basically directing a laser over a bed of powder to fuse powder in successive layers into a 3D object.  Since the object is being created in a bed of powder and any new layer is supported by the powder above it, the powder print media becomes it’s own support material.

His latest post diverges from his adventures with SLS 3D printing and details his efforts at building a DIY laser cutter.  His idea is for a “reciprocating laser” which would change the focal length or the height of the laser above the material being cut.  Peter points out that commercial high power laser cutters essentially brute force burn through the entire depth of the material to be cut.  They’re so powerful that it doesn’t matter that the laser is out of focus and “cooler” at different depths.

He has demonstrated a proof of concept using much lower power laser to cut material by lowering a much lower power laser as it cuts material.  The downside is that the lower power laser requires a much longer time to burn through the material – having to hit the same area several times at different depths to cut all the way through.  His proof of concept setup was about the size of a CD/DVD drive – since CD/DVD drives, motors, and housing provided most of his building materials.  So far he’s been able to burn through most of two CD case backs – about 2mm together.  He’s hoping to push it to cut thicknesses up to 3.0mm to 4.5mm.

The incredibly small size of his setup means that it can only very small pieces of material.  However, this gave me two ideas:

  1. If the low power lasers are so cheap, why not install multiple lasers at different focal lengths?
  2. If the entire setup is that small, what about making the entire setup mobile? 1  Think hexapod CNC mill.  If a laser cutter wheeled or hexapod robot was as small as a CD drive, you could conceivably just take out a large sheet of acrylic or thin plywood, set the robot in the dead center, and let it go. 2
  1. This reminds me of one of my favorite sayings.  “If Mohammed won’t go to the mountain, the mountain must come to Mohammed.” []
  2. The robot could stay oriented in any number of ways.  You could draw a grid on the material, the material could have a thin paper coating with LeapFrog style micro-dots that told the robot it’s location, you could project a grid onto the material with light or guide it with another laser like a laser guided missile. []

MakerBot woes

Building my MakerBot and getting it printing reliably was challenging, but totally doable by a technical novice such as myself.  I have lots of people on the MakerBot Operators group to thank for their patience and help in getting my MakerBot online. 1  Looking back, I spent about a month building and then calibrating my ‘bot. 2

It’s easy for me to forget that first month of occasional frustrations and triumphant victories, now that I’ve been printing successfully for more than eight months.  It actually makes me a little sad when I read people writing about their own frustrations and how they’re ready to throw in the towel.  The most recent example was noobcake getting frustrated with her ‘bot and getting ready to sell it off in parts.  Thankfully, Spacexula swooped in to help her out.

This brings me to We Alone On Earth‘s recent post.  WAOE are a group of introspective, philosophically and technologically minded twenty-somethings.  To give you you an idea of their frustration with their ‘bot, the post was entitled, “MakerBot: not very much fun at the moment (caveat emptor)”  Yikes. 3  I realize that WAOE has revised their original post several times since the original publishing date – but they have a lot of legitimate concerns.

WAOE list off seven problems with the MakerBot.  I’m not going to refute these points – but rather offer another perspective on them.  After several updates, WAOE offer additional comments, I’ll include them here in “[]”.

  1. The PTFE is prone to melting.  [WAOE expects the new MK5 Plastruder will resolve this issue]. I have never heard of a PTFE barrier melting.  I’ve heard of them deforming from a blockage and had one develop a clog which I had to remove.  Several people have purchased MakerGear PEEK replacements – but these are far from necessary.  I clogged my first barrier once, cleared it, clogged it again, and am now using a slice of it as an insulating washer.
  2. Inexplicable printing behavior due to noise.  [WAOE fixed this issue by twisting wires and installing a resistor]. I’ve never had this problem, but I know others have.  Like WAOE, I’ve heard of people fixing these issues by twisting wires, using resistors, or ferrite beads.  Perhaps my workstation has less electronic noise, but I haven’t had to do any of these things.  Then again, perhaps my prints suffer from a certain degree of noise?
  3. Printing large objects is hard without a heated build plate.  [WAOE notes this isn’t an issue if you’re good at soldering]. Totally true for ABS, but not PLA.4  However, this is really a problem with the print media – not with the printer, right?  ABS will warp as it cools, unfortunate but true.  I’ve had less warping problems in warm weather or during with a second print – basically when the build platform is already warmed up.  Zaggo’s printruder is one of the largest things I’ve printed.  Interestingly, his design takes into account that certain parts are expected to warp. 5  Or check out Clothbot’s train track – it was designed with a lattice/correlated bottom to prevent warp problems.  Plastic warps – but with careful and thoughtful designing, this shouldn’t be a limitation.
  4. The heated build platform is difficult to build and requires a relay kit. [WAOE notes this isn’t an issue if you’re good at soldering]. I can’t dispute either point.  I just got both and haven’t had a chance to assemble them yet.  I’m assuming the heated build platform, which requires SMT soldering, will be challenging.  Frankly, fear of SMT soldering was the big reason why I didn’t jump into buying a MakerBot sooner. 6  The MakerBot HBP is just one option for a heated platform – there’s several others out there.  Don’t like SMT soldering?  Try out Rick’s platform over at MakerGear.  More into DIY?  Well, use the plans posted for any of several other variations.  As for the relay kit – it’s not a requirement – but it will prevent MOFSETs from burning out on your extruder motherboard7
  5. Calibrating Skeinforge is hard.  [WAOE notes this is still an issue]. I like to use the word, “challenging.”  A better way to look at MakerBot calibration is that you get out of it what you put into it.  I have my MakerBot tuned to the point that I get reasonably good looking durable parts.  Sure, I could spend more time and get even better looking parts.  However, once I got it printing reliably I was much more interested in printing new things than refining the printing process.  I’ll get around to improving the print quality even more – but I’m having too much fun right now.
  6. The Plastruder MK4 feed system is unreliable. [WAOE expects the new MK5 Plastruder will resolve this issue]. Getting the tension on the MK4 idler wheel is just one of those aspects of my MakerBot I had to experiment with and get just right.  I’ve been printing reliably for eight months using the same idler wheel and gear.  With proper maintenance, flossing the extruder, and clearing chips out of the extruder the current setup is serving me well.
  7. The threaded rods are of poor quality. [WAOE are getting new threaded rods, which should fix their problem.]. Of my four threaded rods, one is definitely warped and two have very minor warps.  By experimenting, rotating them just so, and printing a few wobble arrestors I’ve eliminated most of these issues.  You can definitely get more expensive and straighter threaded rods and improve your build quality.

A MakerBot Cupcake CNC kit is not for everyone – but the kit can be build and operated by anyone who is willing to invest the time to do so.  It is a cheap, hackable machine that is literally going to be just as useful as you make it.  Want less warpage, higher resolution, more reliable extrusion?  You can buy an upgrade, build one from their plans, or design your own solution. 8  Want a CNC mill, CNC pencil, or CNC music box?  Design the very first one!  Then again, you don’t have to do any of these things.

A MakerBot kit is just a platform for your creativity.  It’s just that big. 9

As for you, WAOE, if you want some help – drop me a line!

  1. If I had an acceptance speech, I’d go on and on while the music played. []
  2. My first successful print was on 12/31/2009. []
  3. Don’t get me wrong – I love my MakerBot, but I readily acknowledge its limitations. []
  4. From what I heard.  :)  []
  5. It was designed before availability or widespread use of heated build platforms. []
  6. Well, that and a little thing called “money.” []
  7. Did I get that part right? []
  8. I haven’t installed a single non-printed upgrade. []
  9. Or that small.  :)  []

MakerBot Business Idea #5

I’ve had a few ideas about how one can build a business around a MakerBot.

  1. Advice for a Makerbot based business
  2. Thingiverse based business idea
  3. Custom plastic cookie cutter business idea
  4. RepRap crowdsourced parts business

Well, here’s my latest idea.  Small custom replacement parts.  Not a new idea, right?  Well, it’s all about the marketing and how you reach and pitch to your target market.  Who is always out looking for small replacement parts?  When they do, where do they go?  What are their alternatives when they can’t find a replacement part?

I found the answers to all of those questions when I needed a replacement window latch.  Here’s the business model:

  1. Print up some universally useful parts, prime examples of your ‘bot’s ability to print
  2. Take said parts to your local neighborhood hardware store and ask to talk to the manager1
  3. Explain that you can quickly and cheaply fabricate nearly any small replacement part out of sturdy plastic2
  4. Ask them if you can put up flyers for your business and maybe even leave a few samples3
  5. Put up a website with a few examples of what you can print, how you solve problems with your Makerbot, things you’ve fixed, things you’ve replaced
  6. ???
  7. Profit!

What do you think?

  1. You’ll probably have much better luck with a mom-and-pop store than a big chain []
  2. Throw or jump on said ABS specimen []
  3. I’d even offer them a percentage of net []

MakerBot Origami

1. Or, “Design Constraints and Creativity”

Origami is another of my hobbies and it is all about design constraints. 1 The rules are simple2 – one square sheet of paper only manipulated by folding. 3  Yet, within these rules it is theorized that a sufficiently skilled artisan can design and fold any arbitrary figure.  I find folding origami to be at once cathartic and contemplative. 4

Pondering the design constraints within origami reminded me of one of my own recent designs – the 3x2x1 Rubik’s style puzzle cube.  Quite apart from the medium or subject matter, I really liked the idea of a single print job resulting in parts that could be immediately hand-assembled without tools to form a useful object.  Then I thought – if the design constraints are one of the things I like about this design, what else is possible within these same constraints?

Thus, I propose a new style of “MakerBot Origami”:  One MakerBot print5 , multiple components6 , no tools or hardware7 .

What’s the coolest most awesome thing you can design within these constraints?

Update:  Cyrozap – sory fore mispellnig yoru mane.

((I waffled on that title.))
  1. I waffled on that title. []
  2. Modern origami rules, anyhow. []
  3. Designing an origami model is not about figuring a way to cheat those rules – rather a way to work within them to achieve a desired goal. []
  4. I recall one origami master referring to the folding of a particularly difficult and rewarding model as invigorating. []
  5. Or, as Cryozap Cyrozap calls them, “production file.” []
  6. Otherwise, people would be making whistles. []
  7. Thus, no bottle openers []

Make(rBlock)Shift #1: MakerBot, Mineshaft, Tiger Solution

The recent Make(rBlock)Shift #1 posed this conundrum:

You’ve got a MakerBot, a laptop, unlimited plastic and electricity.  You are trapped in a mineshaft with a tiger.  How do you get out?

Dave’s suggestion was close, but no cigar.  The correct answer is:

  1. Design and print a second mineshaft.
  2. Throw tiger down second mineshaft.
  3. Design and print a tunnel to the surface.
  4. Walk out of mineshaft.

((This reminds me of an old “quiz” attributed to Andersen Consulting.))

Electrical design help?

I recently bought the Perhaps with a joule thief?)1  Since I know very VERY little about electronics, I’d appreciate some diagrams, descriptions of parts, etc.

My end goal is to install this device into a MakerBot made replica of the 11th Doctor’s Sonic Screwdriver.

If you’re interested in this project or just want to help, I’ll gladly accept any assistance.  Let me know if I can help with any printing projects in return.

Thanks!

  1. Why do I get the feeling I’ve seen the guy on the right before??? []

3x2x1 Rubik’s Cube Production File

My prior copy of this 3x2x1 Rubik’s Cube was printed a few parts at a time – I’d print one part, test it, print up another, etc.  Last night I was able to use my production file to generate all seven pieces in one go.  It took 1 hour and 45 minutes to complete the print job, but well under three minutes to clear most of the pieces of the raft off the parts and assemble the puzzle.  In order to help people modify and improve upon my design, I’ve upload the original Sketchup files, the STL I used, as well as my own GCode.

Owenscenic on Thingiverse asked,

I am interested in trying your gcode, how did you generate it? How well does it minimize strings between the printed parts? I’ll look at is to see how it starts and the temp…

In case you’re wondering too, the answers are as follows:

  1. I generated the Gcode using my slightly tweaked RepG v18 built-in Skeinforge settings for ABS with a raft, with a build temperature of 220C.
  2. The Gcode does pretty well with minimizing stringing.  However, some of the credit has to go with the part placement in the STL production file as well as the nature of the object.  As soon as you assemble it and start to rotate the parts, most of the remaining strings and little blobbies will pop right off.

Owenscenic, please let me know how your print of this turned out!  Please post a picture!

What’s the cost of printing with a MakerBot?

I’ve wondered for a while about the cost of operating a MakerBot.  Let’s break it down and see what happens:

  • Plastic. According to some calculations on the MakerBot Operators group, the cost of MakerBot ABS is around $0.03 – $0.04 per cubic centimeter based upon a price of $70 for 5 pounds (or 2268 grams) of ABS, a density of 1.2 grams per cubic centimeter. 1  Using the current prices of $81.36 for a 5 pound coil after shipping, I calculate the price of ABS at $0.035 per cubic centimeter.  Since we’re talking about such large numbers, let’s just round on up to $0.04/cc.
  • Time. Skeinforge has been estimating about 85 minutes to print 19 cc of plastic.  This comes to about 4.5 minutes/cc.
  • Electricity. At at $0.20/kWh, a MakerBot probably draws around $0.03 per hour.

Thus,we may estimate the cost of operating a MakerBot in terms of consumption of goods and resources (excluding computer, human, and MakerBot time and wear and tear) as follows, where V is the volume of the extruded object in cubic centimeters or “cc”:

Supposing I wanted to recoup the entire cost of my MakerBot to date and spread it across the entire life of a single 5 pound roll of ABS. 2  Let’s round the cost of the MakerBot, all repairs, and all extra MakerBot related materials up to $1,500.00.  One 5 pound coil would have 1890 cc’s of plastic.  This would come to $0.794 per cc of plastic.  So, I would suggest the cost of buying a MakerBot and printing off an entire coil of plastic would probably end up costing you about $0.85 per cubic centimeter of plastic.

Resource cost of printing a 19cc totally MakerBottable 3x2x1 Rubik’s Cube is $0.80.

Actual pro rated cost of printing a 19cc totally MakerBottable 3x2x1 Rubik’s Cube is $16.15.

Absolute cheapest MakerBot usage I’ve seen anywhere at Metrix:Create for members printing from Thingiverse is $0.30/minute, which would print the totally MakerBottable 3x2x1 Rubik’s Cube for $25.65.

  1. No one has yet quoted me a price on a pint of tears. []
  2. Printing an entire coil would take about 142 hours. []

Measurements of a pen

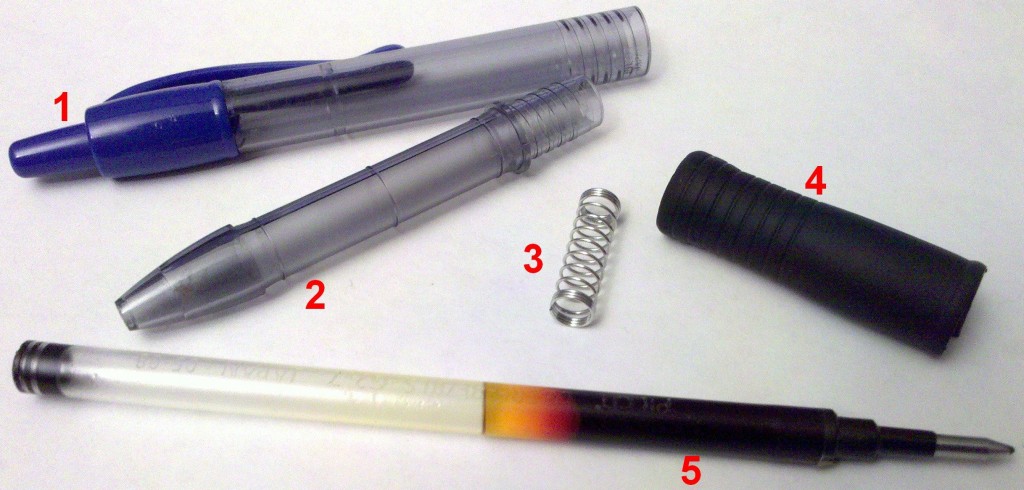
Pilot G2 Gel Pen

Pilot G2 Gel Pen

Pictured are:

  1. The pen end and handle. 9.89mm in outer diameter. 8.06mm in inner diameter. 76.92mm in length, when the button is totally recessed.
  2. The pen front. 68.00mm in length. 8.25 in outer diameter at the middle. 7.91 in outer diameter at the screw threads. 6.35mm in inner diameter.
  3. The spring. It is 19.67mm tall, uncompressed. 6.36mm, compressed. 5.53mm in outer diameter, 4.54mm in inner diameter. The wire is 0.47mm in diameter.
  4. The rubber grip. 1.3mm thick. 8.41mm inner diameter. 37.77mm in length.
  5. The ink cartridge. It is 6.03mm in diameter. 110.47mm in length.  Filled with ink.

Why am I telling you these things?  Stay tuned…

Thing idea: Crayon mold

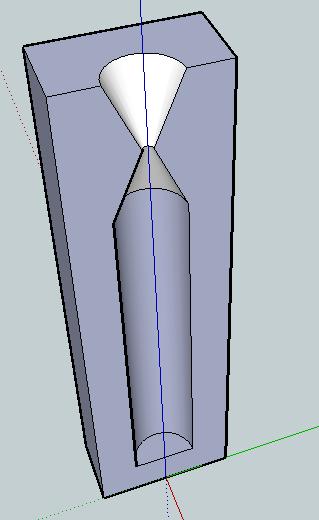
Crayon Mold v0

Crayon Mold v0

Problem: Broken crayons, useless crayon bits, or crayon shavings.  Crayola has their own crayon making system – a cross between an easy-bake-oven and little molds.  However, I don’t think it is quite versatile enough.  Plus, why pay $20 for what could be accomplished easily for $0.20 worth of plastic parts?

Solution: A printed crayon mold!

Description: Crayons melt at about 128 – 147 degrees Fahrenheit, or up to about 66 degrees CelsiusABS won’t melt until around 88-125 degrees Celsius, so there’s a wide margin for melting the paraffin wax crayons without distorting the mold.1

I would want at least three different molds – the normal crayon size, the fat crayon size, and then a triangular non-rolling crayon size.  I’m picturing a two part mold for each, with the seam of the two parts running along the crayon lengthwise and a half funnel for pouring.

In addition to the half-mold, I’d also design a snug fitting square block for fitting the assembled mold into.  That way you could stand it up and pour crayon wax into it.

Another potential use for this would be to place the pieces of crayon inside the mold, close it up, then heat.  This would allow you to mend a broken crayon.

Usage: I can think of several different ways to use this mold.  Frankly, I’m not sure which is easiest/most advisable/least advisable.  There are easily several considerations:

  1. Assembly:
    1. The mold could be assembled with crayon inside to be melted and repaired.
    2. Crayon pieces could be melted and then poured into the assembled mold.
    3. Crayon pieces could be placed in the funnel at the top of the mold, the entire system heated and crayon allowed to melt down into the mold.
  2. Melting:
    1. Crayon could be melted in a test tube or similar container in the oven, microwave, hot water bath (such as on the stove) or perhaps even open flame and poured into the mold.
    2. Crayon could be melted while inside the mold by placing the mold in a heat source (oven, microwave, hot water bath).
    3. Crayon could be placed in the funnel and allowed to melt down into the mold with the application of a heat source (oven, microwave, hot water bath, open flame?, or sunlight plus magnifying lens!)
  3. Cooling:
    1. Allowing to naturally cool to ambient room temperature.
    2. Placing in fridge.
    3. Placing in freezer.
    4. Placing in cold water bath.

I’m not sure which method of heating and cooling are optimal.  Though I’d suspect it is preferable to apply the least amount of heat over the shortest period possible.

Variations: It would be interesting to create these molds in different shapes besides cylinders.  You could top each one with a geometric shape, the head (or tail!) of some kind of animal or character, or something else entirely.  You could mold crayons into spheres, blocks, chips, or little figurines.  While not particularly sturdy, you could even mold them into building blocks or components of some larger device.  A clever person could use some left over nichrome wire to build a heated metallic funnel.

  1. That said, my extruder isn’t pumping out plastic until it hits 200 degrees Celsius at least. []