
While I’m nominally focusing this series of posts on paper circuitry, I’m actually looking to put together a resource for myself and others for any kind of electronics project. To that end, there are some ideas below that have nothing to do with affixing a circuit to paper, but that might still be an interesting or fun alternative.
Table Of Contents
2. Repurposed Plastic Enclosure
4. Off the Shelf Plastic Enclosures
1. DIY Adhesive Lamination with Tape or Contact Paper
1. Tins
Altoids and other tins are cute, small, and easy to source containers for projects. However, since they’re metal be sure to take extra care to wrap your electronics (or the inside of the tin) so that parts aren’t accidentally grounded against the tin. When I put a project in a MintDuino tin I used the paper cardstock from the packaging to insulate the project board.
Anything from paper to plastic should work fine. Cutting holes in the tin required a little more trial and error – since punching holes and using tin snips caused sharp edges. I solved these problems by wrapping the sharp edges in electrical tape – further adding insulation.
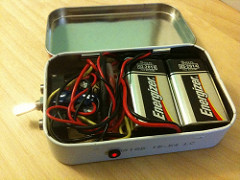
Altoid Amplifier by sharonrosen
2. Repurposed Plastic Enclosure

Tupperware
Plastic is probably a superior choice for an electronics project enclosure. As with tins, they come in a variety of shapes/sizes/colors, are cheap-to-free, and sturdy. Unlike tins, they don’t require any special insulation to work.
Besides rescuing containers from the recycle bin, don’t forget to check out your local dollar store. I picked up a particularly nice looking piece of tupperware with a big red screw top lid from the dollar store for a project and couldn’t be happier with it. If you do go to the dollar store, keep your eyes out for more than empty containers. Since everything in the store is a dollar, you can always dump the unused contents of a useful container.
If you do use/reuse a plastic container for a project, I would strongly suggest going very, very, slowly when drilling holes. Seriously, go as slow as you can manage to run the drill because rigid plastic has a tendency to crack under stress. Ideally, drill a small hole, then work your way up with larger bits. If you’ve got the equipment, you may want to consider actually melting holes instead.
3. 3D Printed Enclosure
This is probably my favorite way to encapsulate a project. If you have access to a 3D printer and enjoy 3D design, you can have a cheap bespoke project container.
4. Off the Shelf Plastic Enclosures
I remember Radio Shack carrying a dizzying array of plastic enclosures when I was a kid. However, these days, I can’t think of a single reason to get an off-the-shelf project enclosure when there are just so many repurpose and dollar store options. I’m really only mentioning this option for the sake of completeness.
5. Lamination
I’ve really only tried one “lamination” project/experiment so far with very mixed results. However, I feel like this is a promising avenue for exploration and experimentation. These ideas allow for a project being sandwiched under or in between one or more layers of plastic. This could make a small and thin project more durable, while still leaving the parts visible for inspection and teaching. I also like the idea of potentially using additional with extra information printed on them which could be laid over the circuits for additional context and annotation.1
1. DIY Adhesive Lamination with Tape or Contact Paper
A much cheaper DIY alternative to off-the-shelf adhesive lamination sheets would be to use clear packing tape or contact/shelf paper. Both are inexpensive and durable options, but would need to be cut to size. I actually use the packing tape method to copy and consolidate cards for my minimalistic wallet.
2. Heat Lamination

Laminator
I love the idea of designing a project, affixing it to a sheet of clear plastic like an overhead transparency, and then laminating it with a standard heat laminator. As the offspring of two elementary school teachers, I had ready access to a laminator as a kid and have some fond memories of (mis)using these machines. These days desktop sized laminators and the plastic heat lamination films are quite inexpensive and good for lots of different applications besides small electronics projects. My favorite laminator electronics use, ever, is easily this amazing modular solar panel project from rcpederson.
3. DIY Heat Lamination with Plastic Bags

Putting plastic bags back to work
This is an idea I’m really really looking forward to trying. Several years ago at a Benicia Mini Maker Faire I was introduced to the idea of fusing plastic bags together using a household clothes iron. The Makers showing this method let people cut scraps out of thin grocery and shopping bags, layer them between sheets of wax paper, and then fuse them together using an iron. They were using this process to create large colorful sheets of very durable plastic that could be cut and sewn like cloth.
While writing this post it occurred to me that this same method could be applied to paper circuitry, to embed a project within sheets of plastic. There are some interesting parallels to the process of using an iron to fuse aluminum foil to the toner on a laser printed page, described above. Additionally, by layering a project between sheets of plastic one might be able to dispense with some soldering since the fused sheets of plastic might be able to hold parts in direct physical contact with one another.
4. My Lamination Fail
The project I tried involved using 8B soft graphite art pencil traces and HVAC aluminum tape contact pads on copier paper, “laminated” in place with inexpensive clear packing tape. I believe my experiment didn’t quite work out because the packing tape may have pulled up some of the pencil traces, causing a break in the circuits. If you try to mix pencil graphite and packing tape, just be on the lookout for this possible issue.
There are several self-adhesive lamination plastic sheets available. Basically, there are two sheets of plastic, each with a sticky coating, which sandwich over your desired material. These come in various sizes from business card up to full 8-1/2″ x 11″ sheets.
These tend to be much more expensive than the heat lamination options, but require no additional materials. However, this is a decent option if your project cannot be subjected heat or pressure.
6. Encapsulation
1. Silicone Mold Material
As far as I know silicone rubber mold material comes in either a two-part liquid or two-part putty-like format. You mix the liquids in proportion, pour around desired object, cut apart and you get your mold. The putty kind is considerably less messy, but also much more expensive. You mix two balls of putty together well to activate them and they harden/cure into silicone rubber. I haven’t tried it, but I think either would work well to encapsulate a small electronics project.
2. Sugru

Sugru packs
Sugru is a moldable silicone rubber which starts off as a sticky putty which then dries2 into a flexible rubber. It is incredibly useful but very expensive with a relatively short shelf life.3 At roughly $4 per 0.5 gram packet, it is ideal for small fixes around the house, but would be prohibitively expensive for all but the smallest projects.
3. Oogoo aka DIY Sugru

Oogoo – DIY rubber silicone
Oogoo is a DIY version of Sugru made from 100% Silicone caulking and corn starch.4 Silicone caulking dries from the outside in and takes about 24 hours. By mixing in corn starch5 the silicone will also dry from the inside out at the same time – in as little as 5 to 10 minutes. Corn starch is easily found in many kitchens and a tube of silicone is very inexpensive (around $4 for a large tube).
I haven’t tried this process yet, but I’ve purchased the silicone and am looking forward to giving it a go. A note of caution – drying silicone is smelly due to the acetic acid released as the silicone cures. It will smell strongly of vinegar while it cures, but should be harmless.
4. Resins
Resin encased electronics
As I mentioned above, some of these ideas have been kicking around in my head for years just waiting for the right inspiration to bring them together. More than four years ago I saw an interesting article on Hackaday about someone who had designed a circuit and then embedded the entire thing within a block of clear resin. There’s so much to love about this process. A resin encased project shouts, “I have made this thing; it is perfect and eternal.”
As I was writing this blog post I began to run into a George R.R. Martin problem – I have so many inspirations, so many ideas, and written so much that I felt I was in danger of never hitting “Publish.”6 Finally I decided to break up the post so that I can share what I have so far. I hope you find it helpful and gives you some ideas of your own – and share them here.
Default Series Title- Though, now that I think about it, this transparency idea could be used as an overlay for any flat project [↩]
- Or cures??? I honestly do not know which is applicable – but I think “cure” is more accurate [↩]
- Let’s just say the cost and shelf life is on par with conductive ink pens. [↩]
- Do not use Silicone II, any quick-curing silicone, or anything less than 100% – this process won’t work [↩]
- and colorants [↩]
- By way of context, this post is about 1,600 words and the draft I began to split up is about 4,000 words and still growing [↩]