DrawBot – Printing, Part II

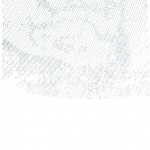
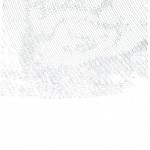
After actually calibrating my machine, the results are MUCH better.  I still need to adjust the settings a little, but otherwise I’m very very happy with this result.  As you can see, the drawing is flipped.  Once flipped back, I think it is reasonably apparent this is Van Gogh’s Starry Night.  Here are a few things I’m going to try:

  • The pen I was using seemed to stop working in certain regions of the drawing.  I bought a few new pens on my lunch break today.  Both are art marker pens – one blue and one red.  Unfortunately, both are too wide to fit in my current gondola.  For now I’ll use a thin sharpie.
  • There is a slight curvature on the top and bottom of the drawing.  This is probably due to a miscalculation in the mm per rotation.  The downside to using a spool, rather than a sprocket/ball chain or gear/toothed belt, is that as the spool contains more cord, the diameter of the spool actually grows larger.  This means that when there’s a lot of line on the spool each rotation releases more line and when there’s very little line left on the spool, each rotate releases less line.  However, given the diminished space requirements, I don’t think this is going to be such a big deal.
  • I mostly measured the machine width.  Basically what that means is that I did measure it, but then got distracted, then used what I recalled the width to be inches to calculate the width in mm.  Clearly, there is room for increased precision.
  • For weights I’m using a bunch of spent batteries in a ziplock baggie tied with a wire to the gondola.  Too many batteries were causing the line to be too jagged.
Default Series Title

DrawBot – Printing!

I’ve actually printed something using my DrawBot!!!  Would you like to see it?!

DrawBot test print #4

As you can see, this is a print of Van Gogh’s Starry Night.  It has a few problems.  First, the pen was non-ideal.  This will take some experimentation.  Second, the image, as anyone can tell you, is mirrored.  Third, the image was supposed to be much larger – almost as wide as the entire A4 page I’ve scanned in above.  I fiddled with some settings last night, but didn’t accomplish much.  I’ll try again tonight.

However!  I’m really very encouraged!  It actually drew something that roughly corresponds to the thing I’ve asked it to draw!  I’m looking forward to playing with the settings.  The robot is fairly quiet – it’s propped against a wall about seven feet from where I’m sitting and the sound of operation is barely noticeable above the television.

Default Series Title

DrawBot – The Breakdown, Part II

Since my prior cost breakdown post, I’ve invested a little more in this project.  Thankfully, this hasn’t been a project where I’ve been throwing money at the end goal.  Overall, it’s been incredibly cheap with the cost of failure at the most delicate points being quite low.this help in choosing the steppers and power adapter.  Here’s what I bought and from where:

Right now the robot is probably close to its final form and I don’t anticipate any further expenditures.  Someone who has a box of electronic stuff could almost certainly build this robot for next to nothing.  Many other people have spare Arduinos, steppers, stepper controllers, and power supplies.  If I just purchased the bare minimum for this project and used scrap stuff from around the house, I probably could have built this robot even cheaper.

Default Series Title
  1. I couldn’t think of anything else I couldn’t live without!! []

DrawBot – The Assembly, Part VIII

Well, my newly designed motor mounts, while cool, just aren’t working.  If I were committed to using that long pine box, I could probably make a go of them.  I’ve tried several variations on this robot, and nothing has really worked so far.  Here’s what I’ve tried:

  1. In a box, mounted to the wall
    1. This just didn’t work.  The spot I found on the wall was in our robot room, behind my monstrous card catalog.  It was difficult to get to, the laptop I had it hooked up to wasn’t really talking to the robot, and I didn’t even get it fully hooked up in that location before I decided it just wasn’t going to work.
  2. In a box, under an easel
    1. In a fit of inspiration I realized that I had a painting easel, a rather nice one at that.  I took an old new canvas1 , put it on the easel, put the easel’s feet inside the long pine box, ran the monofilament line from the motor, through holes in the pine box, up behind the canvas, through an eyescrew on top of the canvas, and down over the front.  This was terrible.  It creaked, shuddered, and the pen sputtered around the front.
  3. In a box, on an easel
    1. Not ready to give up on Project Easel, I tried to put the pine box on top of the canvas and hold them together in the easel.  This really didn’t work.  Because of the location of the motors in the pine box, the canvas was either going to block the holes for the monofilament line or I’d have to run the line through the top of the box, which would have resulted in the same creaky, shuddering, sputtering problem of using the line through a hole in the box as if it were a pulley.  Either way, the entire assembly just wasn’t stable on the easel which did not want to hold it together.
  4. Bolted to a chunk of wood
    1. I actually have some spare plywood, but it’s been in the garage for a while and has a weathered look to it.  It also has a large 1.5 foot radius quarter circle cut out of it.  I figure if I’m going to keep this inside, I might as well spring for a new piece of wood.  A bit over $14 at the hardware store and I was in business.  Now that I’ve given up on my nifty motor mounts, I designed and printed a dead simple motor mount.  I could have accomplished much the same result by just drilling some holes in a piece of scrap wood. 2  I’ve also abandoned a gondola of my own design. 3
    2. The final result is essentially as follows – a 2’x4’x0.5″ piece of plywood, wrapped in butcher paper, two steppers bolted to mounts and screwed to the left and right sides at the end of the plywood.  The steppers are wired to the stepper motor in the center, and the Arduino and stepper motor controller are in an ill-fitting plastic holder which is duct taped to the front top of the plywood.  The plywood is then propped up against our built-in on which my most useless laptop is sitting, ready to run the robot.
Default Series Title
  1. Old because I’ve had it for about 10 years; new because it’s still in the shrink wrap.  Now, to my credit, I have actually painted on my other canvases – this is just the last one and I completely forgot about it. []
  2. These will probably have been the very very last thing I’ll have ever printed with my black ABS. []
  3. While cool, it just did not work well at all – I made the pen holder so large it would only hold the largest sharpie made by man, it didn’t do a good job of holding the pen against the paper, and it held the weights rather awkwardly. []
Test