
The design should be pretty intuitive. However, I went ahead and took some pictures of the assembly anyhow.
As I mentioned in an earlier post, I think this one came out really really well. :)
The design should be pretty intuitive. However, I went ahead and took some pictures of the assembly anyhow.
As I mentioned in an earlier post, I think this one came out really really well. :)

The picture to the right is of a kite that I built several weeks ago and only got around to actually flying this weekend. It’s basically made out of office supplies. :)
Originally I just wanted to make the Tyvek sled kite from the Howtoons shown in Craft Magazine, Volume 8. 1 But then I wanted to see how much of the kite I could assemble just using things from the office. The answer is, basically all of it.
The Howtoons calls for:
Instead I used:
Since the envelopes are significantly smaller than the sheet of Tyvek rolls, I had to either make my kite smaller or stitch them together into a larger sheet. I did both. I scaled the plans down to about 2/3rds the size from the diagrams and then used packing tape to put them all together. To get the most surface area out of each envelope, I burst all of the envelopes at the seams and then taped them up. Once I had a 36″ tall sheet, I started cutting it into the pieces I needed, re-taped it back together as indicated by the diagram, and then set it aside for weeks while I didn’t fly it. :)
On the day of the launch I made the tail out of strips of leftover envelopes taped together with the gluey bits from some of the envelope flap sealants and more packing tape. I punched a hole in the three ribs using a pen, ran the line through each of the three ribs, reinforced it with more packing tape… and launched.
The only non-office supply things used in the construction were:
It flew pretty well.
I’m so happy with the way this has turned out.
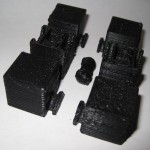
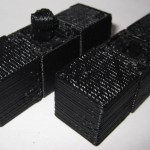
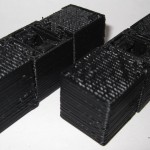
I’ve made a bunch of changes since the last revision of this printable 3x2x1 Rubik’s Cube puzzle:
The was one design choice on which I waffled. I considered making the center cubes non-identical, with one having half a barbell stick out and with the other having the internal connector you see now. This would have removed much of the sideways flex – since the barbell would be stationary. I did not go with this design choice because whether the puzzle used one barbell and two connectors or male/female center cubes, there would always be some flex caused by the use of a connector rather than a static pin. And, to be honest, I much preferred the symmetry of having everything assembled out of just three unique parts.
I know I’ve mentioned this before, but I really like the idea of a MakerBot printable toy that can be printed in one go and then assembled without tools or any additional hardware. I also think this would make a great MakerBot print demonstration.
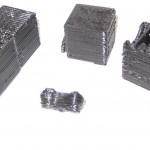
I’ll post some pictures of the parts a little bit later.